โก Stabilize fast, camp longerโbecause your adventure deserves zero hassle!
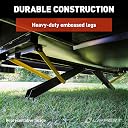
The Lippert PSX1 High-Speed RV Power Stabilizer is a rugged, heavy-gauge steel stabilizer designed for 5th wheel RVs and travel trailers. Featuring a 30" extension and single-motor dual-leg control, it automatically adjusts to uneven terrain for optimal stability. With integrated breaker technology and multiple mounting configurations, it delivers fast, safe, and durable stabilizationโeliminating manual cranking and maximizing your camping time.


| ASIN | B00JMHI11C |
| Best Sellers Rank | #527,157 in Automotive ( See Top 100 in Automotive ) #23 in Stabilizer Jacks #810 in RV Jacks & Stabilizers |
| Brand | Lippert Components |
| Brand Name | Lippert Components |
| Color | Black |
| Compatible with Vehicle Type | Trailer |
| Customer Reviews | 4.6 out of 5 stars 596 Reviews |
| EU Spare Part Availability Duration | 1 years |
| Global Trade Identification Number | 00848150004284 |
| Included Components | Bolt (4), Breaker, Nut (4), Stabilizer Assembly, Switch and Harness |
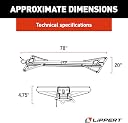
| Item Dimensions | 78 x 20 x 4.75 inches |
| Item Type Name | PSX1 High-Speed Power Stabilizer for 5th Wheel RVs and Travel Trailers |
| Item dimensions L x W x H | 78 x 20 x 4.75 inches |
| Load Capacity | 2 tons (4000 lbs) |
| Manufacturer | Lippert |
| Manufacturer Part Number | 298707 |
| Manufacturer Warranty Description | 1 Year |
| Material | Steel |
| Material Type | Steel |
| Minimum Height | 5 inches |
| Model Number | 298707 |
| Number of Items | 1 |
| OEM Equivalent Part Number | 298707 |
| Style Name | Waterproof Switch |
| UPC | 848150004284 |
| Unit Count | 1 Count |
| Vehicle Service Type | Trailer |
J**S
Easy installation
Camper came with 4 scissors that were manually installed 2 electricity works great
P**L
Need skills upgrading from scissor jacksโฆworth it 100%!
Classic Lippert quality and once installed power stabilizers are like power windows in a carโฆyouโll never go back. The self-leveling ability is one of the best features, besides the a-frame triangulation stabilization they provide at the touch of a button. No 2x4โs and a ratchet strap needed. If they donโt bolt right to your frame or your existing width stabilizer extensions, you might need to weld-on square tube sections the width of these to attach if you are upgrading from scissor jacks like I did. I also had to run my own wiring, as none existed, and mount the included switchesโฆI cut a hole into my body and made a metal backer plate to mount them, you donโt have to do that but will need to make a switch mount if not. Limit breakers keep you from over extending them weight wiseโฆthe perfect front and rear stabilizers. I added Vevor brand snap pads to the feet so no blocks needed, otherwise feet will sink into soil.
J**L
Perfect Fit!
This was the exact leveler we needed to replace the one that got damaged from a very bumpy train tracks. We have a 2016 Gulf Stream Kingsport 29 feet. It was easy to install, minus having to drill the holes a little bigger. Iโm pleasantly surprised.
J**N
Excited for a stable trailer
We ordered two of these stabilizers. One arrived fine the second on arrived without the hardware. Amazon was great and picked up the one without the parts and sent a new one. Word of caution if you receive the stabilizer without the hardware it's most likely because the box received a hole in the box and it was lost in transport. I wish Lippert would package it better with better protection and maybe a bigger box.
B**N
Ease of use and quick deployment.
I wanted to replace my crank down generic stabilizers due to damage they took when I camped on a slight grade and didnโt quite chock the tires correctly. I am a retired maintenance guy and so I had the tools and physical ability to craw around under the RV to wire and position the new power stabilizer jacks. My frame was slightly narrower than the mounting holes provided by the manufacturer. I used heavy 90 degree elbows to extend the width to accommodate the mounting holes on the frame of the power stabilizer. You need to be able to figure out how to wire this without instructions and its not hard. Use common maintenance practices and youโll be OK. If you donโt have the skills, let a handyman do the job. I do love the way it makes it easy to setup the camp and no need to crank and bend down to to it. I just installed on the rear and may do the front also in time. Seem heavy duty and well made.
C**N
Lippert power stabilizer jacks
Fit into pre drilled holes as direct replacement for manual scissor jack stabilizers
J**N
How to replace a Lippert Jack by yourself!
Hey...I was replacing a ruined (I dragged it over a rock ripping it off the coach) Lippert Jack with a Lippert Jack...a no brainer! This unit comes with NO INSTRUCTIONS...but that is okay, your really don't need them and I will quickly tell you how I did it. Tools needed: Floor jack, ratcheting socket wrench, wire cutters, electrical crimp tool, electrical butt joints for joining electrical wire, two wood blocks such as a 6'x6'x4" or something akin to this to lift the new Jack off the ground enough to slip the floor jack under the Lippert jack. I used the original bolts and electrical switches so I set the new parts aside for some other project. Installation Instructions: 1) Find where your jack motor wire is connected to the Extend/Retract switch in the coach (I had to pry a panel off from inside the rear storage bay to reach my wiring. Cut the wire about 3" from the existing joint BEFORE the joint so you have enough wire to pull around the side of the panel concealing it for joining the new cable later. Now BEFORE pulling the wire out of the coach tape a coat hanger (or heavy string) to the end of the motor wire so you have a means of snaking the new motor wire back into the coach...it is a bugger if you miss this step! Carefully work the old wire out with the pull wire/string attached 2) Unbolt the Lippert Jack to be replaced being careful to not drop it on your head...it's heavy! You should wear safety glasses so dirt doesn't fall in your eyes while you are doing this. 3) Using the shipping box, flattened out, drag the new jack into position under the coach so it lines up with the bolt holes. 4) Set the jack up on the the wood blocks so you have room to get your floor jack under the Lippert jack 5) Place the floor jack in the center of the Lippert jack (a natural fit in the center between the two jack arms) and jack the Lippert jack up snug (but not tight!) so as to be able to move the Lippert jack a smidgen to get the bolt holes to line up with the slots on the jack. Put the bolts in but not tight until you have the jack lined up to your satisfaction. Then snug the bolts down (about 20" lbs if you have a scaled wrench...or firm but not so tight that you strip the threads of the bolt!). Remove the floor jack, wood blocks and shipping carton. 6) Snake the new motor wiring up the same route that the old one was pulled out of. Using butt joints, connect the black wire to the black wire and the red to the other wire. 7) Test your new jack and smile...you did it!
N**K
Easy to install.
This was so easy to install by myself and comes down smooth. Any trailer owner that has this stabilizer system on their trailer, I wouldn't pay anyone to do it.
J**E
Same as original and faster!
Bought this to replace an original on my trailer that got broken. exact same as original but probably 3 times faster! Works and fit perfectly.
B**T
Awesome
Easy to install and better than original, totally recommend!
C**Y
Claude j
Recu dans les date promis et article conforme a ce commander
P**E
manque d'information pour installation du control electrique
pour ma roulotte 35 pieds flagstaff
R**T
Quick install
Easy to install , fit perfectly and only took 30 minutes the put on.
Trustpilot
1 day ago
3 weeks ago