Description
⚡ Power your freedom—anywhere, anytime!
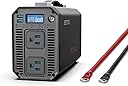
- SMART LCD DISPLAY - Monitor voltage, power output, and safety status at a glance for total control.
- ULTRA QUIET COOLING FAN - Adaptive fan speed reduces noise while preventing overheating during heavy use.
- PORTABLE READY FOR ADVENTURE - Compact design with a rubber handle makes it your go-to power source on the road or off-grid.
- BUILT IN SAFETY WITH 4 X 50 A FUSES - Automatic shutdown and easy fuse replacement protect your devices and investment.
- POWER UP TO 4 DEVICES SIMULTANEOUSLY - Keep your essential gadgets and appliances running anywhere, anytime.
The BESTEK 1200 Watt Power Inverter converts 12V DC to 110V AC, delivering reliable continuous power with 2 AC outlets and 2 USB quick-charge ports. Featuring a digital LCD for real-time monitoring, smart cooling, and multi-layer safety protections including 4 replaceable 50A fuses, it’s engineered for seamless power on the go—perfect for vehicles, camping, emergencies, and remote work setups.