Desertcart purchases this item on your behalf and handles shipping, customs, and support to Croatia.
โก Empower your energy game with real-time precision and smart alerts!
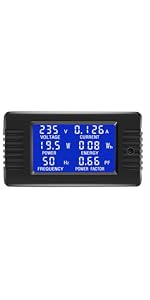
The bayite DC 8-100V 0-100A Digital Meter is a robust 4-in-1 multimeter featuring a large LCD that simultaneously displays voltage, current, power, and energy. It supports up to 100A current and 10kW power, stores energy data during power off, and includes an overload alarm with flashing backlight alerts. Perfect for professional-grade monitoring of solar, battery, and inverter systems, it offers precise, real-time insights to optimize energy management.


| ASIN | B013PKYILS |
| Best Sellers Rank | #41,193 in Tools & Home Improvement ( See Top 100 in Tools & Home Improvement ) #63 in Multi Testers |
| Brand | bayite |
| Brand Name | bayite |
| Color | Blue |
| Customer Reviews | 4.4 out of 5 stars 4,770 Reviews |
| Item Dimensions | 3.33 x 1.75 x 0.96 inches |
| Item Weight | 7.04 Ounces |
| Item dimensions L x W x H | 3.33 x 1.75 x 0.96 inches |
| Manufacturer | bayite |
| Maximum Operating Voltage | 100 Volts (DC) |
| Measurement Type | Multimeter, Voltmeter |
| Minimum Operating Voltage | 6.5 Volts |
| Model | PZEM-051 |
| Part Number | B013PKYILS |
| Power Source | DC |
| Specification Met | CE, RoHS, UL |
| Style | Ammeter, Voltmeter, Power Meter |
| Style Name | Ammeter, Voltmeter, Power Meter |
| UPC | 711463670166 |
| Unit Count | 1.0 Count |
A**H
Excellent for monitoring RV solar setups
I have been using these bayite meters for almost three years now, not only in my travel trailer, but in my shed solar setup. The CHARGE and DISCHARGE meters in my photos are my original meters purchased in April 2019 and the SOLAR and INVERTER meters are the newer models ordered in April 2022. The only differences I can discern is the button on the front. The older meters had a recessed button and you needed a pen or pin to press it, whereas the newer model has a low profile button but can easily be pressed with just a finger, no device needed. The picture attached is before I upgraded the system: 10A controller with 200W solar array (upgrading to a 30A and 300W next) and these pictures were taken under partial tree shade in the late afternoon sun. The TT is running a 2000W modified sine wave inverter off a 385AH flooded lead acid battery bank, which powers mostly a residential mini fridge in the TT outside kitchen, wired through a 120V manual transfer switch to the GFCI outlets. You can see that the INVERTER load from the fridge is about 6A, while the solar output is about 4A, which correlates to the almost 2A battery discharge (including other low current devices: RV fridge circuit board, USB outlets, display lights). This type of setup is great for monitoring and measuring the performance of your batteries and solar system and if you have enough solar available or if your inverter loads are too much. To see what your actual amp-hour draw is, divide the ENERGY output by 12 (or whatever voltage you are running) to get AH so you can size your battery bank appropriately. My setup needs about 186 AH max per day and I am adequate on capacity but really should add an additional 100AH (of course I should add an additional 100W of solar too, but really there isnโt a hard ceiling to the max specs, just mind your budget). I boondock occasionally, but consider myself more of a touring adventurer, meaning I drive long distances in between destinations and camp mainly overnight in the forest or dispersed. My tow vehicle provides charging power along with the solar panels to recharge my batteries and my last 24 hours yielded 166 AH used so I never get below 50% of my battery bank. The extra 100W will help with the charge too once complete. I 3D printed a couple of meter mounts in black ABS and mounted them outside of the RVโs control panel. I could have also flush mounted them for a lower profile look but I think they look pretty good the way they are now. I used some spare Cat 6 and some jacketed landscape wiring to run from the RV batteries to the control panel. I would recommend finding some type of stranded small gauge wire for ease of crimping onto ring terminals and heat shrink tubing to protect them from separating while attached. Using ring terminals is the most secure to attach to the shunts but you can use spades or bare wire too. A good option for mounting is directly attaching the shunt to the negative battery terminal or inverter post, just remember to attach ALL load negatives on the other side of the shunt to accurately capture all discharging loads on the meter. The diagram provided by bayite on this site in the manufacturer pictures show to connect the solar meter/shunt AFTER the controller, which is a correct installation if you want to know how much power the solar controller is sending to your batteries. Bayite also provides a link to a modified diagram where the solar meter/shunt (included in my review pictures) is connected BEFORE the solar controller, directly in line from the solar panels, which will provide the meter with information with how much power your solar panels are actually producing. Each wiring is correct but provides different information; the voltages will differ as connecting before the controller will show the solar panel voltage whereas connecting after will show the battery voltage. Your shunt may have cuts in them, which is completely normal as itโs how theyโre calibrated. Other reviews here say they have cuts and that they are damaged, but thatโs inaccurate. These meters are good displays especially for solar controllers that donโt have displays or donโt show enough information. Great product, great longevity, and great information displayed for nerd like me who like to watch the numbers go up and down as conditions change.
D**.
Good product
Works great. I only wish they had one with a 25 amp shunt.
F**E
Great battery monitor
This was a direct replacement for a previous unit in my travel trailer used to monitor my battery bank. I had a battery issue which may have caused the original unit to fail. Hooked this up to my new LIPO battery and it worked perfectly. Great value for the money. One caveat, the original came with a backing plate for mounting but the new one didnโt. I was able to use my previous one so no problem. Without the plate you will need to be very accurate when you a cut the hole to be sure that you get a tight fit.
C**O
Precision monitoring with a compact footprintโideal for DIY power systems.
The bayite DC 6.5โ100V 0โ100A LCD Power Meter is a fantastic tool for anyone working with DC circuits, especially in solar, battery, or off-grid setups. I installed it in my camper van to monitor battery performance, and itโs been incredibly accurate and responsive. The LCD display is crisp and easy to read, even in low light, showing voltage, current, power, and energy all at once. I appreciate the real-time feedbackโit helps me catch inefficiencies and optimize usage. Installation was straightforward, and the unit feels well-built for long-term use. For the price, it delivers professional-grade insight into your power flow.
C**T
A 3D Printed Case for this Meter
This little meter is just perfect to measure the voltage and current of a 48VDC power supply for a ham radio project of mine. However, I did not want to just have that small (3.5"x2"x1") meter simply lying around on the shelf or the top of the amp. So, I searched for a box that I could mount that meter into and by chance came upon EXACTLY what I wanted as a 3D Print called "Power Monitor case V2" on Thingverse. Now the problem became "How Do I Print This?" since I do not own a 3D Printer. Again, Mr. Google let me know that the local Public Library will print 3D Digital Models and only charge for the filament used. The case was printed in 2 pieces (back and front cover). Once I had it home, a half hour of trimming off any excess plastic gave me the parts I needed to mount the meter. You can see in the photos that this little 3D printed box was just perfect for this meter and was pretty simple to do. Having a custom printed box to hold this meter really adds to the utility of an already great product.
B**.
Many people use the shunt versions with very good results. They all have separate advantages / disadvantages ...
I have two of these units that monitor a portable solar generator system ie. 100 amp battery, 100 watt solar panel/controller and DC/AC inverter. This would be a similar setup one would have in an RV. One is monitoring the power through the dc to ac inverter and the other is monitoring the power of the dc load off of the solar controller. Shunt(s) are wired, as required, at the end of the circuit that goes into the neg terminal of the battery. All functioned for a week correctly, and no wiring was changed, then all of a sudden the voltage on one reads 20 volts (should have 12-13v) and the second unit followed a few days later. Again no wiring changed. I originally ordered (twice) a similar unit from Amazon the Q-Baihe Multifunctional Wireless Digital Bi-directional Voltage Current Power Meter Ammeter Voltmeter Capacity Coulomb Counter DC 0-120V 0-30A . It is a color screen wireless bi-directional meter with a built in shunt and wireless remote display as apposed to separate shunt on the Bayite unit. Twice the unit(s) that are coming from China were turned back at customs for unknown reasons. Both times I received a call from a lady with a heavy Chinese ascent who was very polite and articulate apologizing for the delay (only a week late at this point when I alerted Amazon of a delay) and promised to try to resend. She did, confirmed by email messages that she sent, that a second unit was on it's way only to be followed by a phone call a week later that it got rejected a second time at customs. Two bumps in the road, I'm not giving up so order a cousin of the Bayite ELEGIANT AC 80-260V 100A Digital Current Voltage Amperage LCD Power Panel Meter DC Volt Amp Testing Gauge Monitor Power Energy Meter Ammeter Voltmeter that uses a coil system to read the voltage instead of the shunt version. It was far far easier to install the coil version then the shunt version and only wished I had avoid the shunt versions as described above. Many people use the shunt versions with very good results. They all have separate advantages / disadvantages in regards to remote install locations. The Q-Baihe seems, on paper, to be the best solution for me but good luck in getting it. I have no idea why the Bayite shunt version failed; 20 volts from a closed 11-13 volt system make no sense (one 12 v battery and no panels connected). It could be that my electrical design is flawed. Far more people report success / no problems when using the shunt versions. Ironically, as I write this, I notice above the block I'm writing in the following.....note the voltage reads 22.9 volts.
G**N
Perfect for 30 Amp RV
Installed in class A RV (30 Amp Service). Used 100 amp shunt. Wired with 22/4 stranded alarm wire purchased at home depot for .30 cents per foot. Mounted flush adjacent to rv systems control panel. Unit works as advertised and I am very pleased. Another reviewer mentioned using a DPDT swith to use one meter to monitor both charge and discharge readings. Sounds like a good idea to me. I will update after I install the switch. For now, I have the meter measuring discharge. Wish I would have bought this years ago. Update 14 Feb 2017: I installed a double pole double throw (DPDT) on-off-on switch. This allows one meter to measure discharge or charge rates (or measure voltage only in the off position). Works perfectly. Just wire the switch to swap the two conductors hooked to the shunt. In my case this was the green and white wires. For info only....your situation may be different. Update 6 Apr 2017: For what it's worth, my generator draws a max of 79 amps (momentarily) when cranking the starter. So the 100 amp shunt is adequate for my rv. The generator starter is my highest 12 volt house battery draw. Using this monitor, I've learned having my rv plugged in to shore power, while the use/store switch is in the โstoreโ position will cause about a 13 watt constant power drain. If I disconnect the shore power, the draw goes to zero. I dont know why this is. But, its nice to know and explains why I had low batteries a few times in the past. Update 29 Mar 2020: This meter has been powered up constantly for over three years. Never missed a beat. Still working fine. One of the few systems on my rv that didnโt fail yet. Update 24 Nov 2021: Still working fineโฆ.however it started acting a bit wonkyโฆ..it was corrosion on the battery connectors. My fault for not keeping an eye on it. Little bit of cleaning and all is well again. Update 14 Jan 2023: Still going strong! Update 24 Feb 2024: Still works fine! Update 25 May 2026: I added a second display meter (one for charging and one for discharging) and removed the switch. Original and new meters still working fine.
D**E
I finally can monitor exactly what my motorhome battery system is doing - a must have for any RV owner
I purchased two of these bayite DC 6.5-100V 0-100A LCD Display Digital Current Voltage Power Energy Meter Multimeter Ammeter Voltmeter with 100A Current Shunt and installed them in my motorhome a month ago. I wired them so that one meter shows all current flowing out of the house batteries and the other shows all current flowing into the house batteries. I only needed to use one amp meter shunt at the negative terminal of my battery bank output to accomplish this. This arrangement has worked exceedingly well for me. Both meters show the identical voltage readings. With these meters I can keep easy tabs on what my electrical system is doing. I can tell what the current draw is for the various loads that I have (lights, water pump, standard dorm fridge, etc.) and the watt-hour meter lets me know how much my battery has been depleted (if you know the total capacity of your battery). It also lets me see what my battery charger is doing with regards to voltage and current delivery. The illuminated display uses hardly any current (3 milliamps) so I keep the light on all the time. It makes a great night light. So far both meters have worked great and were relatively easy to install. I can't believe I waited so long to install something like this. It's so inexpensive yet so helpful. A no-brainer. EDIT 7/13/2018 - Meters are still working great and are very helpful. This should have been standard equipment. I added a photo showing how I cut out mounting holes for the two meters in a standard light switch plate and mounted this plate over a cutout on the interior cabinet wall.
V**C
Very accurate and easy to wire
It does what is set to do: tells you the state of your battery bank. Very accurate and easy to wire. Recommended.
M**A
Excellent value for money, highly recommended
I am using 4 of these meters to monitor my solar battery system: - Battery in - Battery out - Inverter out and - Charge controller out Installation: I found it them easy to use and install. Acuracy: I am very happy with it's performance and acuracy, I've tested it against other meters, charge controller displays and multimeters. Support: I had to contact their customer service as there was some confusion (created by me) and they were super helpful. Usage environment: I am using this with a 24V battery system (Voltax), a Epever 200W inverter and 1200W of Canadian Solar panels. You can see them in action on my EcoAmbitionsAustralia YouTube channel in more detail.
J**R
Identity parasitic current draw
No complaints. Invaluable to a novice to evaluate parasitic current draw.
H**A
Excelente
A tiempo y cumple su proposito
L**S
to make it work require different sizes of ring terminals & a different cable colors.
very good small monitoring center to track the battery charge and discharge.
Trustpilot
2 weeks ago
2 months ago