


Buy anything from 5,000+ international stores. One checkout price. No surprise fees. Join 2M+ shoppers on Desertcart.
Desertcart purchases this item on your behalf and handles shipping, customs, and support to Croatia.
🛠️ Restore your leather & vinyl like a pro—don’t let damage define your ride!
The 3M Leather and Vinyl Repair Kit 08579 offers a comprehensive, heat-cured polymer system with 7 mixable compounds and textured grain papers to expertly repair cuts, tears, and burns on a variety of surfaces including automotive interiors, marine upholstery, and furniture. Designed for precision color and texture matching, this all-in-one kit includes everything needed for durable, near-invisible repairs that maintain value and style.
| ASIN | B0058WXNOK |
| Best Sellers Rank | #102,842 in Automotive ( See Top 100 in Automotive ) #412 in Leather Care Products |
| Brand | 3M |
| Brand Name | 3M |
| Color | Clear |
| Compatible Material | Leather, Vinyl |
| Container Type | Packet |
| Customer Reviews | 3.8 out of 5 stars 6,426 Reviews |
| Full Cure Time | 24 Hours |
| Global Trade Identification Number | 00051135085790 |
| Included Components | Leather & Vinyl Repair Kit |
| Item Form | Kit |
| Item Package Quantity | 1 |
| Item Type Name | Leather & Vinyl Repair Kit |
| Item Weight | 0.3 Pounds |
| Manufacturer | 3M AAD Consumer (Domestic) |
| Material | Adhesive |
| Material Type | Adhesive |
| Model | 3005 |
| Number of Pieces | 1 |
| Other Special Features of the Product | Easy color and texture matching |
| Part Number | 08579 |
| Special Feature | Easy color and texture matching |
| Specific Uses For Product | Automotive interiors, Furniture, Marine & RV upholstery |
| UPC | 051135085790 |
| Unit Count | 1.25 Fluid Ounces |
| Viscosity Level | Medium to High |
| Volume | 280 Cubic Centimeters |
| Warranty Description | 2 year manufacturer warranty |
| Water Resistance Level | Not Water Resistant |
K**B
EASY but not SIMPLE: Practice Brings Good Luck
The flat blade screwdriver in my back pocket ripped my grey leather car seat when I sat down. Listen to your Mom when she says don’t put tools in your back pocket. I practiced this repair on an old leather ottoman with a couple of long rips. Was very pleased. The repair on my leather car seat was very good, and is better than the rip. It’s not perfect, but this is a repair kit, not a magic kit, and results were very good. Practice brings good luck. MY EXPERENCE and RESULTS follow: TIPS from my experience: The mystery repair compound is heat curing. It will not cure properly without substantial heat. Also, if left in the open air, it will start to solidify. After 24 hours it will start to become a sticky, clumpy, lumpy mess, so don’t leave the compound out in the open air. The compound is not paint or “color”- it is a heat curing “polymer”. It had the consistency of really thick honey out of the container. It is very prone to stringing, so be careful not to drag strings of compound over the good part of your repair piece. The uncured compound can be wiped off with a paper towel. I suspect that if left on long enough, the wet compound will permanently stain due to the color in it, so be careful. If there are voids/ pits, crevices after the first repair, you can add more compound and heat cure it right over cured compound. THE HEAT DISK: The heat disk will hold heat but will rapidly cool if you are using it outside with a breeze. If you wait too long to apply the heat disk, the disk will cool to the point of not being hot enough to cure the compound. So, have your heat source next to your repair. Pictures and reviews from unsuccessful repairs clearly showed that the material was not sufficiently heated with the heat disk. A hair dryer is not sufficient! The compound needs some concentrated heat to cure. I heated with the disk several times before removing the graining paper with great results. COLOR MIXING: The most challenging part. I placed a piece of clear box tape over the good part of my repair piece. I then applied my color-mixed candidates onto the clear tape to evaluate the color match. Both repairs I made (light grey and dark brown) had a pretty close color match in the end. GRAINING: To get a proper grain, the graining paper has to be LIGHTLY PRESSED into the WET compound before applying the heat. If disk is too hot when placed on vinyl, it will iron out the vinyl grain of your item and it will appear smooth. Practice with small spots of wet compound on the vinyl sample supplied! MIXING THE COMPOUND for REPAIR: I mixed my compound on a paper plate. The paper plate provided a nice surface where I could mix different color palates (different shades) on. I could easily pull a small amount aside and lighten or darken it, or tint it with other colors. I could then put a dab of several candidates onto the clear tape, placed over the good part, to see how good the match was. APPLYING the HEAT WITH THE DISK I applied heat to the disk and then applied the hot disk to the graining paper, constantly moving the disk over the repair area for about a minute. My best result was with applying the heat several times, letting the paper cool then removing the paper. Use a light moderate pressure to get a good feathered edge around the compound. Too much pressure and you’ll squish the material out past the repair. Too little pressure and too much heat and you will get a lump of cured material without graining: not too hot, not too light, not too heavy: PRACTICE A COUPLE OF TIMES TO NAIL THE HEAT AND PRESSURE. I used a propane torch to heat the disk. I got best results with heating the disk a COUPLE OF TIMES for maybe 5 seconds each, allowing the heat to distribute for 10 seconds in between, before applying to the graining fabric (first try, disk was way too hot and burned the graining paper and the material cured in a lump). To gauge the heat, I used a clean paper plate, with my heat-sensing-thumb under it, and quickly pressed the disk on the paper plate, over my thumb. If the disk is too hot, it will burn your thumb, and the paper plate/ graining paper. If the paper plate turns brown, it’s too hot: wait a couple of seconds and apply it again, then place onto the repair. Too hot and you’ll iron out the graining from your vinyl. Not hot enough and the compound will be sticky. If the heat wasn’t suffient, just apply heat again. Practice on the sample! VOIDS AFTER CURING? On the brown leather ottoman with rips, the ends of the torn leather were curled, and would not lay perfectly flat. After my first heating session, there were voids. I re-applied wet compound to the voids and re-applied the heat disk. I had to fill voids in the cured compound several times because I couldn’t get the leather flat. It worked like a charm, you can’t tell I applied compound multiple times. The repair built up very well (I didn’t use the adhesive to fill the voids). SHEEN: If the finished, fully cured repair is too shiny, use a pencil eraser to dull the shine. If it is not shiny enough, apply a tiny amount of paste wax or clear shoe polish and buff. Practice on the sample and you will see exactly what I described, and you’ll be able to nail your actual repair. I would highly recommend this kit to my rowdy back-pocket-tool-toting friends. Good luck….
W**Y
DOES A GOOD JOB, BUT YOU MAY BE ABLE TO SEE THE REPAIR
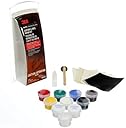
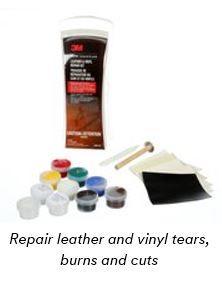
I got this because I have a compact backhoe with a black vinyl seat that had a tear, and another one that had formed in the vinyl-covered seat of my ride-em Husqvarna mower. The backhoe seat is a roughly textured black vinyl, and the mower, a light gray smooth surface. You get two small containers of the glue you need to fill the split or crack, and a number of other colors, with a color guide to mixing custom colors. Because both our pieces of equipment sit out in the weather, the sun had eaten away some of the foam behind the splits in the seats. They say you can just fill these with layers of glue until even, but they were quite deep -- maybe a quarter of an inch. Instead, I took some spun "cotton" -- the stuff they pack in the top of pill bottles to keep the contents from rattling around in shipment. It used to actually be cotton, sometimes called "cotton wool," but it is now some sort of spun plastic and non-absorbent. I packed the cracks with this. Then I took the single small piece of "repair cloth" that comes with the kit, and cut pieces slightly bigger than the splits they were going to repair. This piece of cloth, by the way, is not high quality and somewhat disappointing; the edges shred and threads hang off, which makes it hard to tuck it all away beneath the split. I took a star off for that. In fact, I believe you could use any scrap of textured cloth to make your repairs. It should not be nylon or anything too thin. Probably cotton or some blend would be best, with a textured surface to absorb and hold the glue -- and better something that doesn't fray around the edges! Once I had my "cotton" wool in place, I took the the wooden spatula in the kit -- even a clean flat-head screwdriver would work -- coated the end with glue, and pushed it under the split, about a quarter-inch in all around, and then coated the stuffing material as well. Then I placed the repair top cloth and tucked it in. This can get a little messy and you just get one edge in place and another pulls out. Persist! Then I coated the cloth with glue as well. You have to allow 12 hours for the glue to fully dry, by the way, which is one reason I didn't fill the holes with layer after layer of it, as it would have taken days to set up and re-apply. I allowed the glue to dry overnight, and then reapplied until it was almost even with the rest of the surface and waited another day. As they explain in the kit, the glue shrinks as it dries, so there is a "void" -- a dip in the surface -- which you will fill with the matching color to make it even. There are several squares of textured, slippery material, which you are going to match to the vinyl or leather texture of the item you are repairing. I chose one heavily textured piece to match the backhoe seat, and another that was virtually smooth for the mower. The backhoe repair was dead simple. The seat is black, and one of the tiny tubs of color is black, so I simply scooped some out and smoothed it over the repair. They say to use a pen or pencil and somehow sketch the split on the back, so you know what part you're going to heat after that to cure it, but I found that cumbersome and hard to do. Most people say the little heating tool you're supposed to warm up with your iron on high doesn't work. My wife had an old hair curling iron, so I got it very hot, held the square of textured material over the repair with two of the edges near the crack so I knew what I was heating, then began to roll the curling iron back and forth over the vinyl repair. The first time, I didn't do it long enough -- probably 4 or 5 minutes -- and when I lifted the texture paper off, most of the black filler came with it. You can use a finger to rub and peel off this stuff from the "slippery" paper, by the way, so it is reusable and I cleaned it up. I let the repair dry again for several hours, just to be on the safe side, then used the black material to fill it flush again. This time, I rolled the hot iron over the texture paper a good 8 to 10 minutes, just to be safe. This time when I carefully peeled off the paper, the repair material stayed put. It was done. It looked great -- almost invisible! At a certain angle, you can't see it at all, but if you change your position, you can see a difference in the surface: the original seat is somewhat shiny and the repair is matte. However, overall, I'd give this repair 5 stars. The Husqvarna was a different story. The split is on the rounded part of the seat near the front, so it takes stress and is very obvious. The color is a light dove gray, so I had to custom mix the color. I tried black and white and spread a little on the underside of the seat where it wouldn't be seen and let it dry. Not even close! I tried again, three or four times, and had to let it dry each time to see the result. Finally, I got it pretty close and added a little brown, and that was as good as I could do. As above, I did the repair. The final result is, the crack is more or less sealed (it's an area that gets pulled when you sit on it, so a fine crack has formed where the much bigger split used to be). The color is close, but fairly obviously a "fix." I'd give it a 3. SO the success of your particular project is going to depend on an number of things. One is where the split is, and what color it is. The more "custom color" you have the mix, the less likely it is that you're going to get it exactly right. If it happens that you have a primary color vinyl (or leather) item that is very close to the various colors provided, your chances of success are higher. It's most likely that someone will be able to see your repair when you're done, but let's face it; it's probably, in most cases, going to look better than the ugly crack you're covering. Overall... Recommended.
J**N
Do you have lots of time and patience? If so proceed with caution.
FINAL UPDATE after a couple months use: This did not hold up at all. I did my best to protect it actually by putting a cloth over it so it would get less rubbing when someone sat on the seat. But now the rip is opening back up again. Not completely but now that the process has started I can tell it is going to just continue to open back up. Picture update #2: I tried to put text on the pictures but for some reason this only worked fo some pics. Also it seems that Amazon has loaded them in a mixed up order, so you'll just have to use some logic as the order is not as I describe in this review Picture update: Pics #1 and #2 the day it first ripped (i.e. Before repair) Pic#3 First attempt at Step 1 vinyl adhesive trying to hold leather flaps down. Pic#4 Doing step 1 vinyl adhesive with replacement kit and giving up on trying to glue the flaps down Pic#5 Vinyl adhesive step 1 glue dries clear (before step 2) Pic #6 Beginning of step 2 ...color compound is applied but not yet heated Pic 7,8,9 After color compound is cured. Original Review: This is going to be a long review in case any of these details can help someone else. If you really are going to do this you might want to read my reviews and learn from my pain. If you are just wondering whether you should do this…here is my summary: In summary….. A. if you REALLY NEED to fix your leather/vinyl object….especially if it falls within the size guidelines of this product B. If you are have a TON of patience C. If you have a TON of time and many days over which to do this D. If you are willing to put up with the potential of first getting a bad kit and needing to get a replacement E. If you do not expect this repair to look good, you just need it repaired F. If you already own or are willing to buy an iron or some other tool to heat up the heat transfer tool G. If you can live with the bad results if this doesn’t work very well THEN give this a try because it may end up being your best solution and you may actually be satisfied, or perhaps even happy, with the results. If all of those things are not true, maybe you’d be better off not trying this. Read on for all the gory details of my experience… First…full disclosure that the repair in the leather that I was attempting to fix was outside the guidelines of what this product says it can handle. But as it was a longish but skinny crack ( if it were divided in half would have fell in the guidelines), I felt like I could probably do it in sections and whatever happened, it would be better than letting it stay cracked with the risk of the crack getting worse. I recommend you download and read the instructions thoroughly, and/or watch some of the Youtube videos, as my review will assume you know the steps involved. So here is my long story….I hope to edit this later and add photos. I was trying to repair a cracked in a leather driver’s car seat. I believe it may have been previously fixed/tampered with as the car was purchased only 3 days earlier (used) before this crack appeared and it had looked a little funny in that spot. So I don’t know what or how they had earlier repaired it, but once it cracked it really looked like it was going to get worse and the edges of the leather were starting to curl up. The backing cloth was still very securely in place. The seat was rapidly deteriorating so I ordered the repair kit ASAP and as soon as it arrived I attempted the repair. My first challenge was that I wanted to glue the leather back down as flat as possible. The 3M instructions tell you to use the Step 1 vinyl adhesive to put the backing cloth if needed. I did not need the backing cloth as there was already the original cloth backing, but I wanted to use the vinyl adhesive to hold the leather flaps down (glue it to the cloth backing) and hopefully prevent further tearing. My challenge was how to flatten out the leather flaps during the 4 hour drying time. I was afraid that anything I might put on the seat to weigh down and flatten the leather flaps would ultimately get glued to the seat itself. I contacted 3M and they said there were no solutions, but that it wouldn’t be a problem as the second step (color and heat process) would flatten everything out. I was skeptical so the only thing I could think to try was to weigh it down with some pliers but to use pieces of a rubber pencil erasers as wedges between the tool and the leather. I figured worse case if the pencil eraser ended up getting glued to the seat I could easily break it up and remove it. In fact, one teeny tiny piece the size of maybe the period in this sentence did stick, so I easily plucked it off. The glue goes on white and was the consistency of Elmer’s glue….it should not be solid. I left it to dry overnight and was relieved to see the next morning that it had dried clear. I figured this already was a big improvement and was going to help stop the leather from ripping further. For the step 2 (color and heat curing) I had read so many reviews that indicated the heat transfer tool didn’t work and they just used an iron, curling iron, etc. directly. One reviewer wisely suggested using heavy duty kraft paper, such as a paper grocery store bag, to shield off areas you are not covering by the grain paper. So I dutifully attempted to experiment first on the sample vinyl that is included in the kit before I touched my leather seat. Well, it seemed not matter what I did, the color would cure onto the grain transfer paper rather than staying on the vinyl. I tried everything you could think of. First I followed the directions exactly using the heat tool. I tried doing what I saw in Youtube videos. I tried using the iron directly. I tried Every combination of time and heat settings and tool that I could think of. None of it worked. No matter what I did, no matter what combination of tool, time or setting, every time it cured….but it was stuck on the grain paper and not the vinyl. I began to think “What is the magical substance that is making this supposedly not stick to the grain paper anyway, because maybe my grain paper is missing whatever this is.” Let me be clear….it was NOT the case that the WET color compound was stuck to the grain paper and just had not cured yet (and therefore needed more heat). It was the case that the color compound was fully cured, fully dry, yet it was stuck on the grain paper and not stuck to the vinyl like it was supposed to be. I could easily peel or rub it off the grain paper…it was dry to the touch not wet. So…I called 3M. The agent told me that the color “needs” to stick to the vinyl adhesive (glue from step 1) and that without it, it has nothing to stick to. Huh. I thought, that’s odd. Because the directions sure make it seem like the glue is ONLY needed if you have a rip that requires you to put the backing cloth. And I know one Youtube video simulated a burn in a piece of leather, and he fixed it without using the step 1 glue. But, since I obviously had not put any step 1 glue on the test vinyl, it seemed that could be my problem. And since I would ultimately be using the glue on the real leather seat, I hoped that this was going to solve the whole issue. So, I put a whole bunch of sample spots of glue on the test vinyl so I could have lots of areas to practice on (I circled them with a sharpie so they’d be easy to find once they dried clear). I waited again overnight to try. Next day, the vinyl adhesive glue was dry so I tried the step 2 color and heat again. Once again, no matter what combination of heat source, heat level, length of time…..the color would cure and dry onto the grain paper and come completely off the test vinyl. And now the step 1 vinyl adhesive glue would also peel off the vinyl and get stuck with the color onto the grain paper. Aarghh!!! So I called 3M back and the agent said “she had never heard of this happening before.” Perhaps nobody calls to complain. She said she would ask an engineer but since it was Friday they probably wouldn’t answer. There goes my chance to fix it over the weekend. In the meantime, I of course had to continue to drive my car so the step 1 vinyl adhesive glue was a bit of help in stopping it from getting worse, but it wasn’t a complete solution and it too began to wear away and the edges of the leather curl up again. So I realized just Step 1 was not going to be a long-term solution and I needed to get the color heat compound to work. The following week I called 3M again. They said the engineers had not had a chance to look at the issue but perhaps I had a bad kit. They said they could send me a replacement or get a refund. I really wanted this to work, so I opted for a replacement kit. After about 10 days I received the replacement kit and it was time to try again. Everything in the kit looked similar to the first kit I used except I noticed the grain papers had a more pronounced grain stamped into them. I really needed the print that tells you “This Side Up” with these grain papers, whereas with the first kit I tried it was fairly obvious which side was the grain and which was not. I needed to redo step 1 vinyl adhesive glue because by this point it had really started to fall apart. There was also no hope of trying to hold down the edges of the leather flaps as they were really curling after all this time had passed. I just had to hope they were right in saying step 2 fixes all that (spoiler alert: it didn’t fix it) Again, I waited the required 4 hours for it to dry. While I was waiting for that it was time to test the step 2 on the new test vinyl with the new grain papers to see if it worked. I decided to first try it without the step 1 vinyl adhesive as I was really suspicious that doing that was NOT required (again, the instructions don’t say it and there was the Youtube video). I decided I would NOT risk messing around with anything other than the supplied heat transfer tool. I would once again follow the instructions exactly….and …..lo and behold it worked! The color cured onto the vinyl and not the grain paper!! Woo hoo! AND there was no step 1 vinyl adhesive on the test vinyl, so that advice had been wrong and big waste of my time from 3M. So once the step 1 vinyl adhesive was dried on the real leather seat, I set out to do Step 2 color and heat on the car’s leather seat. Frightening. I decided to continue to use the heat transfer tool for 2 reasons. (1) That is how this is designed and the way it is instructed to be used and (2) I figured it was less likely that I would ruin any other part of the seat….holding an iron over the seat was seeming a bit too risky even if I was prepared to mask it all off with paper bags. Even though I was going to need to do this in sections because the grain paper wasn’t long enough to cover the entire area (essentially I needed 2 grain papers), I decided I should cover the whole thing with the color heat compound just in case. I didn’t want to accidentally hit the step 1 vinyl adhesive glue with the heat transfer tool and cause it to melt (and then have to wait another 4 hours for the next application to dry!) so I figured it was better to just use 2 of the most similar grain papers side by side. I figured I would start with the “best” match and could always switch the other paper when I got to it if that was needed. Well…it worked….sort of. It was painful. I had my iron set on the highest temperature and had run a long (powerful) outdoor extension chord over to my car so that I could have the iron right next to where I was working. Because I had the earlier failed kit, I had 2 heat transfer tools I could use. I actually set a brick on the ground next to the iron, and would have 1 tool warming up while I used one tool. I would set a timer on my phone and play music while I painfully held the tool on the iron for 3 minutes to warm it up. I would then set a time for 1 minute while I used the tool on just a small area just slightly larger than the tool itself to try to cure the compound. Then I would do it again on the same spot. Then I’d heat up the tools again and do the next spot. Repeat. Repeat. Repeat. Repeat. Repeat. Occasionally when I would think the whole area was cured I would set a timer and let it cool completely for 15 minutes. There would always be one spot that was either visibly not cured, or felt a bit tacky so I’d have to give it more heat treatment. I did this for 6 hours until the mosquitoes were going to eat me alive and I had to leave it all overnight. The next day there were still some tacky spots, but also in the light of day there were a couple of areas that just looked like they were going to lift up. There were also a couple of areas that just looked like they would crack open as soon as someone sat on the seat, so I tried to fine tune the whole thing…pushing on the seat to simulate someone sitting, etc.. I gave it a good 2 additional hours of fine tuning. The end result….you can see for yourself in the pictures if I am able to post them. I would say “It’s better than it was and hopefully will stop it from ripping further…..but if I had not seen how it was before I would think this is terrible.” I seriously do not think this is going to withstand the test of time and someone sitting on it. In fairness I think 3M would say that it was never meant to do a crack that is this long and their instructions say that. I will not be surprised if I have to redo this again in the future very soon. I’ll try to report back if that is the case. Aesthetically it looks terrible right now and I can’t help feeling I could somehow make it better if I just tried longer, but after 8 solid hours of doing this, I had run out of time and patience. And to be completely fair, it looked even worse before when it was ripping. I also think the extreme humid weather right now may not be helping, so I will retry in the fall when the air is crisp and dry. I will probably have to buy a new kit just to be able to get new grain papers as the ones I used are a lot worse for wear after 8 hours of being heated. I am not sure they will continue to work. Was 3M’s customer service any good? Mixed review there. Well…they are friendly and so many products don’t even give you anyone to talk to any more, so they get points for that. However, they gave me 2 incorrect pieces of advice: (1)Claiming you need the Step 1 vinyl adhesive for the Step 2 Color Compound to stick to and (2) Claiming the curled pieces of leather will flatten out when you do Step 2. Also they promised to get answers from engineers about why this was sticking to the grain paper, but I never did get that answer (although I guess to be honest I never expected them to). They took a very long time to answer me and while I waited my seat deteriorated further and further. But they did send me a replacement kit (which took a long time to come), which in the end worked. So from that perspective they did help me.
C**H
It Works; But You've Got To Take Your TIme and Follow the Directions
The seat in my car was not like the seats shown in the youtube videos. I didn't need to use the cloth that came with the kit. I checked with customer support, and the gentleman confirmed my suspicions. Also, the curvature of the seat along the stitching line made it difficult to accurately trim the leather prior to applying the vinyl adhesive. The rest of it went pretty smoothly. YOU HAVE TO TAKE YOUR TIME, AND FOLLOW THE DIRECTIONS. I read other reviews where the people were complaining that the paint in the little cups was dried out. NO, IT'S NOT DRIED OUT. It's pretty thick, and when you mix it, if you have to combine colors, it mixes OK -- it's supposed to be thick. Like I said earlier -- READ THE INSTRUCTIONS. I did my best trying to fix the small tear on the driver's seat. I just hope that it comes out OK.
F**L
Might Only Work for Very Small Repairs
I was excited to see if I could repair the rips on my driver side leather seat of my '97 Toyota 4Runner. After watching a few different videos, including the one using this 3M product, I went to work on the repair. There are three distinct rips on seat, one that was about an 1" long with an opening of about 1/4", then larger rip of about 2 1/2" by about 1/2", and finally one that was more of a star pattern rip about the size of a half-dollar piece. The kit came with a single piece of backing material, about 3" x 3" and I used all of it between the three areas and could have used a bit more but got it to work. The supplied adhesive worked will to glue the backing to the leather from underneath. I let the adhesive dry overnight and looked good and ready for the surface filler. The surface filler comes in several colors allowing you to mix a color close to your seat. I had a very difficult time mixing colors to come up with something close to the beige of my leather seat. Finally settled on a mix that I thought would work as the directions stated the color would lighten up slightly, so I went a bit darker but was nowhere near the same color. I applied the filler in a thin layer and it never really cured or dried properly. Even after a few days the filler was still damp and had to basically wipe off so I could sit on the seat to move the vehicle. I pretty much gave up on the kit and ordered a new leather seat cover, which involves removing the seat from the vehicle to be able to access the bottom of the seat and undo all the fasteners and replace with the new seat bottom. Don't waste you money on this solution unless you have a very minor rip or tear, then it might work.
B**M
Beyond expectations
This is a great leather repair kit! It has everything you need to fix a rip, hole or tear and for a great price. I was worried the quality wouldn't be up to par because it is one of the cheapest options but that is not the case. I had a large rip in my driver side seat in my car. (I have added pictures of before, during and after) The car is new to us, otherwise I would have fixed the tear before it got so large. I was worried that its size was going to be too big for this kit or just too large to fix. Once again, it was no problem! The glue was also a concern for me. The rip was in the usual spot in a car seat. An area that gets worn out from constantly being sat on. While applying the glue, it didn't seem like anything special but once it dried, it's been solid! I have been amazed at how strong it feels. Already a week of use and it feels sturdy and permanent. I did have trouble with the paint however. I wasn't actually concerned about matching colors. All I really wanted was to fix the rip. Since no one besides my husband and I will ever see the fixed product, it's appareance didn't matter. But the paint was there and I figured I might as well put some on. Now, the instructions are some what vague and general. I applied the paint in my garage in 20 degree weather (the glue as well). The glue had dried with the assistance of a blow dryer in about 3 hours (4 hours is recommended). You are suppose to let the paint set for 24 hours which we knew ahead of time and I had planned accordingly. It must have been the cold weather (I didn't want to wait months until winter is over to fix this seat) but 42 hours later it was still tacky to the touch even after 1 1/2 hours of intermittent blow drying. I eventually took a wet paper towel and wiped away as much paint as possible because I needed to use my car. Over all, this is a great product for a very reasonable price.
C**S
Easy to use? Eh, not so much.
I'm giving this 2 stars because it did not work for me. Others may have had a different out come but I ended up with a mess. The product seemed straight forward , fill your area with vinyl sealant ,wait 4 hours ( I waited over night) , mix your color, which is not easy but i did get close after I gave up on the color mix chart and tried my own blind ... the problem i had was after you fill your crack/hole/rip you are suppose to use an included tool to heat bond the color and texture it. My iron on it's highest setting must not have been hot enough. (it will burn your finger though) after leaving the tool on the iron for three minutes and rubbing on the texture paper for about a two minutes I had no change in the color mix. it was still soft and runny. after three attempts and using all of my color mix I gave up . Had I spent 40 bucks on it I would be upset but it's cheap and was worth a shot and fixing my problem. Good luck is about all I can say to prospective buyers.
U**M
You get what you pay for.
I didn't expect more and I didn't expect less. It did exactly as advertised, and I was able to fix the leather seat. I followed the directions step-by-step. The colors blended well, and was an (almost) identical match. I believe that some of the reviews made on this product, were by people who didn't have the patience to follow directions. The tear in my leather cushion was approximately 3 inches long, and a 1/4" in width. The mend is a bit harder than the rest of the softer cushion, but only I notice it (no one else noticed it in my family). Yet, with a tear that large, I had to use quite a bit of the vinyl adhesive, which makes the mended tear less softer than the rest of the cushion. Besides, it is "vinyl" adhesive, of course it will be harder. If you want to fix a piece of furniture for less than $10, then this is the solution. If you want to pay a seamstress, or an upholstery professional a lot of money, then go for it! This kit worked fine for me. I just hope I don't have to use it again when my dog rips another hole in my leather furniture. Then I will have to find a German Shepherd repair kit.
B**.
it is good product but particularly hard to exactly match the shade for old items (sofa)
I used to repair the bruise marks of my 10 year old Italian leather sofa. worked ok as it fixed the damage.
J**A
Me esperaba mas por ser producto 3M...
El primer paso que e el adhesivo de vinyl no tiene tanto poder de adhesion, a pesar de aplicarle caire caliente con una pistola de calor y dejarlo curar 12hrs no pudo adherirse bien en algunas secciones de mi reparacion. Ademas la aplicacion no es sencilla, se tiene que tener mucha atencion y aun asi no es facil tener buenos resultados.
B**E
Brigitte
Funktioniert nicht 100prozentig. Wir haben versucht unseren Riss auf der Fläche meiner Kunstledercouch zu flicken. Es war sehr aufwändig, man sieht die Ausbesserung (eh klar - wie neu wär zu schön gewesen), leider verbindet sich die Masse nicht mit dem Kunstleder der Couch. Die Ausbesserung war zudem nicht haltbar, nach 3 Wochen hätten wir gleich wieder ausbessern können / müssen. Wir haben es gelassen, da sich der Aufwand für das Ergebnis nicht lohnt...
P**S
Does it work?
Sadly I could not get the vinyl to set. Therefore wasted my money! Not happy, but you live you learn!
A**R
Easy fix - easy to use - multiple repairs
Fixed my car seat easily, After using the heatpad, the color texture, had a mat shine. I bought some Leather color to fix the rest of my seat, and there is more than enough to fix multiple seats. The First two pictures is With this repair kit!! The last pictures is With this kit, and Black leather color.
Trustpilot
1 month ago
2 months ago