Desertcart purchases this item on your behalf and handles shipping, customs, and support to Croatia.
✨ Restore clarity, erase flaws, and shine like a pro! ✨
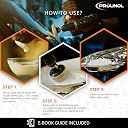
Prounol Cerium Oxide 50g Fine Grade is a premium 99% TREO-certified polishing powder with ultra-fine 2.5 micron particles designed to quickly remove light scratches, scuffs, and stains from all glass surfaces. Ideal for automotive windshields, mirrors, headlights, and delicate glass items, it mixes easily with warm water to create a customizable polishing slurry. Trusted by professionals and DIY enthusiasts alike, it delivers fast, streak-free results when used with a rotary tool and felt pad.


| ASIN | B08BJ5S83L |
| Best Sellers Rank | 2,236 in Automotive ( See Top 100 in Automotive ) 48 in Vehicle Polishes |
| Brand | Prounol |
| Compatible Material | Glass |
| Country Of Origin | Poland |
| Customer Reviews | 3.9 out of 5 stars 2,734 Reviews |
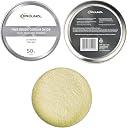
| Included Components | 50g Jar of Pro Grade Cerium Oxide |
| Item Weight | 50 Grams |
| Item weight | 50 Grams |
| Manufacturer | Prounol |
| Manufacturer Part Number | 5907713351243 |
| Material | Cerium Oxide |
| Number of Packs | 1 |
| Set Name | Fine Grade 2.5μ |
| Unit Count | 50.0 gram |
| Unit count | 50.0 gram |
L**S
Scratch removal compound
Brilliant glass scratch removal compound. Bought in conjunction with a glass scratch repair kit. Mixed toughly 2 compound 1 water into a paste and aplied onto the pad. The scratches were quite deep and could be felt. It took roughly an hour if keeping pad and glass wet and cool. Amazing finished results no sign at all of the quite deep and large scratches...
D**J
Excellent
got this stuff to get rid of a scuff mark on my wife's car windscreen. It really works.
L**A
Great Product
Very good product for the most part - The scratches on my back window of my car were varied some fainter than others. It was able to get all the less deep ones away with ease using 1500 grit the larger ones tho only partially went but overall great product. Very easy to use.
J**P
Needs an electric polisher
Bought to remove very slight scratching, caused by use, on our induction hob. Followed instructions, but it has only made a very small difference, despite putting a lot of effort into polishing. Think it would probably work better with an electric polisher.
M**D
Damaged item sent
Make sure a undamaged item is sent
A**K
Great value for money
Good item helped get the yellow fading off my car headlight very simple to use great value for money as I barely used any off it to do 2 sets of headlights
R**E
Worked its magic on a mirror
Scratched a mirror during fitting. I could feel the scratch with a fingernail, so not expecting to get rid of it completely. Following the mix instructions to the letter, I had three goes. I used foam pads in an electric drill to do the rubbing, starting with a coarse pad and about 60 minutes of 'buffing'. It does appear important to keep the mix warm, I have no idea why but less effect with a cold mix. I then used the least coarse pad, similar mix and another 60 minutes. This is my process: Buff the mix over the damage. As the mix starts to dry, add more to keep the mix liquid, not dry. After three additions of mix, allow to dry and wipe off the residue. Repeat. I reckon I used about 10 mixes overall and to my amazement, it was possible to see the scratch reduce after each 3 buffings. The scratch cannot now be seen at all, and no sign of 'bloom' on the glass. Fantastic. I guess you could do the buffing by hand but I let me drill take the strain.
J**R
Not worth the effort
Used this on my windshield as I recently bought a second hand car and it looked like someone had tried scratching something off the glass with keys. None of the scratches were deep and I couldn't feel them with my finger or nail. I also bought a drill polishing attachment to make it easier. After three hours and two battery charges for my drill, the very minor scratches started to shrink but they still haven't disappeared. I decided to leave it there for the day and now I'm glad I did because there's a small distortion on the windshield now. This stuff dries really quickly then coats everything it touches like a talcum powder would. I would say this is not fit to use on a windscreen at all and potentially made the issue worse. I then tried it on an old tablet screen out of curiosity with a cloth. Again it left powdery residue everywhere but it seemed to fair a little better than on the windscreen. I didn't attempt to fully remove the scratches, just lessen how visible they were with the rainbow pattern. This seemed to work better but obviously it's not the point of the product and it still took a good hour to get that far.
S**Y
Werkt perfect!!!
Mijn grote passpiegel had twee hele lange krassen. Na een behandeling met dit poeder zijn de krassen niet meer te zien. Het kost wat tijd en moeite maar het eindresultaat is geweldig! De krassen zijn weg. Eindelijk een product gevonden wat werkt. Niet in één keer maar wel in twee keer. Spiegel is weer als nieuw. Gebruik het poeder als een licht schuurmiddel en heb geduld want je bent lang bezig. Maar het wordt beloond. Vanaf nu geen krassen meer in glas. Dankzij dit wonderpoedertje.
R**R
Polera glas
Den fungerar på mineralglas. Men man får jobba hårt.
T**O
Si es eficaz.
El oxido de cerio viene bien presentado en una cajita metálica. Mejor que compres el mismo producto pero en presentación de 100 g. Sale más rentable y los 50 g se te quedarán cortos. Conseguirás quitar arañazos profundos y hasta las marcas de la matriculas que se grababan en los cristales como medida antirrobo. Eso si, ármate de paciencia y de tiempo libre, pero conseguirse se consigue. Las opiniones desfavorables sobre el cerio creo que responden a que no lo usan correctamente, creyendo que una luna de un coche se corrige con unos 15 minutos aplicando el cerio con un taladro y sin lijar lis rayones Con esos 15 minutos si se corrigen las manchas de aguas, de cal o de lluvia ácida que afean los cristales. Procedimiento: Primero procederemos al LIJADO de la zona arañada. Si el arañazo es profundo tienes que empezar a lijar con la lija de unos P80 hasta que desaparezca el rayón. Tienes que conseguir comerte el rayón. Ahora vas pasando todas las lijas progresivamente, hasta acabar con lijas muy finas (como de 3000 o 5000), Quedará el cristal sin arañazo, pero matizado, como si fuese cristal glasé. Ahora es el momento de pasar al PULIDOcon el cerio: El cerio se mezcla con un poco de agua hasta obtener una consistencia algo mas liquida que la pasta de dientes. Se aplica en el pad de corte (como los de lana) y comenzamos a pulir a bajas revoluciones (unas 1500 rpm), que luego podremos subir un poco más. aplicando una presion como de 2 kilos de fuerza sobre el cristal, hasta conseguir que el vidrio sea totalmente transparente. Puede ser necesario estar puliendo como 15 minutos para cada zona del arañazo. Este proceso debe de realizarse con una pulidora o en su defecto con un taladro de mano. Poderse hacer a mano se puede, pero en este caso el tiempo se deber de multiplicar por 10. Totalmente desaconsejado, cuando puedes comprar pulidoras eléctricas por unos 80 euros que te van a hacer el trabajo perfectamente. A la hora de pulir cuidar que la temperatura del cristal no se eleve mas de 50 º C. Cuando se seque el cerio humedificarlo con un spray con agua. Al pulir ampliar la zona a lijar/pulir mas allá del arañazo, para evitar que se forme una depresión apreciable, que deformara la visión como si fuese una lupa. Si el cristal tiene muchos arañazos y eres muy perfeccionista yo aconsejo cambiar el cristal por uno nuevo. Si el cristal no existe en el mercado para reponerlo o es muy complicado de cambiar el cristal por el nuevo o solo tiene dos arañazos, en estos casos si aconsejo usar el oxido de cerio y ármate de paciencia
C**N
Genial
Mit der richtigen Technik und Geduld echt gut. Meine Tochter hat mit einem Mamorstein auf das Fenster “gemalt”. Die Kratzer waren echt tief. Man konnte sie sehr deutlich mit dem Fingernagel spüren. Das Ergebnis nach 3-4 Durchgängen war aber genial. Kratzer sind weg. Zur besseren Verarbeitung hab ich immer noch ein bisschen Wasser nach gespritzt. Ps. Ich hab einen günstigen Polieraufsatz aus Schaumstoff für meinen Akkuschrauber dafür besorgt.
M**L
Incroyablement efficace
Utilisé pour effacer les rayures d'un pare-brise dépoli par des essuie glace trop usés. Dans un petit pot en verre j'ai mis 3 cuillères à café de poudre et un peu d'eau pour obtenir la consistance d'une crème. Vous pouvez utiliser une polisseuse ou une perceuse avec un plateau velcro, personnellement j'ai mis un tampon en feutre 75mm avec une interface mousse de 10mm, déposer un peu de crème sur le tampon et polir en gardant un minimum d'humidité avec un pulvérisateur rempli d'eau à côté de vous. Faites ça en petite session de 10 15min pour éviter la chauffe du verre, essuyez avec un chiffon microfibre et recommencez autant que nécessaire jusqu'à disparition des rayures. Après environ 3h mon pare brise est revenu transparent, comme neuf 👍
Trustpilot
2 months ago
2 weeks ago