Description
✨ Elevate your lash game with salon-grade curls—no appointment needed! 🔥
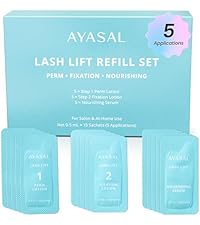
- MULTI USE VALUE PACK - Up to 6 full lash lift applications per kit—perfect for ongoing maintenance and mastering your technique.
- COMPLETE 5 STEP SYSTEM - From lifting to nourishing, every step is included for consistent, long-lasting natural curls that turn heads.
- SALON QUALITY CURL AT HOME - Achieve professional lash lifts without salon visits—save time and money while looking flawless.
- EMPOWERED EXPERIENCED USERS - Tailored for those who know their lash lift routine and crave reliable, repeatable results at home.
- SAFE GENTLE THIO FREE FORMULA - Protect your natural lashes with a cysteamine HCl–based solution designed to minimize lash stress even with repeated use.
The AYASAL Korean Lash Lift Kit offers experienced users a professional-grade, thio-free lash lifting system with a cysteamine HCl formula that reduces lash damage. Designed for up to 6 applications, this 5-step kit delivers long-lasting, natural curls at home, combining safety, value, and salon-quality results for those who want to maintain flawless lashes on their own schedule.