🎨 Unleash Your Inner Gamer with Style!
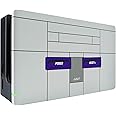
The eXtremeRate Soft Touch Grip Back Plate for Nintendo Switch is a custom-designed replacement housing that fits perfectly on your console and Joycon. With a retro SNES style, this DIY kit includes a console back-plate, replacement Joy-con case, full set of buttons, and necessary tools for installation. Note that installation requires moderate electronic modification experience and will void your warranty.
| Hardware Platform | Nintendo Switch |
| Material Type | Plastic, Acrylonitrile Butadiene Styrene (ABS) |
| Item Dimensions | 7.09 x 3.94 x 0.59 inches |
| Color | Classic SNES Style |
M**D
Gave our switch a fresh look
The clear like green with black console go so hard 🔥The screwdriver quality could be improved as it is easy to strip screws if you're not careful.The video on the YT channel is good enough as a guide, still you should be very organized to be able to put each screw back in its place. (I didn't use the spare screws or buttons that came in the set)
A**I
Beautiful
I loved but, not to easy put in but really like it to try something new to make different
K**A
So boujeee
I love it! Got mines on today, it’s a lot of work so you need to be careful! Better to get your own precision tools because the tools that comes with this is not that good. Make sure you have some tweezers too to hold the springs in place and requires alot of patience. But the results are worth it.
L**N
Don’t do if worried about breaking a joy-con
I really like this product and LOVE how it turned out! It’s beautiful and feels great. I accidentally dropped it once and not cracks (not a far fall and I’m not saying it’s super protective as I did not test that. So if you want to do this for your kids who drops stuff all the time, I might not recommend as I’m not sure if the cases are as sturdy as they feel). The video was great annd helpful. Overall I love the product. I did run into problems (by no fault of this company) and feel I should let you know if you plan on doing this.First of all, I have no experience in this area. I just like challenging things and building stuff, so I decided to try it. It did take longer than 4 hours for me (only the first set of joy-cons, which were the blue flame ones) and I did break one of my joy-cons (the left blue flame one in one of the pictures). I did the blue flame ones first. Once I was done with the left blue one, I tried it and the joystick wasn’t working properly, so I kept taking apart, redoing the joy-con, and testing it again. After a bit, I accidentally broke one of the electrical components (the thing you put the ribbon cable in). So I got a left joy-con and did the process again, but now (for some reason) it won’t charge and say it’s connected to the switch. It connects separately but won’t recognize when it’s connected to the switch. So not sure what happened there. Another problem I had was when I replaced the back of the switch (the switch itself and not the joy-cons) accidentally stripped the middle screw on the side of the switch. It took a dremel, stripped screw kit and a drill to get the screw out. It was very risky and we’re lucky it didn’t damage the switch. Unfortunately it did do damage to the area around the screw (took off paint and stuff). I covered it with sharpie and looks better (I attached a picture). So BE CAREFUL!!!! Everything (except the one blue flame joy-con) works properly and couldn’t be happier with the out come. Just if you decide to do it, take your time and be patient. Do everything the video tells you to do. Just understand the risks that come with doing this stuff. You’ll break the warranty and you run the risk of breaking the joycon or the switch (you would only run the risk of breaking the switch if you did what we did to get the stripped screw out). I would highly recommend watching the video first before buying to see what goes into it (video is at the bottom of the page of the product). Hopefully this helps!!!!
E**R
Carcasa
Súper buena y de buen material le quedo perfecta a mi Nintendo y se ve diferente
J**E
Cutest case ever!
Cutest case ever!The Joycons have a lot more steps than the console back plate, but you DO NOT want to underestimate the back plate installation. ExtremeRate has a link to their video library detailing how to change your plates. You can also search on video sites on how to do so as well.Warning: the Switch Console side screws are VERY fragile. It's very easy to "strip" the screw. You have to be very careful and slowly unscrew it so you don't damage the screw head. In my case, I accidentally stripped one screw.If you stripped your screw, there's a drill bit called a "screw extractor." It comes in a set of varying sizes. You'll want to use one that's in the range of 3mm. You want to bore a hole into the striped screw head then switch to using the other side of the extractor to remove it. I recommend using a power drill. It was all worth it, because everything is cute as a button!
S**L
Beautiful 😍
It came out beautifully took some work with joycon and patience but great quality all holes lined up finished product was mint 👌 👍 👏 🙌
A**N
Fits great
The shell fit great and looks good too everything was easy to put on as well I recommend this
Trustpilot
1 month ago
5 days ago