Desertcart purchases this item on your behalf and handles shipping, customs, and support to Croatia.
🔥 Keep your dryer cool, safe, and running like new!
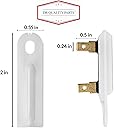
The DR Quality Parts 3392519 Dryer Thermal Fuse is an exact OEM replacement compatible with Whirlpool, Maytag, Kenmore, and multiple other brands. Designed to prevent overheating by cutting power at unsafe temperatures, it ensures safe, reliable dryer operation. Featuring a simple through-hole mounting system, this premium thermal fuse offers easy installation and long-lasting durability, effectively resolving common dryer issues like no heat or no start. Trusted by thousands with a 4.7-star rating, it’s the essential fix for professional-grade appliance maintenance.


| ASIN | B01FX2AODM |
| Best Sellers Rank | #72,975 in Tools & Home Improvement ( See Top 100 in Tools & Home Improvement ) #928 in Dryer Replacement Parts |
| Brand | DR Quality Parts |
| Brand Name | DR Quality Parts |
| Color | As Pictured |
| Customer Reviews | 4.7 out of 5 stars 13,522 Reviews |
| Item Weight | 9.07 g |
| Manufacturer | DR Quality Parts™ |
| Material | High quality material |
| Material Type | High quality material |
| Model | drqp-00010 |
| Mounting Type | Through-Hole Mount |
| Number of Items | 1 |
| Part Number | DR3392519 |
| UPC | 647358743120 |
| Unit Count | 1 Count |
T**E
Perfect replacement part! Saved my dryer and money!
This thermal fuse was an exact fit for my Whirlpool dryer and worked perfectly. My dryer had stopped heating, and after a quick diagnosis, I found the old fuse was blown. This replacement arrived quickly, was easy to install (took less than 10 minutes), and fixed the issue immediately. The quality looks solid and durable, not flimsy like some off-brand parts I’ve tried in the past. It matched the original part number exactly and fit snugly without any modification. My dryer’s been running great ever since! If your dryer isn’t heating, this fuse is a reliable and affordable fix. Excellent quality, quick shipping, and it works exactly as described, highly recommend!
S**S
Maytag Maxima XL 6000 series dryer
This is the 2nd time I had to replace this sensor. Original (oem) lasted almost 5 years....... The aftermarket one lasted almost 5 years. So here I am replacing the thermal sensor again, and I bet it lasts about 5 years (2-people live in the house, so not heavy laundry users here) Did a dryer load.... then the 2nd load, all there was was just a "click" Dryer would not start its cycle. I think 5 years ago there was U-tube videos on how to replace the sensor in a Maytag Maxima XL 6000 series dryer..... But I could not find it...... But since I have done it before I vaguely remember how to do it. 1st you have to take the top off..... There are 2 screws that hold the top on (on the back of the dryer), once they are removed you just slide off and up (there are Utube videos on how to get the top off) NOW THAT YOU HAVE THE TOP OFF..... there is a service Manuel under the white control box. The 2 pictures (from the service manual) I have provided show what screws you have to remove the rear panel. Now that you have the panel removed.... Next un-clip the two blue wires that are attached to the thermal sensor..... and unscrew the 1 screw (not much room in there to get a wrench) The sensor just sits on top of the exhaust tube.... But I think you have to do a little bit of a slide to get it to seat correctly as there is a notch on the opposite side of the screw side that holds it down. I have only done this repair taking the back cover off....... You may be able to do it by taking the front of the dryer off (but I don't know if possible or not). They say that the reason these sensors go bad is because they exhaust gets too hot (IE: lint build up in the vent) but mine was not in any way restricted. So, I think these sensors over time break down. Anyways, Dryer works perfect again. Hope this helps someone.
K**L
Thermal Fuse
Just as subscribed Worked Great Problem solved !!
M**E
Works as it should
Okay, so my dryer stopped drying. It still ran, but no heat. I cleared out the lint screen, then looked in the pocket that held the screen. It was packed with lint and other debris. I got out the vacuum, and cleaned it out. Fired up the dryer, and…still no heat. Fearing the worst, I took to the Interwebs for help. The most common failure is this fuse. If the dryer overheats (usually due to blocked airflow in the exhaust system) this fuse blows and the heat stops working. Flashlight, pen, and paper in hand, I gather the model number. Finding a parts diagram, I find the part number for the fuse. On an appliance parts website, I locate the part number for the OEM fuse. 26 bucks + shipping + unknown delivery time. On a whim, I check Amazon. Under 6 bucks, next day delivery. No brainer. Now, my dryer is located in a short hallway between the garage and the kitchen, up on a stand about 14” high, between the water heater and the washer. There is no room to work on it as it stands. I will describe my repair procedure. Day One: First off, I decided to build a box out of some scrap lumber I had laying around. This would allow me to slide the dryer into the hall, and be able to work behind it. This took about an hour. I put to box in the hall, and wiggled the dryer on to it. Now I could get behind it comfortably. Unplug dryer. Remove exhaust tube. Disconnect gas line. Here’s where it got a little tricky. There is an elbow on the gas pipe, and an adapter. The back of the dryer will not come off with these in place. So out comes the PB Blaster. A half hour later, I am able to unscrew the adapter, and then the elbow. Now to the back panel. 3 screws hold the top on, out they come, and off comes the top. There are about 14 screws holding the back on, off they come. Once the screws are removed, disconnect the black and white power wires from the panel (take a picture so you can remember which wire goes where). I lift out the back panel and set it aside. Now the heat distribution pipe has to come off, 3 screws and lift it out. Now to find the fuse. Out from behind the dryer, I rotate it 45 degrees to the east. Flashlight in hand, I locate the fuse. One screw and I pop it out. Pull the fuse towards me, and attempt to take the blade connectors off, but they wont budge. More PB Blaster and another half hour. Stull stuck, I get the needlenose ViceGrips, and am able to work it off. Get out the multi meter and fuse shows no continuity. Great! This is the problem! Since the fuse won’t be here until tomorrow, I slide the partially disassembled machine back in place and take the box outside. Total work time today- About 3 hours, with about an hour of that making the work platform, and some time waiting for the PB Blaster to work it’s magic. Day Two: Bring the box in place, slide the dryer onto it. Hook fuse to wires, and put in place. This was a little tricky, as the exhaust from the blower was behind the vent tube, about elbow deep in the center of the dryer. My first plan was to put a dab of bearing grease on the hole in the fuse to hold the screw in place while I set the fuse. This didn’t work out. After several attempts, I couldn’t get the fuse to “seat” in place. Once I figured out that there was a tab on the west side of the fuse, I got it seated, and the screw went in on the second attempt. Re-assembly was pretty straightforward- attach the heat distributor (3 screws), place the back panel on, attach the power leads, 14 screws for the back, three screws for the top. Re-attach the gas pipe elbow, the adapter, and the gas hose. Re-attach the dryer vent, slide back into place. Turn on gas, check for leaks, and fire it up. Success! Total time about 4 hours. The location of my laundry set up made this job far more difficult than it “should” have been. If I could rotate the thing where it stood, it would have been much easier. The time spent actually working on disassembly, removal and replacement of the part, and reassembly was about 2 hours. Some of that time was spent wrestling the dryer itself. The placement of the fuse is in a very difficult place to access also contributed to the time taken. AS for a review of the product- it works as intended, and was much cheaper than the OEM part. I don’t know how you assign a star rating to something that works as intended, so I’ll give it a 5, because it worked out of the box, was delivered next day, and was significantly cheaper than the OEM part.
J**P
Good so far ...
Perfect fit, but measuring durability and quality will take time. Fast, easy replacement for Whirlpool OEM part. The price was right -- not excessive -- and the part looks like the Whirlpool OEM part.
Z**E
A quick piece to change yourself.
This part looked exactly like the piece I took off the dryer, except newer. It fit perfectly. It has worked well so far. The quality of the part seems to equal the factory standard that came in the dryer. So far the part has lasted a long time, but we will see. For the money spent, it was worth the money saved in labor to hire someone!
H**R
fixed my dryer from the 90's
dryer works again
C**E
Dryer fuse
Worked great easy install
A**R
Less expensive than competitor.
Product arrived as described.
P**N
Bonne qualité
Ma secheuse
Trustpilot
1 month ago
2 months ago