C**S
These are awesome, buy it now!
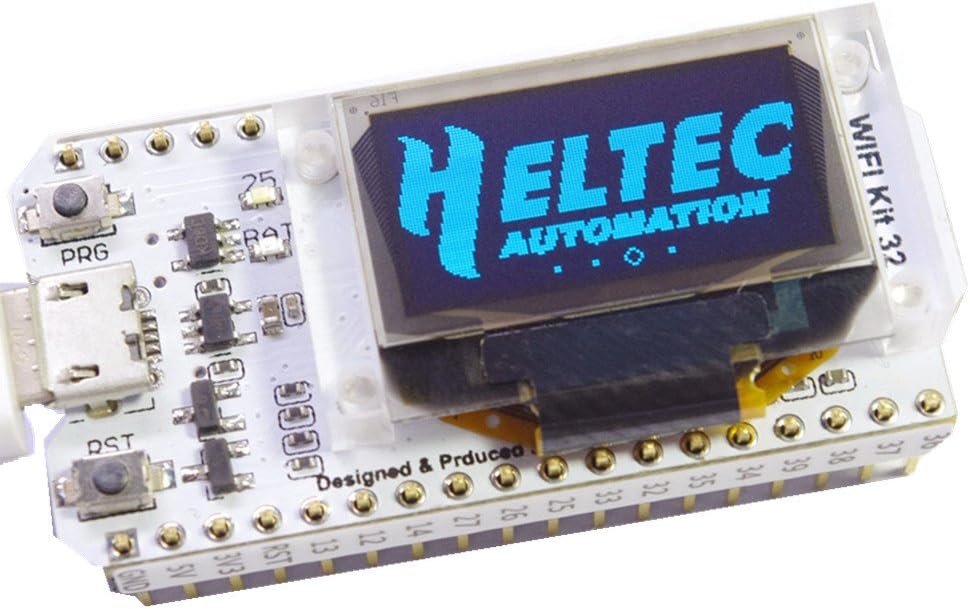
I was trying to make this work "the right way" via ESP tools. But really, just use the Arduino IDE, it's only a couple steps and it's so easy:1) Download latest Arduino IDE2) Visit github (dot) com / espressif / arduino-esp32 and follow the directions about adding the ESP32 via board manager.3) Open Arduino IDE under menu Tools → Board there are now a ton of new boards at the bottom of the list. Choose the "Haltec WiFi kit 32" -- also Pick the right COM port.4) To get library for display: Sketch → Include Library → manage Libraries... search for u8g2 and install it.Then put this in the sketch:#include <U8g2lib.h>#include <U8x8lib.h>U8G2_SSD1306_128X64_NONAME_F_SW_I2C u8g2(U8G2_R0, /* clock=*/ 15, /* data=*/ 4, /* reset=*/ 16);// ESP32 OLED WiFi Kit onboard LED#define LED_PIN 25// ESP32 OLED WiFi Kit "PRG" button for input to programs#define PRG_BUTTON_PIN 0void setup() { u8g2.begin(); u8g2.setFont(u8g2_font_6x12_mf); // fairly small font u8g2.setFontRefHeightExtendedText(); u8g2.setDrawColor(1); // normal, not inverted u8g2.setFontPosTop(); // x,y is at top of font u8g2.setFontDirection(0); // not rotated u8g2.drawStr(0, 0, "It Works!"); u8g2.sendBuffer();}This is my new go-to MCU for development. The OLED makes debugging easy and at least there's the one "PRG" button you can watch in your sketch. I've bought more of these via a different listing and it is the same board.Oh, and don't press down REAL HARD on the face of the OLED, like trying to smash it down into another PCB ... if you do it hard enough, you can break the edge of the LCD and wreck the words showing up. :D So now I try to avoid pressing on the OLED itself. These boards are pretty tough. The soldering also isn't that hard - when near the ribbon cable for the display, hold the iron to the outside of the pin and board.Additionally, the PWM on pins 25 and 26 are super easy to set up.// pwm#define SIG_OUT 26double freq = 15.8;const int pwmChannel = 0; // This is not the output pin, that gets attached later!const int resolution = 10; // Resolution 8, 10, 12, 15 -> higher freq = less resolution pinMode(SIG_OUT,OUTPUT); // configure LED PWM functionalitites ledcSetup(pwmChannel, freq, resolution); // attach the channel to the GPIO2 to be controlled ledcAttachPin(SIG_OUT, pwmChannel); // set duty cycle based on 2^10 ledcWrite(pwmChannel,64);
D**R
Excellent little module for the price
Excellent little module for the price. I docked 1 star because it's 32mbit of memory, aka 4Mbyte. Still plenty for most projects. Be aware that the pinouts are not accurate at the moment in the Arduino IDE. Also the unit I received is the version 1 silicon, NOT the version 0. This is good, as there are some hardware bugs with v0.
E**R
Not the board that's listed :(
I needed the ESP32 WiFi board that's listed and shown in the images. What I received is the ESP32 LoRa 32 V2 instead, this will not work for my application. It appears these are mislabeled in the warehouse if I had to guess. Taking full advantage of Amazon's quick and easy returns and will order from a different listing!
C**Y
No manual.
No documentation, link to docs expired, unprofessional to say the least.
I**Y
Nice board, great price, very easy to use.
Pros: This is a very well made board at a great price. I like the inclusion of breadboard pins and the pin-labels that others don't include. It took five minutes to add OLED support (via the U8g2 library) to an existing sketch, and now I get immediate feedback on my project from the top of the SoC itself. The OLED is very readable and ... brilliant!Cons: It doesn't include an external WiFi or Bluetooth antenna connector. Those are almost as easy to add as to configure on a board that includes the connector, so it's not very con at all. The WiFi antenna is mounted beneath the multi-layer circuit board, and that seems to shield the antenna a bit. I measured -55dbm on this board, sitting next to a standalone ESP32 module that reads -50dbm from the same AP. That's as-measured by the chipset, which could vary more than the measured difference, but that's what I saw on my breadboard. It shouldn't be an issue for most projects. It also has a very basic battery management circuit that batteries won't like. It will charge a battery, but not at the proper fixed current, and that means shortened battery life. However, that's standard for all the dev boards that include battery support and nearly all dedicated battery management boards, so not much of a con.This is my favorite development SoC now. It has every feature I commonly use.Four stars v five because this board did not make a sammich when I requested one.
T**S
Too many issues
There are too many issues that need to be resolved with this specific model, and there doesn't seem to be any documentation from the manufacturer to help with it. Simple things like getting a separate OLED screen working are impossible. The orange LED keeps flashing and you can't stop it for some reason.
G**M
Good luck.
I reached out the the company a couple of times and they did their best to reiterate what I've already seen in the comments. No one I've emailed at that company appears to have a working knowledge of this part but they seem to want to be helpful.I do not know if mine is defective or if the mountains of bad information out there are keeping me from getting the OLED to work. The rest of the board appears to be fine, except for an annoying amber light which never stops blinking and draining battery. I already threw away the packaging so I'm eating the 22 bucks. I still would like to get one of these working but only if I can find a WORKING part and a readable and accurate guide to this device.Anyone out there have a working Arduino sketch for this thing? [email protected] Much appreciated.If you aren't familiar with Github or how to "Fork" or "pull" from there, take some time to study that first. The vendor doesn't supply libraries, software or drivers for this part, rather deferring you to Github and the tiny community of enlightened ones who have figured this thing out.. Also, the library installation for Arduino is not straight forward. You have to have Python installed so you can install some other chunks from the Windows (DOS) command line. I have used Arduino for years, and this was bay far the most convoluted and difficult library installation I've seen.
Trustpilot
5 days ago
2 weeks ago