Description
🚀 Upgrade your gear, own the speed, and never look back!
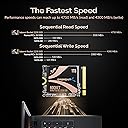
- BLAZING GEN 4 X 4 PERFORMANCE - Experience lightning-fast 5000 MB/s read and 4300 MB/s write speeds that crush load times and boost productivity.
- COOL EFFICIENT DRAM LESS DESIGN - Host Memory Buffer tech slashes power draw and heat, keeping your device chill during marathon gaming or work sessions.
- RETAIL GRADE RELIABILITY SUPPORT - Brand-new, warranty-backed SSD with included Acronis True Image software for seamless data migration—ditch risky OEM drives.
- MASSIVE 1 TB STORAGE IN TINY PACKAGE - Store your entire game library, apps, and files without compromise, all in a drive that weighs just 20 grams.
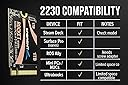
- PERFECT FIT FOR PORTABLE POWERHOUSES - Tailored for Steam Deck, Surface Pro 8/9, and ROG Ally with a sleek 2230 form factor that slides right in—no adapters needed.
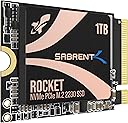
The SABRENT Rocket 2230 1TB NVMe SSD is a cutting-edge PCIe Gen4 x4 internal drive designed specifically for compact devices like Steam Deck, Surface Pro 8/9, and ROG Ally. Delivering up to 5000 MB/s read speeds and 4300 MB/s write speeds with 800K IOPS, it offers desktop-class responsiveness in a tiny 2230 form factor. Its DRAM-less Host Memory Buffer architecture ensures efficient, cool operation ideal for handheld gaming and ultrabooks. This retail-packaged SSD includes Acronis True Image cloning software and is backed by a warranty, making it a reliable, high-performance upgrade for space-limited systems.
![SABRENT Rocket 2230 1TB NVMe SSD – PCIe Gen4 M.2 2230 Internal SSD for Steam Deck, Surface Pro, ROG Ally – Up to 5000 MB/s Gen4 x4 Speed, DRAM-Less HMB Design [SB-2130-1TB]](https://m.media-amazon.com/images/I/71BVLQNOlmL._AC_SL3840_.jpg)