Desertcart purchases this item on your behalf and handles shipping, customs, and support to Croatia.
⚡ Power Your Ride, Own the Course — Upgrade to LOSSIGY Lithium!
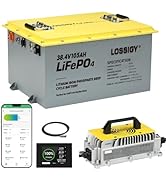
The LOSSIGY 48V 100Ah Lithium Battery Golf Cart Conversion Kit features premium automotive-grade LiFePO4 cells, delivering up to 1000A peak current and 4000+ charge cycles for a decade of reliable power. Its IP65 waterproof rating and smart BMS protect against extreme conditions and electrical faults. Designed for easy installation, it includes a charger and Bluetooth monitor for real-time battery management, transforming your golf cart with lighter weight, faster acceleration, and longer-lasting energy.


| ASIN | B0DK4NLV24 |
| Automotive Fit Type | Universal Fit |
| Battery Capacity | 100 amp_hours |
| Battery Cell Composition | Lithium Ion |
| Battery Type | Lithium Ion |
| Best Sellers Rank | #18,945 in Sports & Outdoors ( See Top 100 in Sports & Outdoors ) #100 in Golf Cart Accessories |
| Brand | LOSSIGY |
| Brand Name | LOSSIGY |
| Compatible with Vehicle Type | Golf Cart, Passenger Car, RV, Truck |
| Customer Reviews | 4.6 out of 5 stars 406 Reviews |
| Included Components | Charger, Monitor |
| Item Dimensions D x W x H | 10.59"D x 20.47"W x 8.66"H |
| Item Weight | 82.9 pounds |
| Manufacturer | LOSSIGY |
| Manufacturer Part Number | 48V100Ah Pro+Charger |
| Manufacturer Warranty Description | 5 Year |
| Model Number | LAF48100 |
| Number of Items | 1 |
| Size | 48V100AH-Charger&Monitor |
| Terminal | Screw Terminal |
| UPC | 787942453711 |
| Vehicle Service Type | Golf Cart, Passenger Car, RV, Truck |
| Voltage | 48 volts_of_direct_current |
D**N
Excellent Upgrade for My Icon i60L — Powerful, Lightweight, and Smart
I recently installed the LOSSIGY 48V 150Ah Lithium Golf Cart Battery in my Icon i60L, along with the included display and 18A LiFePO4 charger. The entire project took about 2.5 hours with help from my two sons. That included removing the old AGM batteries, cutting and painting a treated plywood board, and installing the new battery, charger, and existing 48V to 12V converter. Installation Notes • Battery fit perfectly in the Icon i60L with no clearance issues. • We positioned the battery so that we could use the existing battery cables. • We replaced the original battery tray with treated plywood mounted to the metal frame beneath the tray for a clean, secure, and easy to work with surface. • Be cautious when drilling as there are suspension parts and brake lines underneath. Measure carefully before committing. • Modified the existing charger connector to accept a standard female receptacle for easy plug-in. NIGHT and DAY Performance Upgrade This battery transformed my Icon i60L from sluggish to sporty. Before the upgrade, the cart ran on 8x 6V AGM batteries. Fully charged, it would get up to 27 MPH downhill and struggle to reach 18 MPH uphill with a full load. Acceleration was quick for the first couple of minutes and then would get extremely sluggish , and uphill climbs felt like a slow grind (faster to walk). To make matters worse, the AGM batteries only lasted a little over two years, even with light use. Now it’s a whole different machine. • With the LOSSIGY lithium battery, the cart rockets to 30+ MPH downhill and powers up to 25+ MPH uphill in seconds. The torque and responsiveness are instantly noticeable. • No more waiting for the cart to “wake up” on inclines. Acceleration is smooth and immediate. • The nearly 400-pound weight reduction from removing the AGM batteries makes the cart feel lighter, more agile, and far more enjoyable to drive. • Whether cruising flat roads or tackling hills with passengers, the cart maintains consistent speed and power without hesitation. This upgrade didn’t just improve performance, it redefined how the cart handles. It’s faster, stronger, and far more efficient. If you’re looking for a serious performance boost, this battery delivers. Display & Monitoring: • Display works well but isn’t weatherproof. I plan to 3D print a case to mount it safely under the battery compartment. • The Bluetooth app is excellent—shows real-time power consumption, battery health, charge cycles, and remaining battery life. • Much more reliable than the Icon dash, which tends to show 100% even when the app reports 90%. Charging Experience: • Battery arrived at ~50% charge and took about 4 hours to reach full using the included 18A charger. • Charger is loud and gets warm, but that’s expected and doesn’t affect performance. • Love the battery switch—safe wiring with no sparks. Battery automatically powers on when connected to the charger. I was originally planning to replace my AGM batteries with new lead acid ones, but this lithium upgrade was more affordable, more powerful, and far superior in every way. If you’re considering an upgrade—go with LiFePO4. LOSSIGY delivers a fantastic product that’s well worth the investment.
A**N
Outstanding Battery- Worth Every penny
I can't say enough good things about this battery. We installed it in our golf cart, and a single battery replaced eight traditional water-cell batteries. Not only did it significantly reduce the weight of the golf cart, but it also saved me at least $1,000 compared to replacing all the old batteries. The battery charges quickly and easily provides 20 miles or more on a single charge. The performance has exceeded my expectations, and the convenience of having just one battery instead of maintaining multiple water-cell batteries is a huge bonus. Absolutely worth the purchase. I highly recommend it.
P**.
Incredible Upgrade That Completely Transformed My Golf Cart!
Incredible Upgrade That Completely Transformed My Golf Cart! I purchased the LOSSIGY 48V Lithium Golf Cart Battery Conversion Kit, and I couldn't be happier with the results. I'm not a mechanic by any means—just someone with basic DIY skills—and I was able to complete the entire installation in about an hour. The instructions were clear, all of the necessary parts were included, and the process was much easier than I expected. One thing I really appreciated was that the battery arrived already about half charged, so I was able to get everything installed and test it right away. Wiring everything into the golf cart was straightforward, even for someone with very little mechanical experience. The performance improvement was immediate. After replacing my old six 8V lead-acid batteries with this lithium conversion kit, the golf cart accelerates faster, runs more efficiently, and feels much more responsive. The weight savings and increased efficiency have made a noticeable difference in the overall driving experience. Pros: Installation took about an hour with basic DIY skills Clear, easy-to-follow instructions All required parts are included in the kit Battery arrived partially charged and ready to install Wiring was simple, even for a beginner Significant improvement in speed and overall performance Much more efficient than the old lead-acid battery setup Excellent value for a complete conversion kit Cons: Initial cost is higher than replacing traditional lead-acid batteries Double-check your golf cart's compatibility before purchasing Final Verdict: The LOSSIGY 48V Lithium Golf Cart Battery Conversion Kit exceeded all of my expectations. Even with very limited mechanical experience, I had it installed in under an hour, and the improvement in performance was incredible. My golf cart is faster, more efficient, and much more enjoyable to drive than it ever was with the old battery setup. If you're considering upgrading to lithium, this kit makes the process simple and delivers outstanding results. Highly recommended!
M**K
Highly recommend upgrading to this battery from lead acid. Great service too.
Easy to install. Much lighter than 6 lead acid batteries, I was able to install by myself very easily. Hold a charge longer. Recharges quicker. Costs the same as six 8 volt lead acid batteries. What else can I say. I have been using this battery in my golf cart for the past 6 months and am very pleased with how much capacity this battery has. Normally I have to charge my cart every night on the weekends to keep up. This one I normally charge it when I put it away on Sunday and it's ready the next morning for the week. I did have the charger fail after 6 months causing the battery to go into protect mode. With a message to Lossigy and some troubleshooting with them it was replaced at no cost. Very friendly service and help me troubleshoot to find out what was wrong easily. I Would definitely recommend this to anyone looking to replace their golf cart batteries. Can't say if it will last 10 years, but if it does that's twice as long as the lead acid batteries I have been using, I did the best name brand in lead acid golf cart batteries and replaced them every 4-5 years. With the reduced number of charges needed I can see it lasting a long time. I have also noticed that unlike the lead acid batteries, the run rate is consistent from the initial charge to the point of needing to be charged, like the BMS is always outputting the same voltage across the charge. I like this, but it does cause the speed to be a little less at the beginning of the charge vs being fast at first and slowing down as the battery is drained.
M**.
Excellent Battery and Especially when Purchased on Sale!
I installed this battery in a 2014 Club Car Precedent that came with six (6) eight (8) volt lead-acid batteries that were beyond resurrection; installation was super easy. I watched a couple of videos and removing the stock charging system cables was simple and exactly what I expected. The battery arrived with 52% charge, so I charged it to 100% before installation. I have approximately 8-10 miles on the battery and the Bluetooth app on my phone indicates I am still at 81% charge. My Club Car is limited to 12 miles per hour (motor upgrade coming soon), so the battery did not provide any increase in speed, but the weight reduction, minimal maintenance, and increased lifecycle (estimated 4000 cycles) is more than enough reasons to purchase this battery. I purchased this battery on sale for $648, before tax, which was an amazing price! I would definitely purchase again!
R**K
Good value and quality
2 day review. This battery so far has been exactly as described. Excellent build quality. Very compact size. I was able to install in my club car precedent golf cart with minimal modification. A very good value. The only issue I had was for the included charger. The charging cable that connects to the battery came with two positive quick connects instead of a positive and a negative. I was able to modify this to work for me.
M**.
Lot of Work but worth it !!
It was time to replace our Star EV 48V golf cart batteries AGAIN (eight (8) 6V batteries). Versus another set of lead acid I decided to look at Lithium now that costs have really come down. After a lot of research decided to purchase the LOSSIGY 100Ah kit. I knew it would be a job to make the swap, watched a LOT of videos that helped immensely with the "how too" and also with items I didn't think about. Along with the battery kit I purchased a six (6) slot fuse block, 48V to 12V reducer, 15amp 110V plug adapter and battery cable extenders. Ended up using everything except the cable extenders - based on how I mounted the battery the cables all reached. First about the kit - the pictures are WRONG. You DO NOT get a ratchet strap but do get two (2) about 18" long battery cables. I used one to go from shunt block for negative side for the remote monitor panel (more on that below). Didn't use the 2nd one. The remote monitor is connected via a long USB cable. The cable goes INTO the side of the monitor. VERY POOR design as it make flat mounting it almost impossible. It was as big a job as I expected. Total replacement time was close to 6 hours. Took pictures of how existing cables were run (including 12V accessories that were using only two (2) of the 6V batteries to give 12V). Removed all the batteries and connecting cables, tie down holds for outer 2 batteries and pulled 12V wires off to the side. This left the center area (held six batteries) and 2 side areas (held 1 battery each) empty. As I saw in some of the videos I had to build of the bottom to make a flush space to mount battery, charger, fuse block and voltage reducer. I custom cut marine grade pressure treated 2"x12" boards (left over from a bulkhead project - this is much higher grade wood then general pressure treated) to fit each area. Anchored each board from below with screws and large washer through existing metal bottom. Next I removed the old charger port and replaced with the 15amp 110V port. This went pretty well, the screws were not exactly lined up but was able to make it work. It is very solid and looks great. Beside the actual charger cables there were also 2 very thin wires connected to the back of the original charger port. From research I knew these were safety wires to keep you from driving off with the charger plugged in. What I didn't know is if they needed to be "Open" or "Closed" for the cart to run. I had to wait for the actual battery to be installed and wired to work that issue. Battery was next along with shunt block for monitoring. Battery went into center compartment - plenty of room. Battery is heavy (~88#'s) but overall I shed a net of almost 400#'s of weight!!! Wiring the shunt wasn't hard but ran into two (2) issues. First the battery cable provided would not fit on shunt bolt - the center hole was too small. Poor product selection by LOSSIGY, this should have been checked. I used a step bit and drilled out center just enough to snuggly fit on shunt bolt. I had the same issue with the negative battery cable on the cart. I also drilled this one out to just fit bolt. The other issue was the very small gauge wire used for powering the shunt (from the positive side) - this was not easy to install. Instructions were not detailed enough. The wire is tinned on the end but you had to press a VERY SMALL release to let wire slide in and then let go to lock it in - this was NOT on the instructions. I mounted the shunt in one of the small bays. The positive golf cart load cable reached to battery with no issue. Next mounted the charger (will be nice to not have to lug that old massive beast with us) and ran the cables to the battery and plugged into the new charger port. Super clean look. Connected the remote monitor (to test before running the cable to the dash) and it powered right up. Then download app to test Bluetooth - also worked great. Now it was time to test and I got NOTHING - wouldn't move ! Checked wire after wire, traced everything - couldn't find anything wrong. Tested charger, worked fine. Was more then a bit frustrated... By this time it was way after lunchtime so took a break to eat and think. During lunch started do more research and watching videos and it hit me "The charger port wires!". After lunch ran a temp jumper between the ends and BAM we had movement ! The connection had to be closed to work for this setup. Tested both dash key and tow/run toggle - worked exactly as expected. Turned everyone off and hardwired the lines together and secured out of the way. Secured the battery with eye bolts lagged into bottom boards and short ratchet straps (actually made for jet ski transom holds). Very secure !! Last step was the fuse block and voltage reducer. This turned into the biggest issue. Cleaning up the existing 12V wires, extended as needed, getting fuse block and reducer mounted and wired (mostly) was very straight forward. What wasn't easy was finding a switched 48V line to control the on/off of the reducer. Per online videos a lot of this is commonly done at the dash key switch. Pulled dash apart and no voltage at the actual key - was only a 2 wire setup. After a lot of wire tracing found a very thin wire running to what I determined was a switch line for both the key and tow/run toggle. Was able to use pointed tip of volt meter test lead and there it was a 48V line that went off and on with dash key and tow/run toggle. As mentioned this was a very thin wire (22 gauge at best) - wasn't sure my crimp taps would work. Crimped on tap and ran line back to reducer and hoped for the best. It worked great !!! Cleaned up and secured the wires. Last step was running the USB cable for the dash monitor. Had a good place to put it but wasn't sure cable would reach - it barely did with about 4 inches to spare. Now calibrating it - a GIANT PIA !! From the video's I watched I knew this was important. The instructions are absolutely horrible. Read them a full dozen times and still couldn't follow them. After a lot of looking finally found a video for this exact model with clear steps on how to set high and low voltage. Because of horrible USB port location its not mounted yet - it is just sitting in a small dash cubby that was always useless before. The next day I did add a 90degree USB adapter that helped some but its still not really mounted. Will have to be later. Finally done - everything mounted and ready for a test run. Battery was only at 50% so had to make it quick. Tested was with 3 adults. WOW ! Cart is much faster at start (both forward and reverse) - will take some getting used too. Topped out at about 24MPH during short test run. At least 3 full MPH faster then before. Guessing at least another 1 or 2MPH with only one adult. All in all very happy - took about as much time as I expected. Time will tell on how long we can go between charges and life span of the battery.
L**L
Surprised…
So far, I’m pretty impressed installation process, and performance that I got out of this. I got myself this 48v, and it did not disappoint. Please note you’re probably going to have to look up installation process on YouTube and it is pretty straightforward. I got more acceleration power and goes may be a little bit faster. Before my first charge cycle, I was about at 15% and it’s still performed like it was fully charged. Great product.
Trustpilot
2 weeks ago
3 weeks ago