
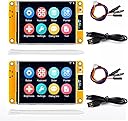


2 Pack ESP32-2432S028R Smart Display 2.8 inch 240X320 TFT with Resistive Touchscreen WiFi+BLE Dual Core ILI9341 Driver ESP32 Development Board for Arduino IoT
Product ID: 685477691
Buy anything from 5,000+ international stores. One checkout price. No surprise fees. Join 2M+ shoppers on Desertcart.
Desertcart purchases this item on your behalf and handles shipping, customs, and support to Croatia.
desertcart.com: 2 Pack ESP32-2432S028R Smart Display 2.8 inch 240X320 TFT with Resistive Touchscreen WiFi+BLE Dual Core ILI9341 Driver ESP32 Development Board for Arduino IoT : Electronics Review: ESPHOME code for this display - Worked fine with ESPHOME after I figured out the proper settings. To help anyone here is my base code that I use to get it working; esphome: name: touch-display friendly_name: Touch Display esp32: board: esp32dev framework: type: arduino logger: api: ota: platform: esphome wifi: >> # Two SPI buses: one for display, one for touchscreen spi: - id: spi_disp clk_pin: GPIO14 mosi_pin: GPIO13 miso_pin: GPIO12 - id: spi_touch clk_pin: GPIO25 mosi_pin: GPIO32 miso_pin: GPIO39 output: - platform: ledc pin: GPIO21 id: gpio_21_backlight_pwm light: - platform: monochromatic output: gpio_21_backlight_pwm name: "Display Backlight" id: back_light default_transition_length: 1s restore_mode: ALWAYS_ON display: - platform: ili9xxx model: ILI9341 spi_id: spi_disp invert_colors: false cs_pin: GPIO15 dc_pin: GPIO2 reset_pin: GPIO4 rotation: 270 update_interval: 3s color_palette: 8BIT lambda: |- auto color_bg = Color(0, 0, 0); auto color_header_bg = Color(0, 50, 100); auto color_white = Color(255, 255, 255); auto color_gray = Color(150, 150, 150); auto color_accent = Color(100, 200, 255); auto color_red = Color(255, 0, 0); auto color_green = Color(0, 255, 0); auto color_orange = Color(255, 100, 0); >> # -- Touchscreen uses the SECOND SPI bus -- touchscreen: - platform: xpt2046 spi_id: spi_touch cs_pin: GPIO33 interrupt_pin: GPIO36 update_interval: 50ms calibration: x_min: 200 x_max: 3900 y_min: 240 y_max: 3860 on_touch: then: - logger.log: format: "Touch at x=%d, y=%d" args: - 'touch.x' - 'touch.y' >> time: - platform: homeassistant id: esptime font: - file: "gfonts://Roboto" id: font_tiny size: 10 - file: "gfonts://Roboto" id: font_small size: 14 - file: "gfonts://Roboto" id: font_medium size: 18 - file: "gfonts://Roboto" id: font_large size: 28 Review: Working, but check and inspect for damage on arrival. - Boards arrived and appear to work normally. Plastic shipping boxes were both crushed on one corner but boards appear to be working OK. Metal shield over the processor was dented on one board. Demos on both boards work but it would be nice if these makers, importers or whomever sells these would include some documentation along with the code or .bin for the demo. Some of it is available but you'll need to look all over the .net for the info just to find bits and pieces to try to assemble into a coherent doc. Bottom line, these do work. Pic attached.


| ASIN | B0DHJXYJY9 |
| Best Sellers Rank | #4,534 in Single Board Computers (Computers & Accessories) |
| Brand | Stemedu |
| Built-In Media | ESP32 Development Board |
| Compatible Devices | Camera |
| Connectivity Technology | Wi-Fi 802.11b/g/n/e/i, Bluetooth 4.2BR/EDR and BLE standard, UART, SPI, I2C, PWM |
| Customer Reviews | 4.2 out of 5 stars 8 Reviews |
| Included Components | ESP32 Development Board |
| Item Dimensions L x W x H | 3.55"L x 2.36"W x 0.79"H |
| Manufacturer | Stemedu |
| Memory Storage Capacity | 32 MB |
| Model Name | ST5815X2 |
| Operating System | FreeRTOS |
| Processor Count | 2 |
| RAM Memory Installed | 520 KB |
| RAM Memory Technology | SRAM |
| Ram Memory Installed Size | 520 KB |
| Total Usb Ports | 1 |
| Wireless Compability | 802.11bgn, Bluetooth |
G**.
ESPHOME code for this display
Worked fine with ESPHOME after I figured out the proper settings. To help anyone here is my base code that I use to get it working; esphome: name: touch-display friendly_name: Touch Display esp32: board: esp32dev framework: type: arduino logger: api: ota: platform: esphome wifi: <<< your wifi config >>> # Two SPI buses: one for display, one for touchscreen spi: - id: spi_disp clk_pin: GPIO14 mosi_pin: GPIO13 miso_pin: GPIO12 - id: spi_touch clk_pin: GPIO25 mosi_pin: GPIO32 miso_pin: GPIO39 output: - platform: ledc pin: GPIO21 id: gpio_21_backlight_pwm light: - platform: monochromatic output: gpio_21_backlight_pwm name: "Display Backlight" id: back_light default_transition_length: 1s restore_mode: ALWAYS_ON display: - platform: ili9xxx model: ILI9341 spi_id: spi_disp invert_colors: false cs_pin: GPIO15 dc_pin: GPIO2 reset_pin: GPIO4 rotation: 270 update_interval: 3s color_palette: 8BIT lambda: |- auto color_bg = Color(0, 0, 0); auto color_header_bg = Color(0, 50, 100); auto color_white = Color(255, 255, 255); auto color_gray = Color(150, 150, 150); auto color_accent = Color(100, 200, 255); auto color_red = Color(255, 0, 0); auto color_green = Color(0, 255, 0); auto color_orange = Color(255, 100, 0); <<< you LVGL display code... >>> # -- Touchscreen uses the SECOND SPI bus -- touchscreen: - platform: xpt2046 spi_id: spi_touch cs_pin: GPIO33 interrupt_pin: GPIO36 update_interval: 50ms calibration: x_min: 200 x_max: 3900 y_min: 240 y_max: 3860 on_touch: then: - logger.log: format: "Touch at x=%d, y=%d" args: - 'touch.x' - 'touch.y' <<< debug output above to test touch. Add you touch action code here... >>> time: - platform: homeassistant id: esptime font: - file: "gfonts://Roboto" id: font_tiny size: 10 - file: "gfonts://Roboto" id: font_small size: 14 - file: "gfonts://Roboto" id: font_medium size: 18 - file: "gfonts://Roboto" id: font_large size: 28
T**M
Working, but check and inspect for damage on arrival.
Boards arrived and appear to work normally. Plastic shipping boxes were both crushed on one corner but boards appear to be working OK. Metal shield over the processor was dented on one board. Demos on both boards work but it would be nice if these makers, importers or whomever sells these would include some documentation along with the code or .bin for the demo. Some of it is available but you'll need to look all over the .net for the info just to find bits and pieces to try to assemble into a coherent doc. Bottom line, these do work. Pic attached.
H**D
Better vidio or instructions
Product looks good but have watched newmerous videos and still haven't figured out how to work it
D**Y
Cool little display/ controller
These are really cool. It took me a bit to get things figured out (maybe just me) and it’s still a work in progress. The instructions included are non-existent. But fortunately there are several good tutorials and info sources online. Best of luck to you all. Fun just improving your knowledge.
Trustpilot
2 months ago
4 days ago