Desertcart purchases this item on your behalf and handles shipping, customs, and support to Croatia.
🔥 Seal the heat, lock the comfort — upgrade your stove game now!
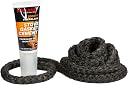
The Rutland Wood Stove Gasket Replacement Kit features a 5/16" x 7' graphite-impregnated rope gasket and a 1.35 oz tube of high-temp fiberglass adhesive, designed to resist abrasion, creosote buildup, and temperatures up to 1000ºF. Made in the USA, this kit offers a reliable, easy-to-install solution for maintaining airtight wood stove doors, ensuring optimal heating efficiency and durability.


| ASIN | B000UFR7T2 |
| Best Sellers Rank | #182,077 in Home & Kitchen ( See Top 100 in Home & Kitchen ) #27 in Fireplace Replacement Parts |
| Brand | RUTLAND PRODUCTS |
| Brand Name | RUTLAND PRODUCTS |
| Color | Black |
| Customer Reviews | 4.5 out of 5 stars 3,386 Reviews |
| Global Trade Identification Number | 00022624001959 |
| Included Components | 1 |
| Item Type Name | Rutland Wood Stove Gasket Replacement Kit, Graphite Impregnated Gasket & Adhesive, 5/16" X7' Rope |
| Manufacturer | Rutland Products |
| Material | Cement |
| Material Type | Cement |
| Model | 95A-6 |
| Number of Items | 1 |
| Part Number | 95A-6 |
| UPC | 022624001959 |
| Unit Count | 1 Count |
| Warranty Description | This product will be free from defects in material and manufacture for a period of eighteen (18) months from date of manufacture. Rutland fire clay company makes no other warranties including, but not limited to, any implied warranty of merchantability or fitness for a particular purpose. User is responsible for determining whether the rutland fire clay company product is fit for a particular purp… |
A**R
Simple to install
Talk about timing - I just installed this today. As I was waiting for the glue to dry, I got this request for a review. Overall - no complaints with the product. This was my first time replacing the Rope Gasket, so let me give my fellow newbies some advise. ** Wear Latex Painters gloves !!! ** 1). Don't do the work in your Den. The glue is messy and hard, if not impossible, to remove from carpet once it dries (I had a cloth down, but you still get glue on your fingers and if you touch something - DEAD MAN! 2). In my case: Glue is Black, Stove is Black, Rope is Black - which can make it difficult to spot glue spills/leaks to be cleaned-up, so work in a VERY well lit area. 3). Get yourself a 2" wire brush wheel for your cordless drill. It makes cleaning out the channel on the door SO MUCH easier. Use a small flat-headed screw driver for those hard-to-get spots. 4). Another messy note - when I first went to apply the Glue, there was a partially dried piece of glue in the tip that I didn't know about. Nothing was coming out, so I squeezed harder. Then suddenly a glob of glue burst out. Luckily I was pointed at the channel, so I just used my finger to spread the glob of glue down the channel. Had I been pointing at the glass on the door - ugh. (although the glue does cleanup fairly well with a damp paper-towel and soap.) 5). The instructions say to lay a bead of glue in the channel just enough to hold the rope. Well, how the hell much is that??? Anyway - expect glue to ooze out as you lay the rope in the channel. Use a damp towel to clean-up as you go. Frankly, it's hard NOT to get glue all over the place on the door and all over the rope. My guess is that a small bead of glue - about the diameter of 2 coffee stirrers(??) should be fine. I did about twice that and had glue oozing out the sides of the rope as I was laying it in place. My concern now is that once it dries, my rope (in sections) will be hard and not flexible enough to seal properly - oh well, time will tell and practice makes perfect. 6). I used a very sharp box-cutter to cut the rope to size. Very sharp scissors should work fine too. Other than that, the instructions were very clear and simple. My only concern is that this rope seems a bit smaller in diameter than the factory rope I'm replacing (I have a QuadraFire 41i-ACC Wood Stove). The parts section of my manual doesn't list the rope diameter, so I looked up the part# and found a site that listed it as 5/8". The factory rope looks to be thicker - maybe 3/4(??)". Hopefully the 1/8" difference won't be an issue - we'll see. Once the glue dries, the instructions say to light a fire slowly to 500F to fully cure the glue. I'll try to report back on how well the door seals at that point.
K**.
Stick to the name brand!
The only brand I will purchase from now on. I went with a cheaper off brand from a different seller - it was garbage. This fit perfectly, didn't diseningrate like the other brand and there are no gaps. Glue was effective and not an issue at all. Easy to use - not smell.
J**B
Requires Time and Patience to Apply
I used this kit to repair a 7 year old Pacific Energy Alderlea T6 door seal. The instructions call for ensuring that the channel in which the rope seal goes is down to bare metal. Not sure why that should be necessary, as the original door had paint in the channel. Nonetheless I used a wire wheel on a drill to remove all debris from the channel and then I used 60 grit hand sandpaper to remove a bit of the paint. Mind you, this is wood stove paint on a very irregular cast iron surface - you are not getting down to bare metal everywhere unless you break out the sand blaster. I was able to get about 10% or more of the channel down to bare metal using hand sanding. The sealant supplied is not thick like silicone - it is equivalent to a thin artist paint you might buy in a tube. It is somewhat difficult to apply, as you have to squeeze the tube as you go. In any event, after filling the channel, I used my finger to smooth the adhesive so that it filled the channel evenly, without any excess protruding. I did wet the rope prior to applying it to the door, but I'm not sure if that made any difference. Adding the rope was simple, starting midway up the channel on the hinge side. Type A sorts will dislike the joint, as the ends of the rope fray immediately upon cutting. The joint, however, came out acceptable. I advise not drawing the rope tight as you insert it in the channel. Instead, make sure that the rope is loose as you finger-press it into the channel. If not, you run the risk of cutting it short and having the rope pull out in the corners. Make sure that you take your time in the corners, as the rope tends to want to pull out toward the middle. After complete installation, I finger pressed all the way around. I then cleaned up any excess - there was not much excess to clean up, but I can imagine it would be a mess if you overfilled the channel. I then closed the door to ensure it would close and fit well. It did. I then opened the door and gave it an hour, per instructions. I then closed the door. I had started a fire 20 minutes earlier, with the door open (MUST WATCH STOVE FOR SAFETY!!!) so that it would be hot. I closed the door. Problem. Some small amount of adhesive had gotten on the 'clean' side of the rope and had stuck to the stove. Darn. My fault. The rope seal pulled off a little in that one area. I opened the door, let cool, cleaned the channel in the affected area, reapplied glue, set by hand, shut door, open, let cure. Result is good. Seal is in place and is holding and is sealing. I gave this kit 4 stars because the directions could have been slightly more detailed. I will update this if the seal does not last at least a couple of years. For those having problems, I'd say that preparation is critical for this product - if the channel is not very clean with at least some bare metal, this may fail. Also, the sealant needs to penetrate the rope - wet it, as suggested, and use finger pressure to gently push the rope in all the way around after installation.
T**E
Excellent quality and long lasting gaskets
I have used Rutland brand gaskets on Wood stoves, Pellet Stoves and Big Green Egg cookers and I do not bother with other brands. Great price for the superior quality. The key to using any of the Rutland gaskets is to make sure you do not pull the gasket tight as you are installing it in the groove. The way these are made with the weave, you want to push the gasket back from where you're feeding it from. Kind of like bunching it in on itself. That way when you are done installing it, the door has a firm feel to it when latching it. You're not bunching it real tight and you will see when installing it that the gasket keeps its diameter of the size indicated on the package. This style of round 3/8" gasket worked perfect for my Harman Pellet stove door. I did not have any issues with the high temp silicone like some other users have mentioned. I usually put about a 1/4" bead of this all along the groove on wood or pellet stove doors. You want to make sure the surface is down to bare metal. This is easily done with a drill motor and small wire wheel.
T**S
perfect for my landmann smoker
The gasket tape was just the right material for my landmann smoker. I bought three packs but used two packs because I also gasketed the water tray door and the chip door. The 5/8" X 1/8" size was exactly what I wanted. However I did not use the cement tube that came with the tape because previous reviews said they were not good. I bought and used the permatex gasket adhesive instead. Installation was so easy. No mess at all and the curing time for the adhesive of one hour was more than enough to complete my work without any hurrying at all. After two days, I fired it for smoking brined mackerel for 3 hours today. There was no leak at all in the main smoker compartment. A little leak came out of the water tray and chip tray compartments but I think I can fix that too by added some more permatex. Smoked mackerel came out just right and I was real happy with it. Glad I picked the tape type instead of the rope because it laid flat along the edges of the landmann smoker for a perfect fit. Would gladly recommend the product. Time will tell though how long it will last but right now it looked good. p.s. Word of advise though. Should mention that I have to change the 2 magnetic door latches on my Landmann 3895 smoker with mechanical latches otherwise adding 1/8" thick gaskets around the door edges will not work because the magnetic latches will not catch, regardless of what brand of gasket you use. Once you've made the upgrade like I did, then and only then will gasketing work. Sorry but I have to mention this.
J**A
Great deal
Exactly what I needed, perfect fit, easy to install, everything was included
Y**U
Perfect for Lopi/Xtraordinair - double check your current gasket!!
The door gasket to our woodburning insert (Fireplace Xtraordinaire by Lopi) had worn out so we were getting all sorts of air leakage - makes it really hard to control your burn. This was super easy to install. One thing I failed to do was to examine the length of the existing door gaskets. I thought the 2 doors used the same amount of gasket, so I cut it in half. Nope! One of the doors has gasket only on 3 sides while the door I was replacing needed gasket on 4 sides. I was able to add a section to the gasket - not ideal but it doesn't seem to leak at all.
P**X
Nice Gasket, Hard to use adhesive/glue
I bought to to use on a Master forge 2 door smoker, one 6' kit is not enough and you should get two kits. The gasket material looked perfect and should make a great seal and it being black made it even nicer, the hang up is the adhesive/glue. The directions say to make a 1/8 or 1/4 bead with this glue from the tube, but its' way too thick, much thicker than toothpaste more like semi-dried toothpaste. I ended up cutting the top off just to spoon the glue out, this made its application very messy and uneven. Also a big down side with the mess of glue being everywhere was curing, it needed to be done with heat. If I was able to get this small bead this would not have been any issue but since I had to smear it on and combined with the pressure needed to close the door the glue went everywhere and the heat curing almost sealed my door closed. After a broke the seal and chipped of the excess cured glue I was left with a hard gasket with no flexibility. Now the first time I used the smoker the gasket got stuck on the frame and pulled its self off the door. The heat softened the bond, so much for curing. When I do this again I'll buy the gasket from this retailer and buy some other type of adhesive, one that does not require heat to cure the glue. This same company offers the air dry glue but so do others. BTW I did try 3 other tubes and all where very thick and required me to cut off the top to use. The top half of the smoker gasket is working but is still a hard rope but the bottom will require me to remove the gasket and find another type to use. This idea of adding a gasket to the MF smoker is worth the effort in looking for the correct one. Even with all the issues my temp is up by 25+ degrees and no smoke leaking from the door anymore.
M**T
Worked great
Good quality glue that doesn’t run.
L**D
Read the instructions on the adhesive CAREFULLY
Easy to fit (just make sure you wear gloves and knead the adhesive tube for 2 minutes to smooth out the lumps and push out the air bubbles) and looks better than the old white asbestos type rope
C**H
Excellent,and glue works fine.
Worked like a charm. Some say the glue doesn't hold,but if you apply the glue and let it set for 15 minutes before putting the rope in and THEN leave it alone to dry overnight you will be golden. Good quality gasket too.
M**N
good quality
Better than the white fiberglass rope, and the adhesive actually works unlike the waterglass that comes with the other. It being black, it blends in with the stove as well so it's not noticed
K**ー
最悪です
開封した後があり、新品ではありませんでした。セメントチューブにいたっては、チューブの袋側が破れており、中身が出てきていました。 Amazonで買い物をしてここまでひどい商品は初めてです。
Trustpilot
1 month ago
2 weeks ago