


Buy anything from 5,000+ international stores. One checkout price. No surprise fees. Join 2M+ shoppers on Desertcart.
Desertcart purchases this item on your behalf and handles shipping, customs, and support to Croatia.
Elaborate craft, good sealing performance, good dust-proof smooth sliding and maximum mute in high-speed operation. 
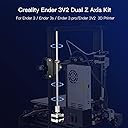
Review: Nuova vita alla mia Ender 3 - Ho acquistato il **Kit di aggiornamento Dual Z ufficiale Creality per Ender 3** con mandrino perché volevo migliorare la stabilità della mia stampante, e devo dire che l’investimento è valso ogni euro. L’installazione non è complicata: con un po’ di pazienza e seguendo i tutorial (anche quelli video che si trovano facilmente) si monta senza grosse difficoltà. La differenza rispetto al singolo asse Z è subito evidente: il movimento è molto più fluido, il piatto rimane stabile anche in stampe più alte e non ci sono più quelle piccole vibrazioni o inclinazioni che rovinavano i layer. Anche la qualità finale dei pezzi è migliorata, soprattutto nei dettagli più fini. Il kit è ben realizzato, con componenti solidi e mandrino preciso, e dà una sensazione di robustezza generale alla macchina. Da quando l’ho installato non ho avuto problemi di disallineamento, e il livellamento resta costante per diverse stampe consecutive. ### Pro - Migliora notevolmente la stabilità dell’asse Z - Qualità di stampa più uniforme, soprattutto nei modelli alti - Componenti solidi e ben rifiniti - Installazione accessibile con un minimo di manualità - Evita ri-livellamenti continui del piatto ### Contro - Serve un po’ di tempo e pazienza per montarlo correttamente - Aggiunge peso e ingombro alla struttura (ma ne vale la pena) In sintesi, il **Dual Z Kit Creality** è uno degli upgrade più utili e concreti per l’Ender 3: migliora la qualità delle stampe e rende la stampante più affidabile. Consigliato a chi vuole fare un salto di livello senza stravolgere la macchina. Review: good and easy to install - Good packaging, installation was easy without issue. I know there are cheaper alternatives, but for which quality ? This one is reliable.


| Brand | Comgrow |
| Colour | Black |
| Compatible Devices | Laptop, Personal Computer, Smartphone |
| Item Weight | 0.83 Kilograms |
| Material | Metal |
| Supported File Format | STL, GCODE |
M**O
Nuova vita alla mia Ender 3
Ho acquistato il **Kit di aggiornamento Dual Z ufficiale Creality per Ender 3** con mandrino perché volevo migliorare la stabilità della mia stampante, e devo dire che l’investimento è valso ogni euro. L’installazione non è complicata: con un po’ di pazienza e seguendo i tutorial (anche quelli video che si trovano facilmente) si monta senza grosse difficoltà. La differenza rispetto al singolo asse Z è subito evidente: il movimento è molto più fluido, il piatto rimane stabile anche in stampe più alte e non ci sono più quelle piccole vibrazioni o inclinazioni che rovinavano i layer. Anche la qualità finale dei pezzi è migliorata, soprattutto nei dettagli più fini. Il kit è ben realizzato, con componenti solidi e mandrino preciso, e dà una sensazione di robustezza generale alla macchina. Da quando l’ho installato non ho avuto problemi di disallineamento, e il livellamento resta costante per diverse stampe consecutive. ### Pro - Migliora notevolmente la stabilità dell’asse Z - Qualità di stampa più uniforme, soprattutto nei modelli alti - Componenti solidi e ben rifiniti - Installazione accessibile con un minimo di manualità - Evita ri-livellamenti continui del piatto ### Contro - Serve un po’ di tempo e pazienza per montarlo correttamente - Aggiunge peso e ingombro alla struttura (ma ne vale la pena) In sintesi, il **Dual Z Kit Creality** è uno degli upgrade più utili e concreti per l’Ender 3: migliora la qualità delle stampe e rende la stampante più affidabile. Consigliato a chi vuole fare un salto di livello senza stravolgere la macchina.
D**T
good and easy to install
Good packaging, installation was easy without issue. I know there are cheaper alternatives, but for which quality ? This one is reliable.
N**A
Perfecto
Perfecto, montado y funcionando. No requiere grandes conocimientos para su montaje, mejora notablemente la impresión y hace que el nivelador de la cama sea más preciso y no requiera demasiada atención.
L**N
Works great with the couple small quirks I mention below.
This kit works great and definitely will tighten up the z axis of your Ender 3. The installation was quite easy once I was able to figure out how it all goes together. There are however a couple things that I have seen about this kit in many You Tube videos, etc that are just dead wrong, and may cause you a lot of frustration if you follow poor advice. The main issue is that machine frames are never perfect, and it is okay- and normal for your z axis to be unlevel by a mm or two in one direction or another. When the installation is finished, Do NOT try to align the z axis to the top bar by wedging some object in there. This is terrible advice. it will create unequal stresses on the steppers and they ultimately will work itself back to balanced forces, causing poor print quality. What you actually want to do to align it is to turn both z screws in opposite directions by hand and you will feel it begin to bind as the forces become uneven. Set it in the middle of the range on both side so that the forces are balanced across both leadscrews/stepper motors. It will stay right there and not move alignment. Forcing it to a different alignment, will only cause it to miss steps at some point and fall back into balanced position during the middle of your print. Once the forces are balanced and you have run the axis up and down a few times, it will stay there. Now tram your bed to this alignment and you will not have to touch it again. I have printed at least a dozen prints since installation using this method and cr-touch bed leveling repeatedly shows .01-.03 max variance without ever adjusting the z axis. Installation Notes: The first thing you should do is remove the original leadscrew and check and adjust the eccentric nuts on both sides of the z axis. The whole axis should roll up and down with no resistance, but be snug enough to stay straight and not wobble. Put something on your printer bed to keep the nozzle from hitting the bed while you are doing this. During the installation process, be certain to loosen the two small hex bolts that hold the brass follower nut to the arm. the nut can move aa few mm in any direction and will alleviate any alignment stress on the leadscrew. Leave all the attachment screws slightly loose, and only tighten the leadscrew into the stepper coupler. Move the z axis to the top to align the stepper/leadscrew to the frame and then snug up the stepper attachments. Bring z back down and make sure it moves smoothly and then snug the brass follower nuts. The top bearings actually slide back and forth to accommodate any forward or backward tilt of the stepper, so your main concern here is right/left alignment.
I**A
Compatible con Ender 3 Pro
Compatible con la Ender 3 Pro, incluye todo lo necesario para montarlo. Una de mis recomendaciones es imprimir dos varillas de almenos 120mm ya que tendras que alinear ambos motores de manera manual ya que este kit no tiene un cinturon de sincronizacion.
Trustpilot
1 month ago
1 month ago