Desertcart purchases this item on your behalf and handles shipping, customs, and support to Croatia.
โก๏ธ Fix it fast, dry like a pro โ donโt let laundry slow you down!
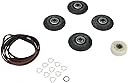
The Whirlpool 4392067 Dryer Repair Kit is a genuine OEM replacement set designed to restore your dryerโs performance. It includes 7 key componentsโbelt, drum rollers, idler pulley, clips, and washerโcompatible with six popular Whirlpool dryer models. Crafted from durable alloy steel and stainless steel, this kit enables a reliable, DIY repair in about 2 hours, saving you time and service costs while extending your dryer's lifespan.


| ASIN | B0053F8D1U |
| Access Location | Top Load |
| Best Sellers Rank | #30,547 in Tools & Home Improvement ( See Top 100 in Tools & Home Improvement ) #273 in Dryer Replacement Parts |
| Brand | Whirlpool |
| Brand Name | Whirlpool |
| Color | Original Version |
| Customer Reviews | 4.6 out of 5 stars 1,963 Reviews |
| Global Trade Identification Number | 00048172056227 |
| Item Part Number | 4392067 |
| Item Type Name | Repair Kit |
| Item Weight | 16 ounces |
| Manufacturer | Whirlpool |
| Manufacturer Part Number | 4392067 |
| Material | Alloy Steel, Plastic, Stainless Steel |
| Material Type | Alloy Steel, Plastic, Stainless Steel |
| Model Name | Whirlpool |
| Model Number | 4392067 |
| UPC | 638876887854 883049545301 048172056227 732066981312 048712026550 |
| Unit Count | 1 Count |
| Warranty Description | 30-day returns / 90-day defective returns. |
J**R
This kit will fix your dryer like new...... took 2 hrs start to finish
Great product! 4-10 difficulty on installation. Has everything I needed to get my dryer up and running.
A**R
Parts perfect, instruction not so much.
All the parts were as described, worked great no problems. The instructions sheet, well, it was for an apartment style dryer and was not even close to the product I have. I would give the sheet a 0 star. You Tube instructions were much better.
P**0
Good product, fit perfectly
We needed a new belt for the dryer. It was squealing loudly. I decided to order this kit because it included new rollers and another round, white part related to the belt assembly and was cheaper than just the belt. I think the problem might have been the round where part. Ours was unevenly worn inside. The rollers were very easy to replace. There are two plastic triangle shaped washers that go on either side of the rollers. The old ones snap off and the new ones snap on. The triangle washers also hold the round white part in place. I have replaced a few other parts on this dryer (element and thermal fuse) so was familiar with taking the front of the dryer off. The belt is tricky to get back on because it is a snug fit, as it should be. My suggestion is to put the belt around the drum at the smaller area at the back, but the drum on the wheels at the back of the dryer, put something under the drum to support it and lift it up about 3 inches, and then reach back to put belt around the two pulleys (one is the new white part). You're doing this by feel, by the way, because you can't see back there at this point. Look at the diagram that came with the dryer. I put the belt on wrong the first time and the dryer wouldn't start, then figured out what I did. After you get the belt on the pulleys, you have to slide the belt about 2 inches over onto the wider part of the drum. I did this by reaching in on the left, lower side of the drum, sliding the belt towards me over the hump, turning the drum a couple inches, sliding the belt, turning the drum, etc until the belt was in the proper place around the entire drum. I didn't think I would be able to do this by myself, but I did. And I'm a 56 yr old mother of 3, married for 36 years, do-it- yourself gal. The belt fit perfectly and my dryer needed the other parts in the kit so that was a good choice. I also replaced the lint screen and the lint cover which was bowed out (because my hubs stuck his big arm down there) and allowed larger stuff to bypass the lint screen. Good product as far as I can tell at this point, relatively easy to install. Make sure to follow the instructions and unplug the dryer!
B**.
Use these genuine parts, it's definitely worth it.
I bought some of the red cheapies here last year and two of the four wheels failed after a little over a year. The after market red wheels never fit quite right and always made noise, then became loose due to cheap metals and poor QC. I bought this genuine Whirlpool kit and noticed the difference immediately. The belt fits correctly, the blue rollers are smooth and solid compared to the crappy red ones. Even the tensioner wheel is a much better quality and smoother than the after market junk. It even comes with 9 of the triangle clips which can cost as much as $6 EACH from when purchased individually. This kit is a great bargain and it's the real thing, not imported junk. I've tried both and believe me, there's a huge difference. Like my Mom used to say, it's the economy of quality. Buy the quality part once instead of having to replace it multiple times. The price for this kit is essentially the same within a few bucks.
B**H
Choose factory parts. The 3rd party parts will fail you.
My dryer started making a horrible squealing sound and I immediately ordered factory service parts. Imagine my surprise when a day after placing the order, the item shows up on my doorstep. While I can only curse the people who designed this dryer (obvious cheap engineering, construction, parts, and it was a chore to disassemble), at least the parts were not expensive. The parts mostly looked like the ones I removed, except for the triangular clips, which appeared to be lower quality, but as they only serve to hold the parts on, I'm not too concerned. When removing the clips, you can choose to use a small screwdriver to remove them, potentially saving them for spares, or just cut them off like I did, saving yourself a ton of time and frustration. The plastic pulley was narrower than the original, but worked fine. When removing the wheels and pulley, be sure to inspect the spindles, as they are NOT lubricated and will show wear. If they appear to be scored, I recommend running your fingernail across the surface and replacing if it's not smooth (the spindles should hopefully be smooth and have a consistent finish all the way around). I lubricated the spindles with a thin coat of grease and reinstalled all of the parts. Some choose to use oil, but that will not last very long and require frequent reapplication. The new parts function well and the dryer is quiet again! I can't thank Cashwell appliance for having the parts available for a great price and their fast shipping. They made choosing factory replacement parts a no brainer decision.
R**O
Worked for Whirlpool Duet purchased in 2003. (Note: NOT and OEM part)
If you ever want to feel lucky to be alive, open up your dryer. About a year ago, the heater coil burned out on our Duet dryer (purchased in 2003). When we opened it up, we noticed a lot of lint on the inside. There was no question about why the heater coil burned out. Anyway, we vacuumed out the interior and got as much of the lint as we could. We also did a thorough cleaning of the dryer vent. It had been about a decade since it was cleaned out. Again, no question as to why the heater coil burned out. I won't go into why it took us so long to clean out the dryer vent. Lets just said we got bad info. That was the first time we realized we were lucky that our house did not go up in flames and kill us all. It's also the reason we don't start the dryer before going to bed or right before we leave the house. Anyway, fast forward to last weekend. My son came to me and said the dryer won't start. I thought maybe the breaker flipped. Nope. Display was on. When you hit start, it would click, beep, and then nothing. No tumbling. So my husband decided to open it up and found that the belt was broken. We ordered the full kit instead of just the belt. The dryer is old, so it likely needed a tuneup. At this point, we did not see the entire inside of the dryer. When the part came in, and my husband and I spent an hour and a half working on the dryer. About half of that time was spent vacuuming every crevice of the inside of the dryer. When we took out the drum, we realized how much more lint there was in there that we did not see before. My husband pulled some off the heater coil housing that was burnt. That is the second time I felt lucky to be alive. The original rollers were not in bad shape. The clips holding them in place were difficult to get off, so those were not weak. The original rollers were not as grippy (is that a word?) as the new ones. We went ahead and replaced those. We probably could have gotten done sooner but we wanted to get as much lint out as possible. We did clean out the dryer vent too, but it wasn't to bad. It fixed our issue. Aside from the vacuuming, the most difficult part was wrapping the belt around the gears. It's not that it was tight or anything. It's that you had to make sure they were wound around the gears correctly. The drum blocks your view so you have to feel around and hope you are doing it right. You can test it by turning the drum by hand to make sure it's winding around correctly and that there are no twists in the belt.
M**Y
Fixed My Squealing Dryer
This dryer repair kit came with everything I needed to fix my 8 year old squealing Maytag Bravos XL dryer. Check out the video on YouTube: Maytag Bravos Annoying Dryer Squeal Diagnosis and Repair by Bearded Appliance Repair. It is excellent and will take you step by step through the process, which is actually quite easy. In my case, the idler pulley would barely turn. The factory grease that was on the shaft, had hardened and was gummed up, so I had to scrape it off and sand the shaft, as recommend by Bearded Appliance Repair Man, so that it was nice and smooth. I did not put any lubricant back on the shaftsโthe video did not recommend it. Iโm pretty sure that lint buildup in the lubricant is what caused the failure of the pulley. The rollers did not appear to have any lube on them. Lube is a lint magnet, so use with caution before deciding whether or not to use it. I am assuming the reason these rollers/pulley donโt have bearings, is because theyโd get gunked up with lint and fail prematurely. Thankfully the drum rollers on my machine were all rotating smoothly, but I replaced them anyways with the new ones. My Bravos has 5 rollers, and this kit only came with 4, so I swapped out one of the lesser worn ones. Even though the kit came with a belt, it was not the right size for my machine. My belt looked fine, so I was not concerned with replacing it at this time. Additionally, there is another identical kit on Amazon that cost a few bucks more. Not sure whyโthis kit is the exact same thing and cost about seven dollars less. Save yourself some money. Get this kit, check out the video and do it yourself!
M**E
Worked great and belt fit perfect on my Whirlpool Duet dryer
Like all of these dryers at some point, my tensioner pulley seized and was squealing like a banshee. If yours is making this noise, I would recommend not running the dryer until you get it replaced. If you stop the dryer right away, the job is much easier. If you don't, the pulley can seize onto the shaft in which case you may need to buy the tensioner arm as well that the pulley mounts on. And you will likely break the belt. All that aside, the job was pretty easy with some youtube help. I am so glad I did this job as it allowed me to vacuum a scary amount of lint from the inside of the dryer and also remove a thick cake of lint/hair/sand/bobby pins/gunk from the inside of the metal duct that connects to the lint filter assembly. All of my drum support wheels and belt seemed fine, but I replaced them since they came in the kit. The bushings of these wheels are bronze oilite, so no lubrication is needed or helpful (it will only attract lint). I cleaned the shafts that the wheels mount to with automotive brake cleaner and a dry cloth to remove built up residue. I then installed the new wheels and they fit and spun very well. Yes, the clips are a bit of a PITA - but you can reuse the old ones (if you don't break them on removal) which are slightly more pliable. Just take your time and you'll be fine. Hope this is helpful!
K**V
Works great with my Kenmore Gas dryer mod: 110.C97872601
Didn't want repair man in the house during COVID. Replaced the parts myself. Followed Youtube video of the Electric version of same dryer and put it back together and VOILA! Works like brand new. Took the time to clean out the lint and dust inside too. Clothes used to have burnt smell... realized that it was years of built up lint. Roughly 3 hours of work for an amateur. Cheapest appliance repair ever! No more squealing.
A**Y
Excellent Whirlpool Parts
Everything in this bag of parts fit perfectly on our Whirlpool Duet Dryer. Fixed our screeching issue instantly. Good quality parts. Fast shipping!
A**7
Good Kit
I only needed the wheels from this kit (luckily as it turned out as the belt didn't fit my dryer). Works as expected. Would recommend.
S**G
Great kit but watch the belt size
The kit is a great price and all the rollers and belt pulley fit perfect but like a lot of other people the belt was the wrong size (too small). Maytag Bravos MCT YMEDB850WL1
S**T
Quick, easy, perfect fit.
Had a squeaky roller on my Maytag epic Z. This whole kit cost less than one roller at the local repair shop. Arrived quickly. Installed easily. Everything fit (including the belt). Dryer works like new.
Trustpilot
1 day ago
1 month ago