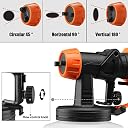


🎉 Paint Like a Pro with Ease!
The REXBETI Ultimate-750 Paint Sprayer is a high-powered, lightweight electric spray gun designed for effortless painting. It features a 1000ml high-capacity container, adjustable flow control, and comes with 4 nozzle sizes to tackle any project, from furniture to walls. With a user-friendly design and easy cleaning attachments, this sprayer is perfect for both DIY enthusiasts and professionals looking to achieve a superior finish.
| ASIN | B07DLR5FK2 |
| Brand | REXBETI |
| Brand Name | REXBETI |
| Color | Black |
| Customer Reviews | 4.2 out of 5 stars 6,057 Reviews |
| Hose Length | 6.6 Feet |
| Included Components | 1 * Rexbeti hvlp Paint Sprayer, 1 * User Manual, 1 * Paint Container, 1 * Viscosity cup, 1 * Cleaning Needle, 4 * Nozzles, 5* Paint Strainers |
| Manufacturer Part Number | 5864270686 |
| Material | Plastic |
| Material Type | Plastic |
| Model Name | REX004 |
| Model Number | 5864270686 |
| Power Source | Electric |
| Recommended Uses For Product | Painting |
| Style | Adjustable,Circular |
| Style Name | Adjustable,Circular |
| Tank Volume | 1000 Cubic Centimeters |
| UPC | 646690217467 |
M**O
Updated 11/2019 - also on missing latex paint info see below
Update 11/2019 - this sprayer was used a lot more this year than was intended. one small job turned into one very large project. while i had some issues with the instructions really there wasn't much to complain about with this. after having finished with a weeks long project i can honestly say for the money this thing is a real value. the worst limitation for me was the size of the tank. i ended up getting a second so i could have one filled and ready to swap out when the one would run dry. that alone helped speed things up the job a good bit. so after a lot of use i decided to change my rating from 4 to 5 stars even with the sad instructions. Thankfully I have not had the need for a sprayer in over twenty years until recently. That last sprayer I used was big bulky and after I was done I hated it so much I threw it away. I had hopes that after 20+ years paint sprayer in general would be better than what I’d used, and this one is. The Good – 1 – Light weight 2 – Ease of use 3 – Easy to clean 4 - Multiple tips and three spray patterns fit most every spot The Bad – 1 – The page says can be used with latex paint, the instructions do NOT 2 – The manual/instructions that come with lack important details 3 – The paint receptacle is on the small side The sprayer comes with all you need to get started other than paint, thinner, a paint strainer/filter, extension cord, and over-sized paint bucket to mix. It has three different tips that appear identical other than one having different diameters. The website says what they are for but not in the manual? I may rant on instructions and manuals but they matter a lot and not just with this product. Something so integral to a purchased item, something that cost cents to produce? But all too often neglected. I like this product but it is frustrating to once more get a manual that is so poorly written in this case it doesn’t mention details on paint? Really it is primarily a paint sprayer? Yet the manual’s focus is on other thinner materials like stains. Example on the website it says, “great for spraying latex paint,chalk type paint and milk type paint.” Well the manual list everything else not a word about dilution for latex paint any paint? It has a chart for dilution everything under the sun literally speaking but paint? It also does NOT say a word about what thinner type to use with latex paint? There are many types of paint thinners. Paint is expensive mistakes are costly, better safe than sorry. So I checked locally and found I should use a mineral oil based solvent thinner. I used 1-1.5 cups of thinner to however much paint is held by two of the reservoirs. Mixed thoroughly 4-5 minutes. As to use, it did have mostly good coverage partly due to it being so light weight. The sprayer paint receptacle unscrews easily. I found out the hard way that I had to stay at least a couple inches away from my masking line as it would spit random bits of paint from the get go over the masking line. I tried both vertical and horizontal patterns and made no difference with that issue. I ended up leaving a two inch gap around everything I’d masked and had to touch up by hand. The sprayed areas did show a very good consistent results. I am happy with the overall paint application. My impression was positively impacted by the fact that I had ordered a second kit that included a spare paint receptacle. For the money I can’t complain much though. Yes the instructions are bad, missing a lot of important information some as mentioned. But all said the sprayer works well for the most part. It isn’t perfect but it is worlds away better than what I had used previously. You can pay a lot more and get a better sprayer but in my case this unit fit my needs best and as said was affordable compared to others. I cannot say how this sprayer works with anything other than latex paint. Based on my results for most small to medium jobs I would recommend this. Jobs that are bigger mostly due to the smaller size of the paint reservoir, at a minimum you really need spare tanks to hold more paint. That is its weakest point and why maybe not the best for large jobs but to each their own.
S**R
One of the Best Purchases I've Ever Made!
We built a garden cottage in our back yard, and it was time to paint it. My son spent an hour-and-a-half just painting under the eaves on one side of the cottage using a paint brush. This was going to take forever! I decided to buy this spray gun, and it is seriously one of the best purchases I've ever made! What took my son an hour-and-a-half with a brush, my husband did in less than 10 minutes with this spray gun! We had never used a spray gun before, so I was worried that it wouldn't work right, or we wouldn't know what to do, or we would mess it up, or a million other things. I chose this particular gun after comparing all the reviews, and not wanting to spend a ton of money, but still having a decent gun, and having it delivered the next day for free. The instructions are a bit confusing, but I just used common sense and figured things out. A very important thing to do is to make sure that you filter your paint before pouring it into the spray container. I bought a paint filter (it's just some mesh) from the hardware store and poured the paint through it into the container. If you don't filter your paint, you will end up with a clog which will cause the gun to spit and sputter. Also, make sure that your paint is the right consistency. Our paint was Behr Paint & Primer (from Home Depot) and it was very thick. The container for the gun holds about a quart of paint. In a separate container, I poured in 1/3 cup of water, then about a quart of paint. I stirred, stirred, stirred, until it was mixed super well. Then I poured the thinned mixture through the filter into the gun container. It took a few practice strokes to get the feel of the gun as I began spraying the paint onto the cottage, and I had to figure out how fast I should move, and how close to the wall I needed to be, but after we experimented, we figured it all out and we made super fast progress. There wasn't very much over-spray, which I was happy about. We painted all the walls (about 600 sq feet of vertical walls) and under the eaves (about 75 feet) with the gun, using about 3 gallons of paint onto bare siding. The gun worked perfectly. In fact, my husband tilted the gun in all directions, even practically upside down at times while doing underneath the eaves, and I was surprised that the gun still worked! Then we built some shutters and used the gun to spray the shutters a different color than the cottage. After we were done painting each time, I took everything apart, and cleaned everything really well. The handle and the motor are one unit, which pulls off of the front part (which is the container and the nozzle). When you're ready to clean the gun, pull off the handle/motor and set that aside. It's the front part that you will be taking apart and washing. There's a little cleaning brush included to help get in the small areas. I have my own cleaning brush that I used also. I've really had a great experience using this spray gun! I wish I would have gotten it years ago! I was thinking about all the things we have painted with a brush and roller, when we could have been using this spray gun! Now we want to repaint our actual house! With this gun it will be a breeze!
M**S
Surprisingly useful & long-lasting
I'm a hobbyist furniture refinisher, but I've been doing it for 20+ years, so this is not my first rodeo. After a large, drop-leaf dining table took me way too long to brush in the stain and then poly (by brush) while constantly watching for bubbles and brush marks, I read up on lacquers and spray systems. Sounded great, but $500 for a "cheap" sprayer is way beyond what I would spend as a neophyte. So I found this RexBeti as a cheaper version to the "hair-dryer with a cup" from the bigger brand names and figured I could use it once to figure out if I am a sprayer at all. Well, it has exceeded my expectations. It may not be very quiet, but it certainly gets the spray out and is easy to clean. There is a relatively large amount of overspray and the droplets or whatever are not uniform (apparently that's a big deal with higher-end systems) but it is consistent and easy to use, Will it last years with thinners and paint build-up? Certainly not. But this is also not the "single-project" throwaway tool I thought it could be. Over the past 6 months, I've used it for 3 refinishing projects (spraying stain, tints and lacquers) and one painting project (milk paint). Does the job quickly and no brush marks or bubbles. The key has been to use thin coats of fast-drying mixtures. I also got a large spray tent w/ floor ($50 - https://www.amazon.com/gp/product/B07HMZQ4M7) and an N95 mask, some straining filters, and watched some Y'tube videos on spraying techniques for the particular media I'm using. A surprisingly useful sprayer for finishes and paints, and can stand up to occasional hobbyist use while I learn the finer points of spray finishing. If I find a need to do more projects or it falls apart in a year, I'll probably spring for an Apollo or Fuji HVLP system, but for now it does the job and hasn't let me down yet.
S**J
Great results with semi-gloss latex paint for doors and trim
I really wanted a means to avoid the brush marks on new doors and trim. Having looked at the limited offerings at the local box stores, I sifted through the options on Amazon - and came upon this sprayer. The manufacturer does not specify latex paint as an option for this gun, but after reading several reviews, I thought it worth the try. Be advised the instructions are sparse to the point of being almost non-existent. If you don't like figuring things out - this is not the gun for you. But that said, with a few minutes of use, and some common sense, it was relatively easy to use and clean. Technique is not hard to master, but I suggest you test spray on a scrap so you can get the feel of the sprayer. The harder you pull the trigger - the heavier the spray. I diluted my latex (Semi-gloss) paint so that it passed through the supplied funnel (sort of like an hourglass for paint) in about 45 seconds - and that seemed a good consistency. I initially sprayed way too heavy a coat until I figured out the trigger control. Also - initially, i noticed some spattering - but that cleared up with a little use. Once the technique was down, I was able to get a very consistent coat. It literally took only 5 minutes to paint one whole side of a door. Be advised - at least with latex paint - you won't get a glass smooth texture. but the resultant texture is smooth, professional and looks a thousand times better than brush strokes. Clean up (at least with latex paint) was quick and easy.
P**P
Positive reviews overstated, this is a disposable, rough finish machine (Hairdryer)
I was impressed by the positive reviews here, and as an experience painter using airless (old beater proforce) I decided this could work for touch ups. NO. no. No and .... nO. If you have a textured paint, like very textured as in outdoor siding, fencing or deck (rough to the touch) this will work fine. DO NOT USE IN WARM and DRY CLIMATE. You will want to use this machine super early in the morning if your area gets to 80 degrees F and low because the paint drys around the needle and inside the tip. I know painting and I devote soapy buckets at the location to drop my tips and parts in immediately after use, I decided to try this on some properly thinned and cone-strained premium paint (sorry, no product plugs or endorsements here). Results? Same material, same thinning, between my cheap-o super old tiny airless machine with Graco low pressure tips at lowest setting and this machine. The roughness is noticeable to me and I only find quality, professional finish to be acceptable. In my opinion, someone doing interior trim or cabinetry should buy at least a $200 airless machine, waste some paint, and fall in love with their results. Now, value for money... I believe this machine to be worth about $25 or $30. It really is a toy, hairdryer, with plastic everything and very cheap to produce,. I saw a review here of some cabinet doors painted with this machine, I think it looks good because the picture is so far from the finish and there isn't another finish to compare to. Think about this machine as the equivalent as a spray can quality finish, actually, a bit more speckled. It would be great for speckled textured paint effects like two color, green base with some copper speckles or vice-versa (vintage copper?). Anyway, bottom line is I bought this machine to sacrifice as my flat bed and dump trailer painter because I will not use oil-base paints in my airless. I'm sure it's fine and proper cleaning yada yada... but no. I would rather sacrifice a cheap sprayer. OVERSPRAY - those reviewing who mention little/no overspray likely have no experience with the ultra-low pressure (green) graco tips and an airless machine. In fact, regular airless with the pressure set right produced far less spattering overspray then the orange hairdryer. Does this machine have its place? Sure, maybe fall or early early spring outdoor paint projects using sparthane or other poly based and oil based paints. IN THE HOUSE? Absolutely not. Never. Would at least buy the $150 handheld airless, though I'm not a fan, I'll stick to larger pot and pump airless and waste paint for stellar results. DON'T DON'T DON'T think you can paint with an airless or HVLP out of the box and do a great job. Not going to happen. Please practice practice. Get some 2x4's or garbage furniture or something disposable and practice there first. MAYBE translucent stains on decks are the exception, they tend to be self-leveling, somewhat, and very forgiving. You can see the tiny thumbnails are indistinct regarding the baseboard, but blow them up, these are 5.5" wide, get some scale and look at the rough speckled paint. (rough paint holds dirt, hard to clean, scratches, can scrape off... etc. etc.) Hope this review helps offset the OVER THE TOP positive reviewers here who think this sprayer is actually better than the higher priced name brands and AIRLESS sprayers. Happy painting (or rather taping, scraping, prepping and cleaning, if you know what I mean).
R**N
Pleasantly Surprised
I bought this to stain my red cedar fence - about 150 linear feet x 2 sides. After finishing side 1 I feel I have to share my experiences with this sprayer. I recently threw away my old sprayer - it was a "W" brand. It used to sound like a jackhammer. I tried to use it for a third time and the pump was seized. This Rexbeti sounds more like a vacuum cleaner or a blow dryer. I used the gray tip, (3.0mm I think) because I wanted lots of stain to flow and was concerned about clogging. I had lots of clogs with the "W" brand. This thing did not clog once during the entire afternoon. Obviously you can't let it sit dirty for an hour or the stain/paint will dry in the sprayer but no problem stopping for 10 minutes. I did not experience any splattering of the stain but I have done this a couple of times before. You need to start the sprayer off of the fence either above the top or into the grass below. Then sweep the sprayer across the wood and keep it moving. The output was a fine mist. Winds were like 10-15 mph which is really too windy for spraying but I just held the sprayer closer to the fence, about 8 inches. I really had to keep it moving to avoid getting runs. Clean up was easier than the W brand as well. There is no piston pump to clean. I rinsed the cup with mineral spirits a wiped it out with a rag. Then I put some fresh mineral spirits in and sprayed it into a 5 gallon pail. Then the nozzle was easily unscrewed and I just wiped it down. No doubt, it is not fun to clean but I'd say it took me 15 minutes, start to finish. Here's a couple of tips when staining a large fence. 1. Test the sprayer using water. This will give you a feel for the consistency of the spray and the spray pattern you want to use. Also, good to know it is not defective before loading it up with stain. 2. Buy one of those mixing paddles that you put on your drill so you can mix your stain very thoroughly. This really makes a difference in avoiding any clumps in the product. 3. If you are using those 5 gallon pails of stain, after mixing, pour a gallon into an empty plastic jug with a handle. Something like a windshield washer bottle. Now leave the big pail in the driveway and bring the gallon jug with you as work on the fence. You will need to refill the sprayer many many times and it will be much easier with the jug. Then you only need to go back to the driveway after 4 or 5 refills. Also bring a little table around with you so you have a place to lay the sprayer down while you refill. 4. Buy more stain than you think you will need. Home Depot and Lowes will take back any unopened leftovers and you really don't want to have to run to the store during the middle of the job. You will need to clean the sprayer if you stop using it for more than 15 minutes at a time. 5. Wear a baseball hat and some type of eye protection because the mist does kind of waft around a little. 6. Make sure your extension cord can reach the part of the fence farthest from the outlet. see tip 4! All in all, a successful first half to my project. I am even more confident the second side will go even better. I am totally satisfied with this sprayer, especially at this price. I couldn't ask for anything more.
N**E
Almost good
I have successfully used spray guns from HF with my compressor for painting window and floor trim many times. The downside is that it is difficult to store the units for the few minutes needed to relocate the painted parts and set up the unpainted parts. The air supply hose is awkward to work around, so I thought I would look for an alternative and found this one. I liked it because it came with 4 different tips, was plastic (so easier to clean) and could be place on a flat surface for storage when changing out the painted parts. It even came with a lid for the jar, so that the unit could be removed and the paint will stay protected. When it arrived I was really thrilled to see that it also came with a viscosity cup so that there would be less variablity in the amount of paint applied when the (generously sized) cup needed to be refilled. it ieven came with paint filters!! So, why did I return it? First the instructions were not great. An obvious translation from another language. Second, there was NO mention of the settings needed to apply latex paint in the manual, but I found an adednum included in the bag with the manual that directed me to use paint diluted to a viscosity of 30-40 seconds. OK, so after reading all the directions a couple of times., I used the smallest of the 3 (not 4) tips mentioned in the directions. I tested the unit as directed with water, and it "worked" so I emptied it out and blew out the remaining water in the unit, transferred the diluted and filtered paint to the cup and tested it on a scrap of plywood. I made several passes until the paint sprayed out consistently then I turned to the window trim that I had spent many hours preparing. The first pass on the first piece sprayed all over the place!! There are paint spatters 3-4 feet from the work area. OMG! I checked the manual, but it did not indicate which direction the flow control knob would reduce the amount of paint dispensed. I tried turining it in (CLOCKWISE) all the way - that had NO effect on the paint dispensed. I tried turning it counterclockwise all the way - NO change. it is the nature of the design of the unit that the pump speed cannot be adjusted. I transferred the dripping pieces of trim to a holding station and used a foam brush (just what I did NOT want to use) to even out the coat and wipe off the bottom edges. Then I transferred the contents of the cup to my gravity feed sprayer and finished painting the rest of the trim - no problems Bottom line is that the instructions are incomplete - (what is the white tip used for?, how is the flow supposed to be controlled?) Be prepared to deal with a HUGE amount of overspray! Might be OK for painting fencing or staining siding before installing, but doesn't have enough control of the flow for paiints or varnishes. Bummer!
P**P
Great paint spray gun, works well, was easy for a beginner petite female
Very pleased with this product. Did my whole attic - walls and ceilings - with this paint spray gun. Upon ordering I was a little worried because I’d never used a paint sprayer before and this was one of the more budget friendly results that came up. But I carefully read the manual when it arrived so I understood the parts, assembly and operational instructions and that helped a lot. Also I watched several YouTube video tutorials of people using paint sprayers - none were for the same brand or model but as long as it’s a a paint spray gun it’s basically the same type of system and method. I’m a petite female and while the gun is lightweight, I did have to use two hands to operate it because when it’s full of paint it’s just a little heavy for a woman to move your arm the way you need for paint spraying. But no biggie to use two hands. I did a whole room by myself and was able to use it for hours on end til I ran out of paint. I was a little sore and tired at the end of the day but the next day I was fine, just a little tight in the upper back. I’m totally going to use this again for other projects, the results are way better than a paint roller, those things kill my body, are hard to clean and are not even that great for results. For this project, I did strain the interior latex paint I was using first and had to thin it quite a bit with water before it was ready to use. I was surprised how much water I ended up having to use to get the recommended viscosity time of 60 seconds or less to run through the provided cup. But it worked and I didn’t have any problems with the gun working or the paint getting clogged. I recommend straining the paint with an elastic straining net (got mine at Home Depot for like $3) because w that kind it’s easier to do by yourself without the assistance of a second person. Also make sure you have a bucket that has a little pour spout or a funnel so you don’t get paint everywhere when pouring. Lastly the cleanup was way easier than I expected, which made the whole process smoother since I don’t dread the clean up at the end when I’m tired. Read the instructions and watch some YouTubes and you’ll be good! Good product, I’d recommend.
Trustpilot
4 days ago
1 month ago