🔐 Elevate your garage game with smart, secure, and sleek access control.
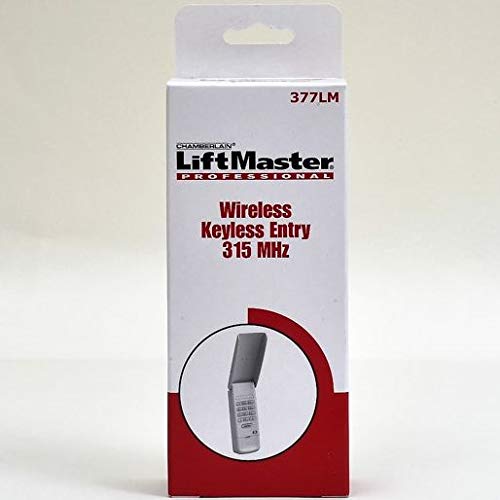
The LiftMaster 377LM Wireless Keypad operates on 315 MHz with Security+ rolling code technology for enhanced security. Completely wireless and battery-powered, it features a weatherproof flip-up cover and a backlit keypad for easy nighttime use. Temporary passwords allow controlled access for guests or service personnel, while the one-button-to-close function streamlines your garage experience.
| Manufacturer | Liftmaster |
| Part Number | 377LM |
| Item Weight | 2.08 ounces |
| Product Dimensions | 2.5 x 1 x 6 inches |
| Item model number | 377LM |
| Batteries | 1 9V batteries required. |
| Is Discontinued By Manufacturer | No |
| Color | Gray |
| Style | Modern |
| Material | Plastic |
| Power Source | Battery Powered |
| Item Package Quantity | 1 |
| Number Of Pieces | 1 |
| Special Features | Backlit |
| Included Components | 9-volt battery |
| Batteries Included? | No |
| Batteries Required? | Yes |
| Battery Cell Type | Alkaline |
D**E
Easy-Peasy Installation - Still working well after 2 years.
2 YEAR UPDATE JAN 2013The 377LM retains my 5 star rating. This unit has survived daily use by two adults and three small children at my son's house. That's quite an accomplishment considering the builder-supplied indoor control was demolished in a year.ORIGINAL REVIEW DEC 2010While this is a preliminary review based primarily on installation and initial operation of the 377LM, I have several months experience with the similar 376LM as well. This new unit was for my son's house.Installation of the 377LM took about 15 minutes, some of of which was spent carrying and setting up a ladder to reach the Learn button on the motor-mounted receiver.The unit came with a 9V battery installed. Setup went flawlessly following the simple well-written instructions.1. I pushed the purple Learn button on the receiver (behind the lamp cover on my unit).2. I entered a four digit code of my choosing on the 377LM keypad.3. The motor unit responded with two clicks indicating success.4. I tested operation by again entering the code and pushing Enter. The door moved appropriately. I pushed Enter again and it stopped. Once more and it reversed.5. I mounted the unit on the wall near the garage, using the two screws provided and tested it successfully again. I was done.The buttons on this unit appear a bit more robust than on the older 376LM that I have been using. The 377LM's buttons are a little rounder and appear to be less prone to getting stuck if pushed sideways. I had no problems at all with the buttons on this unit. A nice improvement on an already good product. My 376LM has been operating without problems for several months. I expect the 377LM will be as reliable.
W**L
Works perfectly with Craftsman (Purple Program Button)
I was a little worried when ordering this that it might not work even though I had checked my opener for a purple programming button, these things have a way of getting tricky, this one did not.Overall: 5This does exactly what it says in the ad, the unit is sturdy and has a very "clean" professional look.Programming: 5 -- Remember to do this step first!This is where I really expected the issues, but it worked exactly as descibed in the instructions. You just go to the opener motor assembly, push the purple button, the LED comes on, enter the 4 digut code into the keypad, press enter. That is it, test and you are ready to mount it.Physical Installation: 5If you can drive 2 screws into wood then you can install this in under 5 minutes, obviously if you have concrete, brick, or cinderblock it takes a little more work. (If you have these materials and don't know how to put screws in it then just take a small piece of wood and get the right adhesive and glue the wood to the wall and screw the panel to the wood.That is it, I also tested my other two remotes and the one built in the car and they all still worked just great.One note: Do not press the purple programming button for too long, it just takes on quick press, if you hold the button for 30 seconds it will clear all devices and you will have to program them all again, not hard but why have the pain.Project Time: 5From opening the box to programming, mounting, testing the keypad and other remotes was 15 minutes. (I am pretty handy with tools, if you are not then allow another 15 minutes so you can take your time.)Minumim Tools Required for installion on Wood:1 Medium Philips screwdriverMinumim Tools Required for installion on Aluminum or Plastic siding:1 Medium Philips screwdriver1 Small drill bit, punch, thin nail to make a pilot hole through the siding material1 Small hammer to make the pilot holeNice to have tools:1 Punch to make a pilot hole (wood or aluminium/plastic siding1 Portable Drill with a Phillips head bit1 Level if you do not have a good eye for things being level(Note: there is no requirement that it be level/square, but it sure looks better than being cockeyed)Mounting Tip:The keypad has 2 screws that hold it to the wall, one that is slotted on the upper half of the unit, and one that is just big enough to fit the screw on the bottom.1. Put the top screw in without the unit but leave it spaced from the wood about 1/4 to 1/8 inch.2. Slid the keypad "slotted" spot over the screw and pull down, if it will not slide, loosen the screw 1/4 turn and try again, the fit should be snug but not super tight so it has some room to expand and contract with temp.3. Open the keypad door, then remove the battery cover.4. Take the battery out of the case but DO NOT disconnect it5. Drive in the bottom screw, and this one make reasonably tight, hand tight, not too much or you might crack the plastic.6. Pur the battery back in the compartment and put the cover on.7. Test opening and closing.That is it. I would suggest you change the included 9V battery every 6 months with the time change so you don't forget but 1 batt will likely last years but I find for outdoor batteries the safest is to replace them at least annually or with the time change 2 times a year, then you never get a leaky battery. For very cold area's I suggest a good cold weather 9V batt.
T**D
Helpful Tips for Liftmaster Keypad
This is a great product for a great price. Why pay a Garage Door repairman to install this for you for $100 when you can buy this for $20 and do it yourself - it's so easyHere are some tips1) Be sure to check your garage door opener BEFORE you order. You need to check the color code on the back of the machine to find out what keypad version to buy.2) Pairing this keypad with your garage door opener is simple and can be done in about 5 minutes3) Setting up a code to open the device is also easy - again less 5 mins4) Attaching to your home outside the garage is the step that will probably take the longest but even that is pretty easy. I live in florida and with a drill and some concrete screws I was able to affix this to my house in about 10 mins5) I've owned this product before for a different home and I like that this new model is updated with the ability to close the door with just 1 button (enter). It also provides the ability to set up different codes if you have guests, etc visiting that need a code but not your primary code.I am very happy with my purchase.
Trustpilot
2 months ago
2 weeks ago