
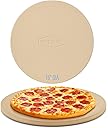
16” Round Pizza Stone
Product ID: 218853339
Details
- BrandUnicook
- ColorBeige
- MaterialCordierite
- ShapeRound
🍕16-inch diameter for large pizzas
🔥Heat resistant up to 1450°F
🛡️Thermal shock resistant cordierite
Desertcart purchases this item on your behalf and handles shipping, customs, and support to Croatia.
🍕 Elevate Your Pizza Game — Because Crisp Crusts Aren't Just for Pros!
The Unicook 16 Inch Round Pizza Stone is crafted from premium cordierite, sintered at 2100°F for superior durability and thermal shock resistance. Its 0.57-inch thickness and 16-inch diameter ensure even heat distribution, producing perfectly crispy crusts by drawing out moisture through invisible micro-pores. Designed for use in ovens and grills up to 1450°F, it’s a versatile tool for baking pizzas, breads, and more. Includes a handy plastic scraper for easy maintenance, making it a must-have for home chefs craving professional-quality results.


| ASIN | B0895T18VM |
| Best Sellers Rank | #14,152 in Patio, Lawn & Garden ( See Top 100 in Patio, Lawn & Garden ) #9 in Pizza Grilling Stones |
| Brand | Unicook |
| Brand Name | Unicook |
| Color | Beige |
| Customer Reviews | 4.5 out of 5 stars 6,411 Reviews |
| Item Dimensions L x W x Thickness | 16"L x 16"W x 0.57"Th |
| Item Weight | 3.4 Kilograms |
| Manufacturer | UNICOOK |
| Manufacturer Part Number | BP101415 |
| Material | Cordierite |
| Material Type | Cordierite |
| Maximum Temperature | 1450 Degrees Fahrenheit |
| Product Care Instructions | Do Not Cut On The Stone, Do Not Use Detergent, Do Not Use Soap, Dry the stone, Hand Wash, Never Season Pizza Stone, Store In Clean And Dry place, Use Brush, Use nylon pad, Use scraper, Wash With Baking Soda And Water Product Care Instructions Do Not Cut On The Stone, Do Not Use Detergent, Do Not Use Soap, Dry the stone, Hand Wash, Never Season Pizza Stone, Store In Clean And Dry place, Use Brush, Use nylon pad, Use scraper, Wash With Baking Soda And Water See more |
| Shape | Round |
| Size | 16" Round |
C**E
Great size!
This was ordered as a replacement for a thinner (and much loved) stone that we had for years. This is thicker, but also a bit larger. We like it for homemade pizza night, bread baking, and I even bake black bean burritos and wiener wraps on it (using parchment). Good quality. Considering a second for our outdoor grill.
M**N
Quality Pizza Stone For a Great Price
I bought one of these to try out on the BBQ grill and it made a huge difference in the overall bake quality and even doneness of the pizza. It works so well that I bought a second one so that we can cook 2 pizzas at a time. I can easily do a large pizza on these or a couple of small homemade ones per stone when we are cranking out personal pizzas for the kids. You will need a little flour on the bottom or cornmeal to make it easy for sliding on and off. A pizza peel is a must if you get to moving them from the grill/oven to the table without an epic fail. If you add a lot of sauce or have holes it will stain your stone but doesn't affect the flavor at all or the ability to bake your pizza successfully. You can easily scrape any remnants off the stone and get them pretty clean for the next use. Let your stone warm-up and cool down with the oven or the grill and it does a great job with the pizza and keeping it in good condition.
T**.
Really good product. Highly recommended!
I really like this stone and I believe it will provide excellent performance for a long time. It’s thick and has a lot of surface area providing an easy target to slide your pizza onto from a peel or other surface. The crust browned beautifully and the taste was as good as any I’ve produced, no off flavors from the new stone. Packaging was extremely well done making this item very shippable both from the manufacturer or from you if you want to gift it to someone else. Cleaning was somewhat problematic. Melted cheese turns hard and black at 500 degrees and so far I have not been able to remove the staining although the residue scraped up reasonably easy. I’m pretty hard to please when it comes to kitchen items and this one passes all criteria to be on my favorites list.
B**L
Perfect for me
I use this for baking frozen pizzas in the oven. My wife broke my 15 year old one by pre-heating the oven and putting a straight from the freezer tin of frozen veggies on it. This stone starts as a very porous piece that soaks water like a sponge. They kind of recommend not seasoning it and dusting it with flour or something, Well, I seasoned it 3-4 times before I used it with cooking oil and didn't use it until it had that nice brown color. It now cooks my frozen pizzas very nice and evenly. It has adequate room for a "Wild Mike's" supreme sized pizza. (one of the best frozen pizzas).
R**L
Great pizza Stone!
This is a necessity in my house for the amount of home made pizza I make. Great product.
M**E
Love it!
It’s the real deal! Make sure your oven is big enough before ordering. I didn’t realize how big a 16” pizza stone really was and it barely fit. Luckily it did fit. I’m glad I got the 16 inch even though most pizzas I make are smaller. It is nice to have that extra room so you don’t have to take time and try to center it perfectly when the stone is so hot.
R**R
Nice heavy weight stone
Nice heavy weight baking stone. Should last a long time.
G**Y
Great for my travel trailer
Bought these for my trailer work great highly recommend
D**N
Good product
I think it will be great but I haven't used it yet because it is a gift but I have used similar products before and it great
G**F
Pizza stone
Excellent stone. Good size for the two of us. Works well.
F**D
Gutes Produkt, in sicherer Versand Verpackung
Kommt sehr gut in einer mit Schaummaterial ausgekleideten Schachtel und Überkaton an.
S**Y
Perfect baking
The stone is perfect. It takes a bit of experience to get pizza on it but the more I use it the easier it gets. The stone will stain but that’s a regular response to use. I love that I no longer need to grease a tin to bake bread!
L**C
Conforme et rapide
RAS, arrivée dans les temps et bien emballée. Pain cuit sur pierre plus croustillant que dans la machine à pain...
Trustpilot
1 month ago
1 month ago