
Desert Online General Trading LLC
Dubai, United Arab Emirates
Desert Online General Trading LLC
Dubai, United Arab Emirates


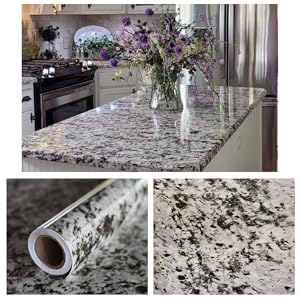
✨ Elevate your kitchen game with effortless marble magic! ✨
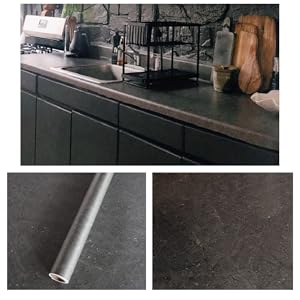
EZ FAUX DECOR Premium 36” x 72” Vinyl Laminate Cover offers a waterproof, scratch and heat resistant white marble finish that easily adheres to any smooth surface. This peel-and-stick contact paper provides a renter-friendly, affordable way to refresh countertops, backsplashes, and more, delivering a modern, durable upgrade with minimal effort.


| Material | Polyvinyl Chloride |
| Color | White |
| Brand | EZ FAUX DECOR |
| Style | Modern |
| Item Weight | 2 Pounds |
| Product Dimensions | 72"L x 36"W |
| Pattern match | Straight Match |
| Theme | Home, Kitchen, Marble |
| Is Stain Resistant | Yes |
| Pattern | Marble |
| Room Type | Bathroom, Bedroom, Hallway, Kitchen, Living Room |
| Manufacturer | EzFaux Decor LLC® |
| Is Waterproof | Yes |
| Number of Packs | 1 |
| UPC | 760625645207 754220637132 |
| Number of Items | 1 |
| Installation Type | Self-Adhesive |
| Application Method | Peel and Stick |
| Part Number | FBA_37132A |
| Item Weight | 2 pounds |
| Item model number | FBA_37132A |
| Is Discontinued By Manufacturer | No |
| Size | 36" x 72" |
| Shape | Rectangular |
| Item Package Quantity | 1 |
| Number Of Pieces | 1 |
| Coverage | 18 sq. ft. |
| Batteries Included? | No |
| Batteries Required? | No |
M**R
Very sticky but stays on firmly
A little tricky to work with, but looks very nice on my kitchen counter, I love it!
M**E
Budget Friendly, Durable & Looks Great after 3 yrs!
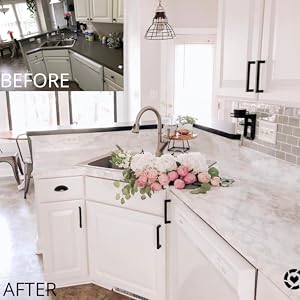
My pink countertops needed a budget friendly update. This stuff was a better than expected option. Installed in 2021 to counters that had a few obstacles including a corner sink, and a few odd angles. It took me an entire day, and a few not so nice words, to do by myself, but I did it and was surprisingly happy with the results. Extremely pleased with the durability. I cook and clean daily, the only negative I noticed was that some sauces & spices will stain if not wiped up quickly. The 3 biggest tips I'll give is; an extra set of hands would be extremely helpful, take your time, and a hair dryer will seal the deal...Literally! It really helped smooth things out. Especially, when it comes to getting around corners and edges. When I had to put my house of for sale, the realtor was shocked that it was a peel and stick film. Home sold day listed. This worked out so well, I did the counters in my daughters apartment. It's been over 3 years and she still no issues! In my current kitchen, I plan on building my own counters and covering them with this product until I can afford a hard surface option. So yes, I highly recommend!
C**N
Very time consuming. Read all the tips.
Make sure you have many hours to put this down. 3 hours and still going at it. Wrinkles and puts creases when you have to maneuver it to remove the backing layer. Use a spray bottle with water in it to coat your counter tops. Use a hair dryer for the entire installation. Is not easy to put down. Definitely need 2 people. Looks good if you cam get all the bubbles and wrinkles out. Hair dryer is your friend. High heat. But not for too long. I almost scrapped it all.and said forget it and tossed the $140 out the window. Thankfully my son came in and took over. Very time consuming. Just keep at the bubbles with the hair dryer. It eventually works its way out. Not user friendly and very frustrating. Looks good in the end.
D**4
Completely transformed my kitchen! Great product!
OK, so when this was advertised as ‘countertop transformation’, I had to see it for myself. I had seen YouTube videos of their appearance on Rachel Ray, and other customer’s videos and had to try it.We are not in our ‘forever home’ but I needed a change for my drab ‘90s kitchen! This completely changed the look. My friends were convinced this was granite until I spilled the beans.I am so happy with my purchase. Who wouldn’t be?! I have the look of spending tons- when I received a product for much, much less that looks the same!In terms of quality, WOW!! The thickness of the product actually outdid my expectations. It was easy to apply. Took less time than I would’ve spent getting our son to a soccer game and back.This product truly transformed my small kitchen. It is such a nice color. Paired with my gray walls- it made my kitchen seem bigger!In terms of customer service, this company is top notch. In fact, I learned while unpacking on the material enclosed, it’s a woman-owned company! I didn’t realize this when I ordered, but was happy to find that out!If I could give this product more than 5 stars, I would. It’s such a great transformation in so little time. Now to convince my husband that we should paint the cabinets... ;)
A**K
Great Product!
Beautiful product! Really refreshed my kitchen!It was a little difficult to place larger sections, but it stuck well and was exactly as pictured!
H**H
Beware when considering this product
I was very excited about this product. I prepped and let the product set to my home temp like website and videos instructed. Bought a new durable sqee-gee, watched multiple videos on the company's website. I knew this was going to be hard to install but I had blocked out an entire day to apply and was in no rush. I love diy projects and I'm always having successful results. I bought two rolls of product, I open my first roll and had to throw away the first 2 feet of it due to it having blue smudges all over it, right when I saw them I figured maybe I could wipe them off but then my paper was crinckled. Almost like someone tried to crumple portions of it. It was damage to the actual paper, not something I could smooth out with the squee-gee. So I apply my first section to my smaller counter top exactly how instructions say. Which by the way is completely different than how they do it in the videos, in the videos the literally just throw the entire sheet on and it's magically perfect. So with my first section applies it is FILLED with bubbles. Huge ones, and small ones. I get to working with my sqee-gee right away and the bubbles ARE NOT budging. I really loved the marble look so I was thinking I'd just live with the awful bubbles look but I attempted then to get some of the smaller bubbles out with a credit card and the color from my credit card rubbed off onto the product and would not come off!!! I felt completely defeated but I was not ready to give up. I was hoping to just remove that section and replace it with left over product, so I move onto the next section of my counter top and I am being extremely slow and careful with the product slowly attempting to smooth out the insane amount of bubbles as I go. I had less than a 1 foot section applied at this point and I have 2 giant bubbles. I worked 2 HOURS on the bubbles trying to get them out, my hands we so swollen from putting all my strength into it. Finally after some-what getting a smaller bubble out the paper where the bubble was crunched together creating a huge imperfection in the paper. At this point I had already had the piece cut so I attempt to apply the rest, stretching/squee-geeing to my ends of my counters and the entire section (which was pretty big) literally spilt down the entire middle as it was applied to my counter tops. This whole section that I had spent 3+ hours on was completely ruined due to the poor quality of product. I wasted half of my day off and luckily due to AMZONS AMAZING CUSTOMER SERVICE they were able to replace me with a refund. There's a lot of this type of product on the market that's A LOT cheaper than this stuff and I thought spending a lot of money on the product would really ensure it's quality but unfortunately it was awful. I have no idea how some reviewers had positive results with this product. Idk if my roll was just a defective badly produced roll or what, but I did not open my second roll. I highly recommend looking into a counter top paint. Extremely easy, cheaper, and better results.
Trustpilot
2 weeks ago
2 months ago
1 day ago
3 days ago