


🚀 Shine Bright, Drive Safe!
The Turtle Wax 51768 Headlight Restorer Kit is a top-selling solution designed to remove medium oxidation and restore headlights to their original clarity. This kit not only improves lens appearance and visibility for safer driving but also seals headlights to prevent future yellowing, all without the need for power tools. Weighing just 330g and compactly sized, it's the perfect addition to your car care arsenal.

| Manufacturer | Turtle Wax |
| Brand | Turtle Wax |
| Model | FG7606 |
| Product Dimensions | 12.7 x 20.32 x 43.18 cm; 330 g |
| Item model number | FG7606 |
| Manufacturer part number | 51768 |
| Position | Front |
| Special Features | Oxidation Removal and Future Yellowing Prevention |
| Wattage | 220 kilowatt hours |
| Item Weight | 330 g |
R**S
DAD VERDICT: Genuinely amazing. Wish I'd done it sooner.
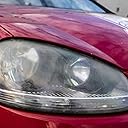
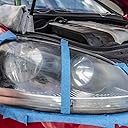
I drive a 2005 Toyota Prius and I'm the fifth owner. Not sure if it's ever had its headlights done to be honest, but as you can see, they were in a pretty bad state from when I bought it. I don't keep the car in a garage and for at least the last three years that I've owned it, it's always been exposed to the elements all year round.FIRST:Why buy this instead of the sandpaper and clear coat solution available on YouTube?If you have 1000, 2000, 3000 grit sandpaper laying around and clear coat, I think you could give that a go as there are lots of videos on how to do that method online. I didn't have any of that gear and going to the store and buying it all separately would have been way more expensive than the tenner I spent on this.THE PRODUCT ITSELF:Delivered very quickly and packaged well. The instructions are absolutely simple, plain English. There's really no making any mistakes with this as the process is also simple. Although packaging is always "optimistic" shall we say, you can absolutely believe the hype on this box: as you can see from my pics, the results could practically be on the box!The only thing missing from this kit is masking tape, but I'm not convinced you really need it anyway. If you're careful, you can do without it.As with several other reviewers on here, I actually could have got away with just applying the cream, and that took all of three minutes per headlight! As there was some ingrained oxidisation on my lights though, I ploughed ahead and did step 4 with the pads too.Once I'd finished with the pads, I actually thought I'd messed up and made the lights worse! However, I re-applied the cream and followed the remaining steps and these came up and absolute treat. Definitely worth the extra elbow grease. One word of warning: If you do use masking tape, peel it off carefully afterwards. I found that some of the residue from 'sanding' the lights with the pads dried on the masking tape and when I peeled it off, it threw up clouds of dust that stuck to the headlights while the fluid from the Lens Sealing Wipe was still wet. I had to wipe it down again quickly.DOWNSIDESThere's only one set of lens sealing wipes and base coat wipe and they don't sell them separately. I have 3/4 of the tube of Clarifying Compound left, so could scrub these lights down several times again, but I will have to buy some clear coat to seal them again in the future. Although, I could just use the cream (compound) more regularly and that wouldn't require sealant.CONCLUSIONThis is well worth a tenner if you have faded lights. It's delivered to your door, you don't need to waste expensive sandpaper on it, or buy a rattle can of clear coat and it takes 30 minutes tops to do, 6 minutes for both lights if you catch the fading early and just apply some cream. If you're selling an old car, you could probably add another hundred to the price for little cosmetic things like this: my car really looks as good as new now. With a little tyre shine too, a layman would never guess it was 15 years old!HIGHLY RECOMMENDED!
P**R
Works pretty well but needs elbow-grease
I've got xenon headlamps on my old car, and after 14 years they're stating to get a little bit foggy. in places No too foggy, but enough to get me thinking I should be doing something about them. There's a load of different videos online about how to restore headlamps with everything from toothpaste to wet & dry paper, but I thought I'd buy a kit.The kit comes with detailed instructions: You clean the headlamp. Then protect the surrounding paintwork. First you use the cutting compound to see if that will do the job, with minimum abrasion to your headlamp. If not, there are four grades of quite small wet & dry abrasive pads to use, helpfully colour-coded.I tried the cutting compound first stage, and that didn't seem to do the job, so I used the wet & dry. That sort of worked, but only in patches. I eventually concluded that my headlamps have a hard coating that has come off in some places, but not in others. The wet & dry paper was not making much impact on the hard coating, but was doing a grand job on the areas where the coating was missing. After rubbing down with increasingly fine wet & dry, I finished with the cutting compound, cleaned it of, applied the seal and the job was done. All in all, it was about 90-120 minutes of work, and the results are pretty good. The lights are noticeably clearer and look a lot better.I'd love to tell you my headlights are absolutely transformed and are now super-effective, but to be honest, there doesn't seem to be any difference in the light output of the headlights. But they certainly look a lot nicer now.
M**R
Works well in removing discolouration, good value for money
I had some discolouration in places on my 10 year old Saab lights. It didn't seem too bad and I tried Turtle Wax headlight cleaner and sealant first which although it made a slight effect I needed something tougher so I decided to try the restoration product which is much cheaper than some of the others available to purchase.I followed the instructions and used the clarifying compound first. It made more impression than the previous cleaner and sealant but couldn't get it all off, certainly not by hand. I very intrepidity used the four stages of sanding pads with the clear fluid. This took the discolouration off but left the sanded areas worse than ever with a dull opaque finish and certainly not clear and see through. Heart in mouth time!I then applied the clarifying compound by hand and this polished the sanded areas to a clear see through look to match the rest of the lights. It took a bit of effort!It's not totally perfect and ideally an electric drill polishing mop would probably polish it much better but for a tenner and just using muscle power it is a very good kit. I can't imagine how paying over twice the price for some other kits would do any better by hand to remove ingrained oxidisation and discolouration, unless you are trying to eliminate scratches and chips which are much deeper in the plastic. I would also be wary of some of the slightly cheaper and less well known brands being able to remove and polish out the discolouration.I didn't bother with the sealant that came with it as I used the cleaner and sealant I had bought previously to see how it lasts.I'd definitely buy this kit again although I'd invest in a mop polish head for my drill to do the final stage .
Trustpilot
4 days ago
2 months ago