We remain fully operational. Our teams are working around the clock to ensure your deliveries continue safely.

DOWNLOAD THE APP


Customer Services
Copyright © 2025 Desertcart Holdings Limited
DOWNLOAD THE APP


🚀 Elevate Your Creativity with Effortless 3D Printing!
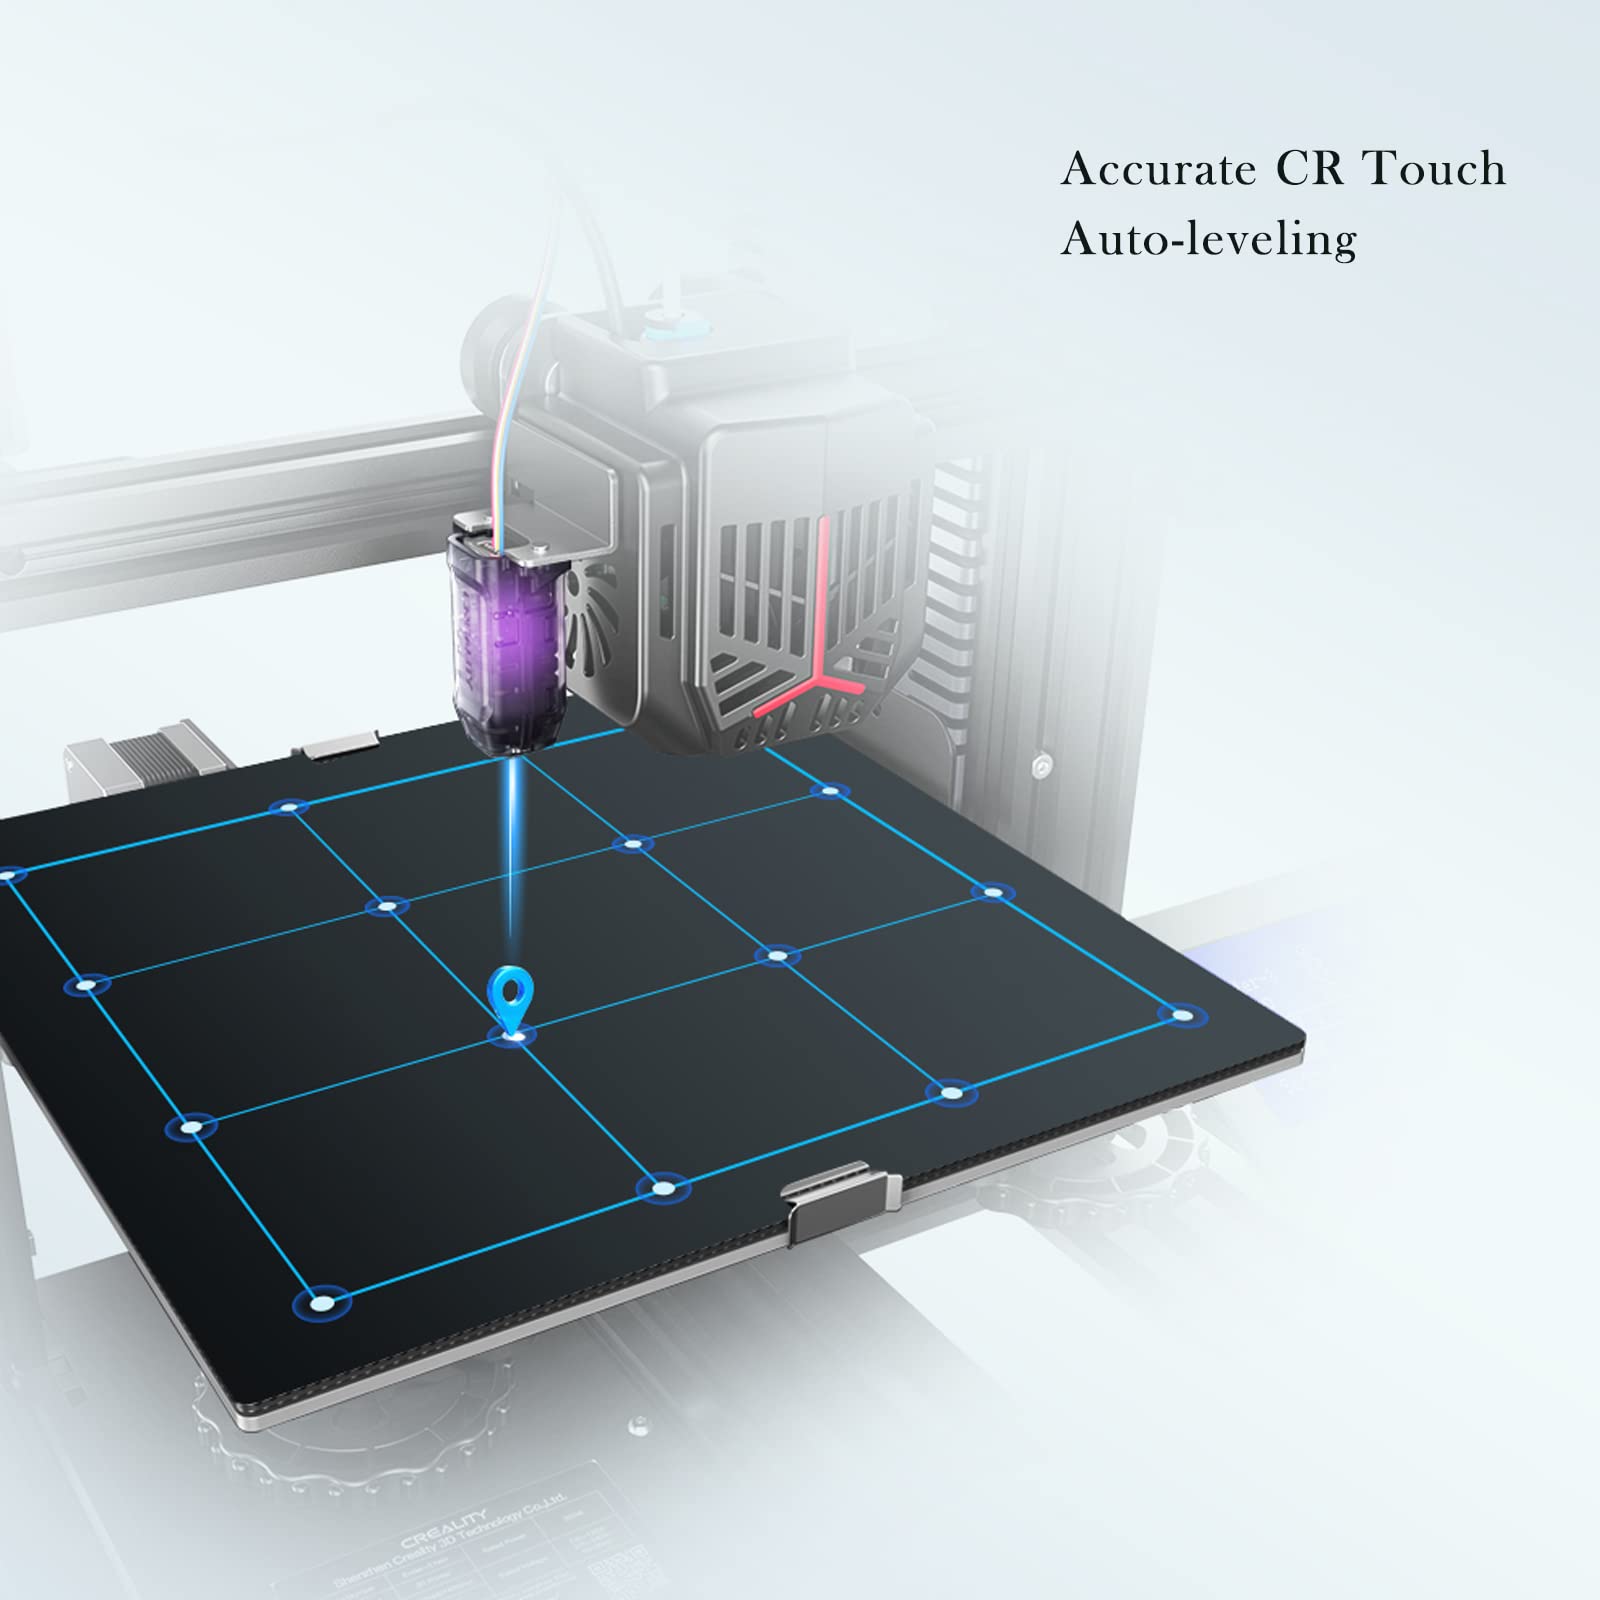
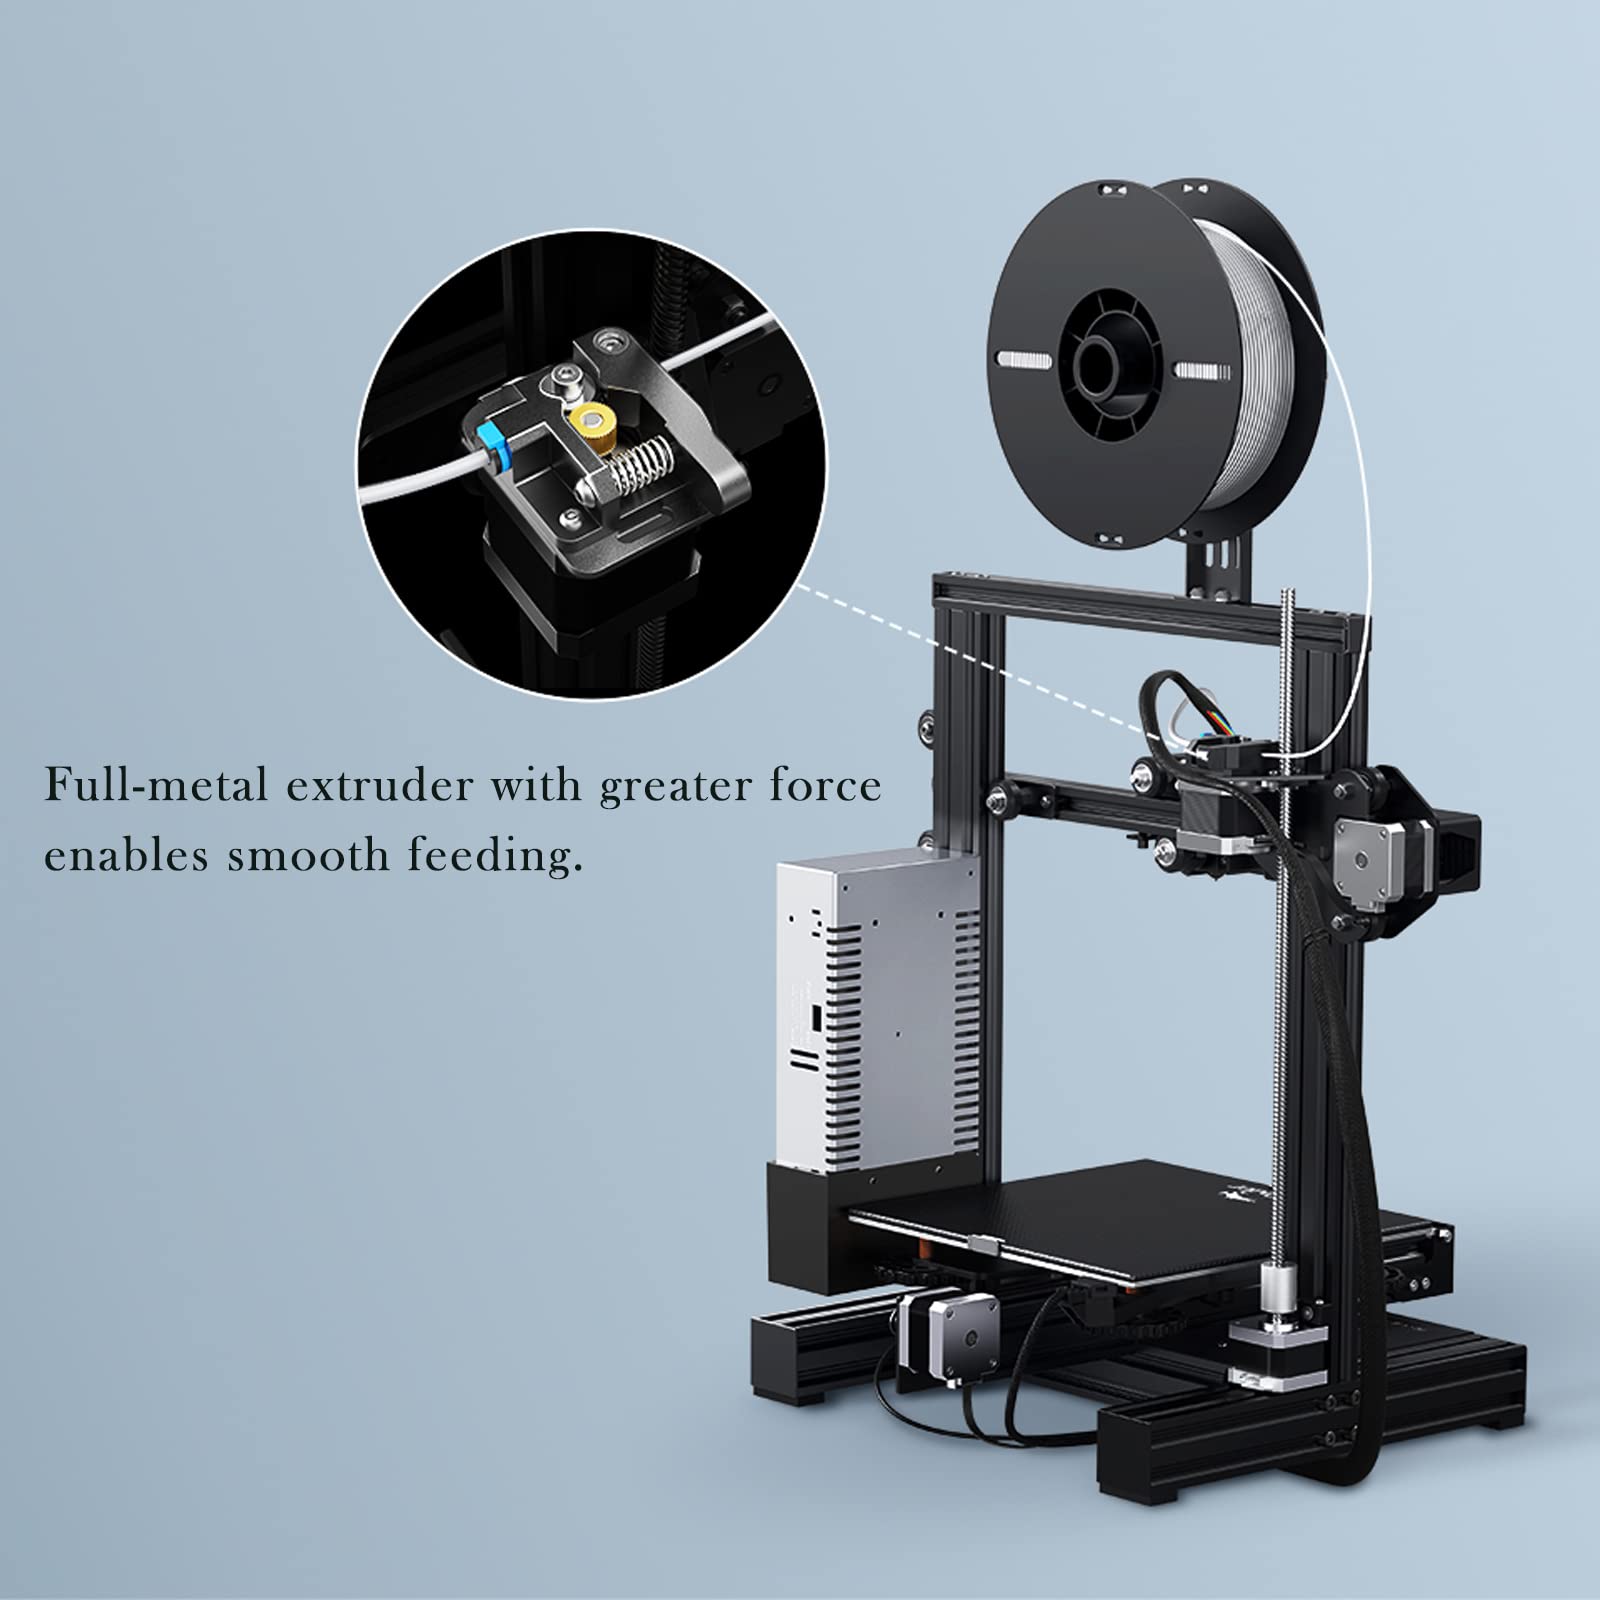
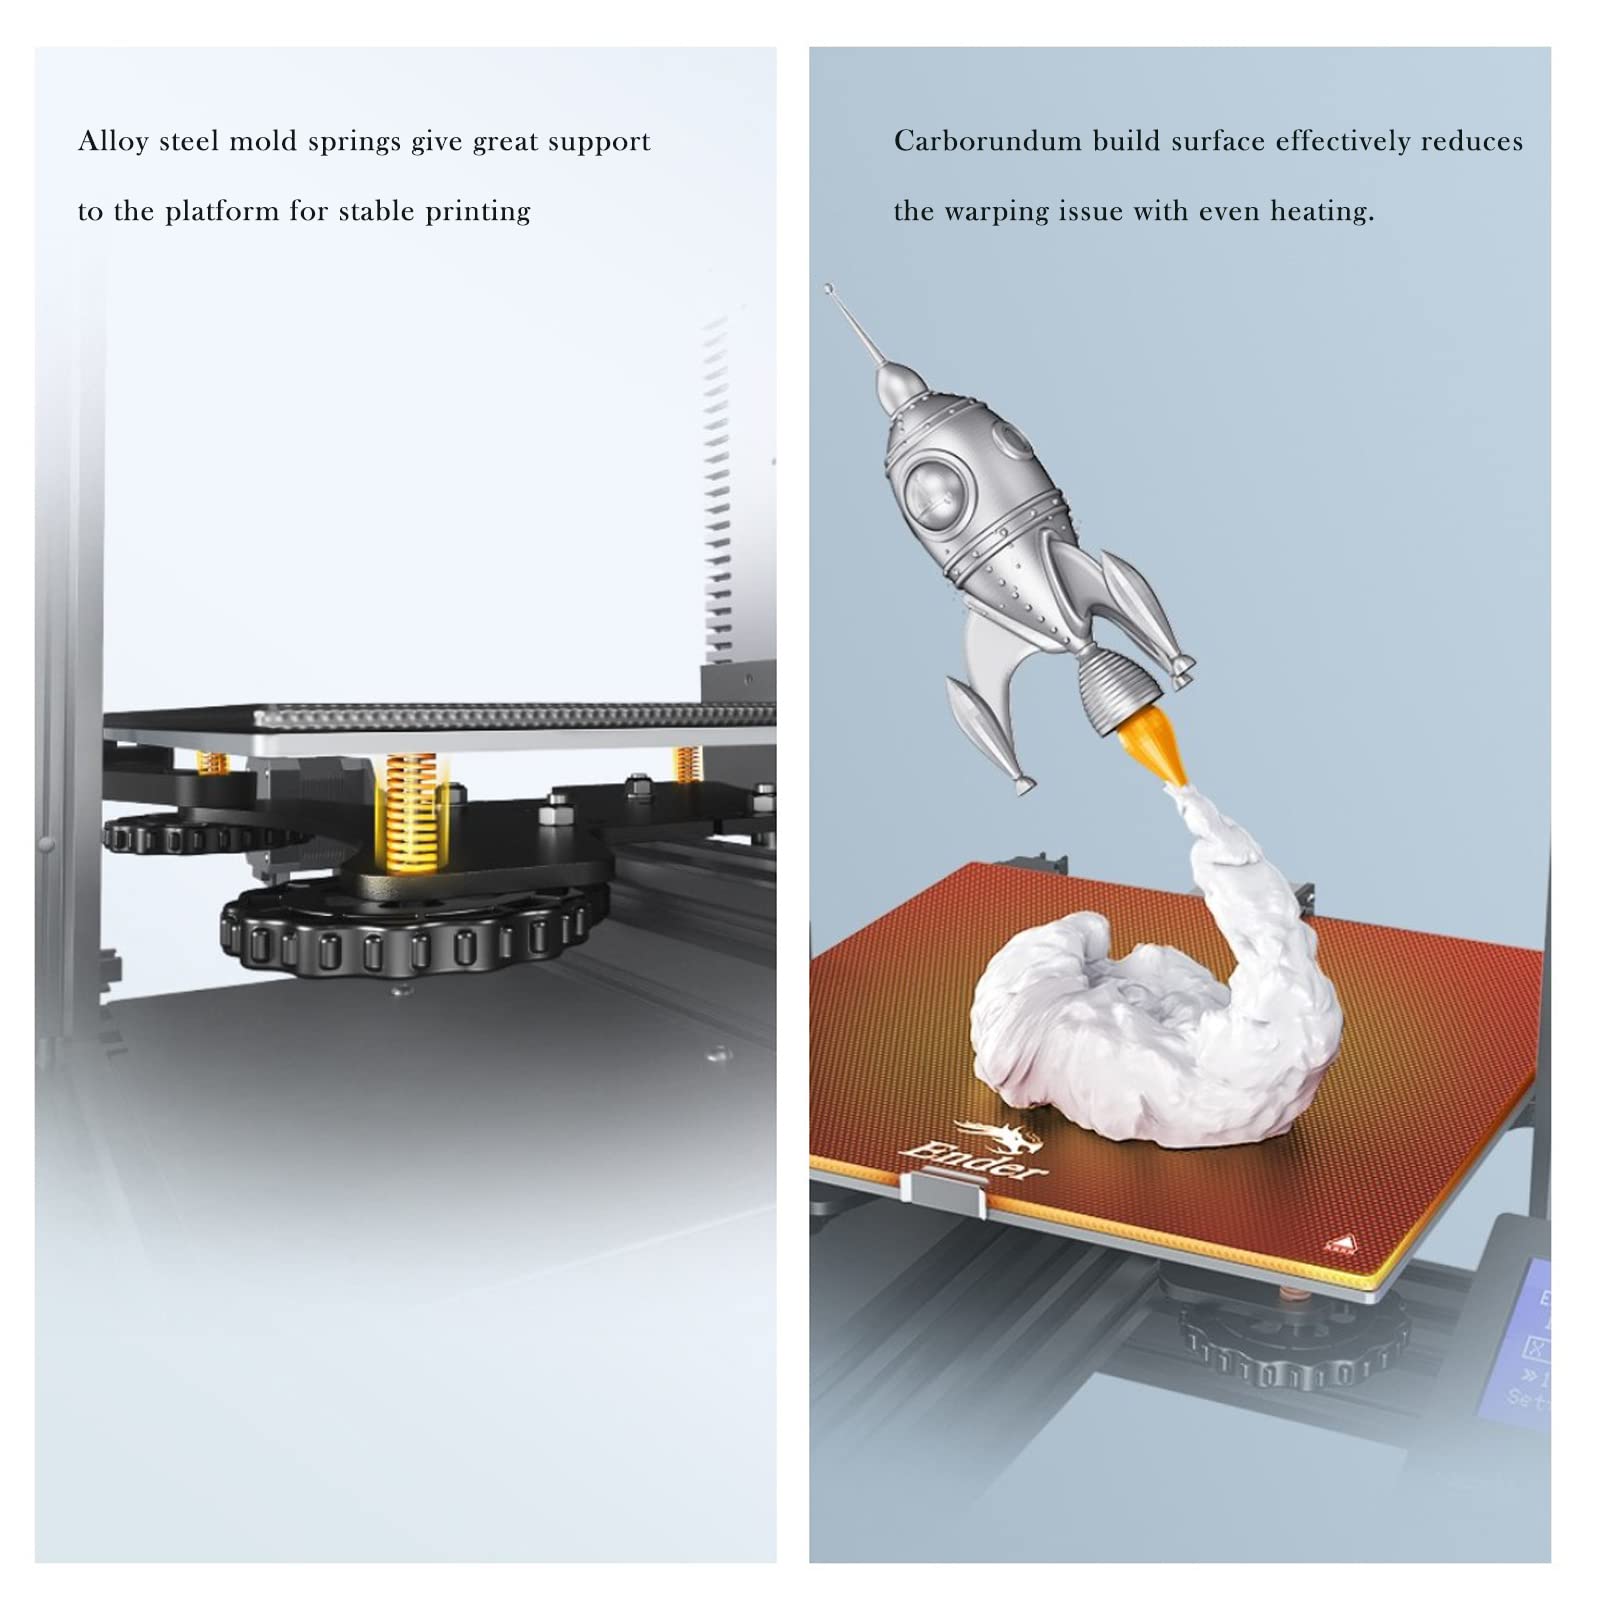
The Creality Ender 3 Neo is an upgraded 3D printer featuring CR Touch auto-leveling technology, a whisper-quiet 32-bit motherboard, an all-metal extruder for precise feeding, and a stable tempered glass build plate. With a 1-year warranty and dedicated support, it's designed for both beginners and seasoned makers looking to enhance their 3D printing experience.
T**N
Awesome Beginner Kit!
This is my second 3d printer but I'm no expert either. I can tell you compared to my first printer (Tevo Black Widow) this Ender 3 NEO is by far the best bang for a limited budget. I spent 1.5-2 hours putting this together (It was a week for the first one). I leveled the bed and did my first print (a Benchy...) and it was beautiful! I did a second print of a HeroForge mini and it was okay-- the walls of the sculpt are smooth and it captured some tiny details that I was sure would be blown out (admittedly 30mm minis are not made for FDM printers). Then I blew the model up to be just under the maximum build height just to see what it would do. The pic attached is my THIRD ever print. I almost cried. Since then the printer has been in constant use-- it continues to print in amazing detail.I NEVER got my previous printer anywhere near this quality. I HATED the entire 3D printing experience-- I didn't want to noodle in Marlin's Arduino code or become an electrical engineer to print digital sculpts or cosplay parts for the kids. I was constantly printing out newer better parts for the old printer to make it work at only about 33% of the quality of what the Creality does. The previous printer was a lot like owning an old boat-- you work more ON the boat than you do enjoying the boat -- this is *ALMOST* plug'n'play by comparison. I really regret the wasted time and effort.I would give you the following hints if you are new to 3D printing---- Buy this printer. The included instructions are quite good but a few YT videos help if you get in a pinch.-- It's relatively quiet but it does have fans and motors. I can't hear it in the next room with the door open.-- Ignore anyone who says that "It's okay out of the box but you need to upgrade this motherboard or do this bladdy-blah." That is your sure-fire path to hell. Enjoy the printer first. If you see anything that says you need to update the firmware-- run. Again this is *beginner's* advice...-- If you must upgrade something, get the magnetic bed upgrade. That's a god send as I sliced my finger open trying to pry a model off the included glass bed (It was stuck that well... but it eventually popped off ). Also remove the plate from the bed before taking off the model so you aren't constantly jacking stuff up and re-leveling the bed. However the included glass bed is quite good.-- Go slow. 3D printers are printing one layer .2 mm in a pass. If you expect to see a full size model in a couple of hours, you'll be disappointed.-- Supports are your friends. I'm talking about both the plastic model supports and user communities.If I had to give it some cons, there's no filament sensor (and to get one you have to do a firmware upgrade-ugh!) and Creality really needs to simplify their product line.
A**N
It's a great 3d printer.
When I decided to buy a 3d printer I knew that I wanted one in the $200 range and that it had to have a lot of guides and community support, since I had an idea of what building one of these would require. I had heard of the Ender 3 before through youtube videos so that definitely primed me to buy one of these. I was not bothered about buying a kit. I knew it would save me some money and I don't have any issues following a build guide so I went ahead and bought one. The installation process took about 2-3 hours and I didn't find it all that challenging. I followed and can recommend the Ender 3 build guide by Tomb of 3d Printed Horrors on youtube. There are some things the video points out to tweak that aren't in the official guide that will make a difference in how well it prints. The installation was not that hard. There aren't any wires, but there are various adjustments and alignments that will need to be done to fit the pieces together. The printed instructions aren't very helpful, so a video guide is a must.I rated this kit 5 stars, but it's kind of staggering how many parts you will have to tweak, replace, or print fixes for. Replacing the mainboard with a 32 bit one with upgraded stepper motor drivers is a must in my opinion, due to how loud the stepper motors are with the default board. I bought a SKR Mini 1.2 E3 and it made a world of a difference in how loud the machine is. I also would suggest upgrading to a BLTouch for auto bed leveling, because getting the bed level on this machine can be maddening. This is because the bed leveling springs need to be upgraded so that they keep the bed level longer. I also got an upgrade for the PTFE tube and the filament feeder, so after everything it's probably another $100 to upgrade it to nearly the best version it can be. Somehow my bed is slightly warped, I'm not sure if that is something I have done or if it came that way. I could only use half of the print bed for a while until my BLTouch was configured properly.The machine is easy enough to operate by the control panel, but is quite tedious. The click knob system gets the job done most of the time, but doing many commands in sequence can be annoying because of the number or times that you have to go back in forth with the a knob that is also a button, and one that can have peculiar sensitivities.I had a raspberry pi 3b+ that was doing a job that a pi zero could do, so I bought one to replace my pi 3 and I turned that into an Octoprint server. This gives you a web interface to control the printer. The interface runs on the raspberry pi and receives and interprets the gcode files. This becomes the main interface to the printer. It doesn't get easier than dragging a gcode file into my browser window to load it into the printer! Plus now I can monitor the prints through a webcam and control the print remotely, and I don't have to use the knob much anymore, which is a plus.There is really a lot to learn when it comes to 3d printing. I can see why it hasn't exactly caught on to the mainstream yet, it's still in the beta stages unless you are spending lots of money on expensive machines that work out of the box with all the upgrades. I think another 10 years and a significant chunk of the population will have one of these though. But as it is right now, I'm actually the only person I know or even have met that has claimed to own a 3d printer. Crazy. I would buy this machine again and recommend it, I think it's really great and the detail this thing can print is incredible. I am excited to find new things to print and to show off my creations and to give them away to friends,. That isn't really something I couldn't do any other way before without much effort and expense.
J**N
Awesome once you get ahead of the learning curve
I bought this knowing not a single thing about 3D printers, so first, I want to say I love this thing. No real complaints. But I want to write a short but vitally important note below this to help other beginners.There are some great videos that will help you put it together and go through the setup process. I have to source from more than one video for this. Assuming you have put it together and are ready to start setting up, here's my cliff notes:1) Feeding the filament-it's as easy as depressing the lever and feeding the filament in until it comes into contact with the backside of the nozzle. Ideally, it's heated and you can push the filament and see a small blob come through.2) Leveling-I used a sheet of paper and adjusted the 4 leveling wheels at each corner to where the paper just started to drag. Then did the auto level.3) Printing-I found that the nozzle must be primed, as in it JUST printed a good amount of filament and the flow is ready to go RIGHT THEN. Otherwise your print will not stick to the bed. I was able to find some G code that printed a prime line off to the side for each print you create, and I also add a skirt on each print to assist further. This allowed me to go from my own file not sticking to the bed to it printing flawlessly.Largely #3 is where I was going wrong and getting flustered, but once I inferred what needed to be done, it was smooth sailing. Good luck!
Trustpilot
2 months ago
2 months ago