Description
🌿 Grow Smarter, Not Harder — Your Future Garden Awaits!
- SET IT FORGET IT - Automated pump timer cycles nutrients every 30 minutes for optimal growth.
- COMPLETE GROWTH KIT - Includes pump, timer, baskets, sponges & tweezers for a seamless hydroponic experience.
- BEGINNER FRIENDLY ASSEMBLY - No green thumb needed—easy setup with clear instructions included.
- SPACE SAVVY WALL MOUNT DESIGN - Maximize your indoor/outdoor garden without sacrificing room or light.
- DOUBLE YOUR HARVEST HALVE YOUR EFFORT - Soilless nutrient film tech boosts yield with less water and space.
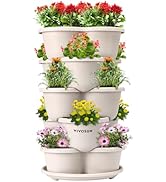
The VIVOSUN Hydroponic Grow Kit features 54 planting sites across six durable, food-grade PVC-U pipes, optimized for leafy vegetables. Its automated water pump timer ensures nutrient circulation every 30 minutes, doubling crop yield with less water and space compared to traditional soil gardening. Designed for easy wall-mount installation and beginner-friendly assembly, this all-in-one system includes essential accessories like a water pump, timer, planting baskets, and tweezers, making it perfect for indoor or outdoor hydroponic cultivation.